The fox came through an hour after Ross Harried deployed his camera in the Wisconsin woods. Then it didn't come back for a month. That's the deal you sign when you build a DSLR camera trap: you set everything up in advance — focus locked, flashes aimed, sensor dialed in — and then you walk away and let the camera do the waiting. When it works, you get a frame you could never have taken standing there yourself: a wild animal, lit like a studio portrait, completely unaware of you. When it doesn't, you come back weeks later to a dead battery, a black frame, or 2,850 photos of a squirrel.
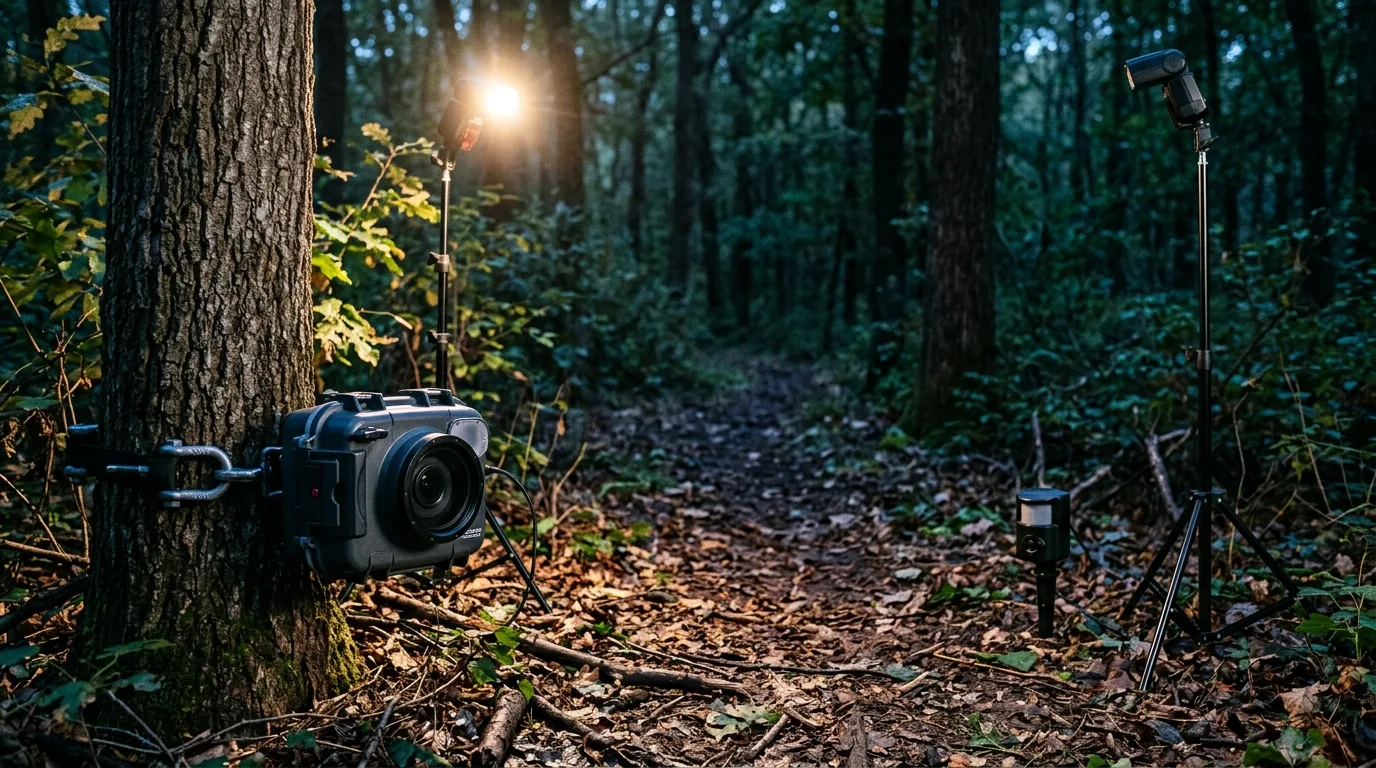
So here's the short version of how to set up a camera trap, before we get into the weeks-saving details. You take a DSLR or mirrorless body and a wide-angle lens and seal them in a waterproof case with a window. You pre-set manual focus on a precise spot and clamp the lens down so it can't move. You stop the aperture down — somewhere around f/8 to f/11 — so a useful zone in front of the camera is sharp, because you don't get to choose where the animal stands. You position off-camera flashes to light that spot naturally, set to manual power. And you trigger the whole rig with a motion sensor or an infrared beam placed to fire the shutter the instant the animal hits your focus zone. Everything after this is making each of those steps survive a month outdoors and actually catch the animal.
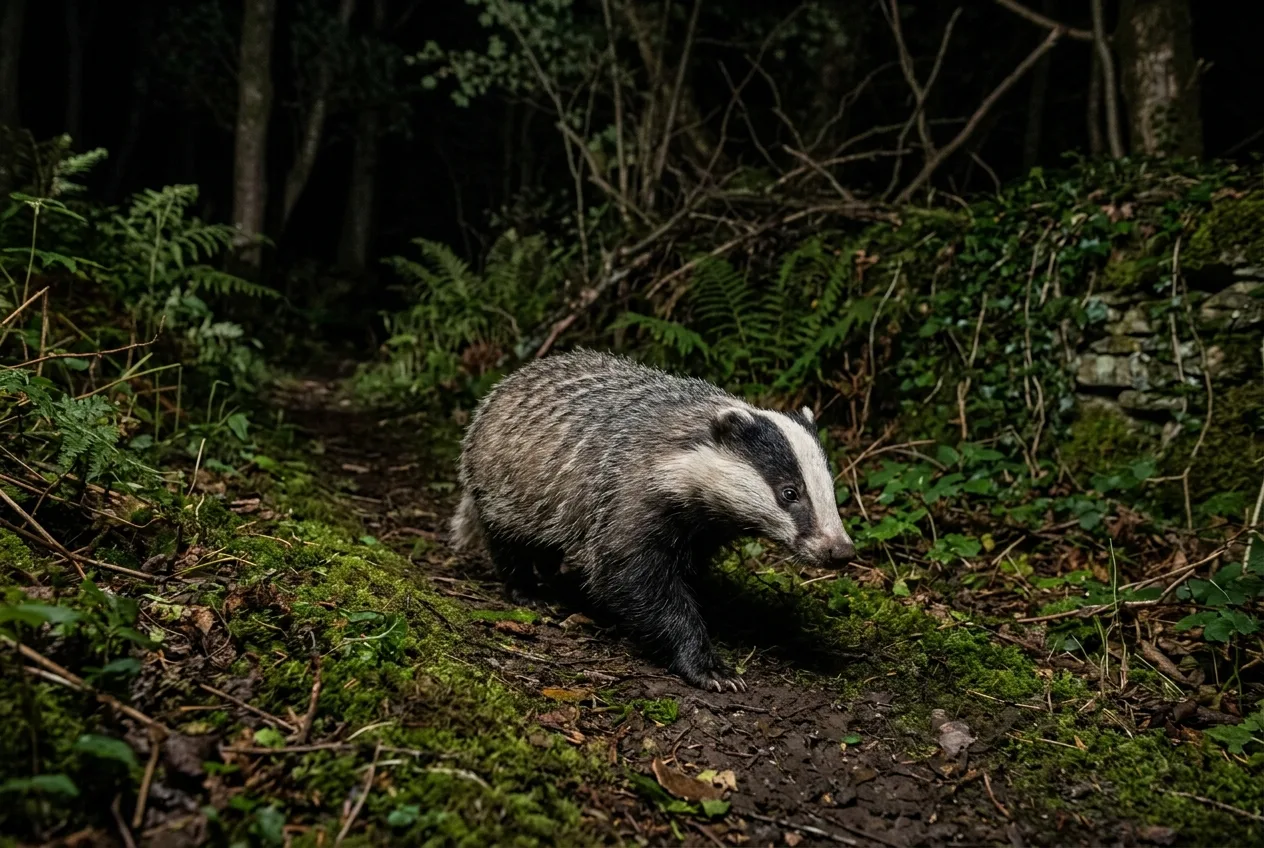
This is not a trail camera. A trail camera survives the weather and tells you what's around. A DSLR trap is a different animal entirely — bigger sensor, off-camera light, and a lot more that can go wrong. It exists for one reason: image quality. The APS-C or full-frame sensor in a DSLR is roughly 12 to 25 times larger than the 1/2.3-inch chip in a typical trail camera, which is why it gathers so much more light and renders so much more cleanly; a full-frame sensor's light-gathering area actually approaches that of the human eye. Pair that with flashes you've moved off the lens axis, and the red-eye and flat, ugly shadows that plague trail-cam night shots simply disappear. (If you're still deciding whether the hassle is worth it, that's a separate conversation — DSLR Camera Trap vs. Trail Camera: Which Is Worth It for Wildlife Photography?.)
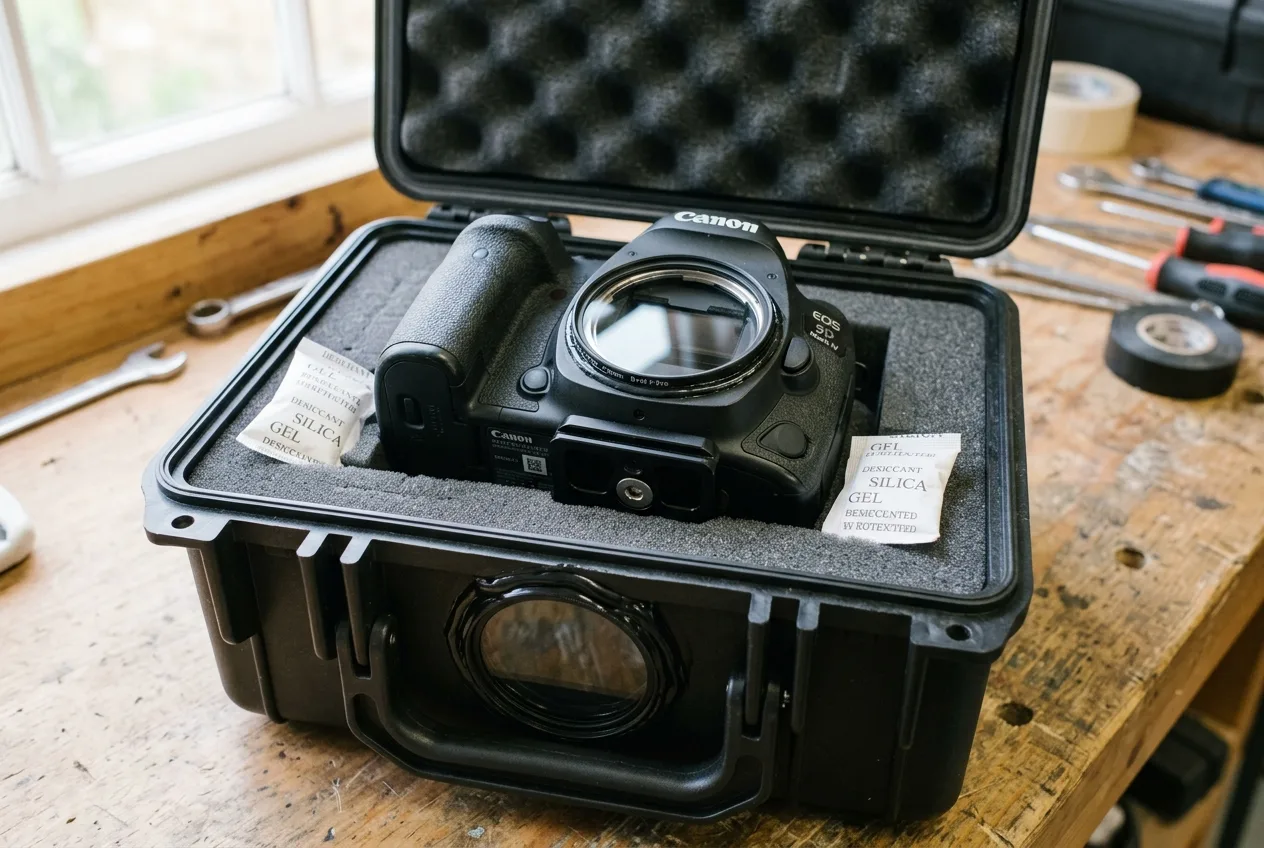
A quick word on "DSLR." Most people building these now reach for cheap, used bodies — a Canon 60D, a Nikon D7200, a Rebel — precisely because they'll be left in the rain where a bear might sit on them. Mirrorless works too, and increasingly that's what professionals use. The one spec that actually matters for a camera trap is a low-power standby mode the camera can wake from in under a second, plus an accessible remote-shutter port to wire the trigger into. Whether the mirror flips or not is secondary — though that "click" a DSLR makes when the mirror moves is one more sound that can spook a wary animal, and mirrorless avoids it.
Let's build it, in the order that actually matters in the field.
Start with the trigger — it's the part that decides everything
You can have perfect focus, perfect light, and a perfect composition, and still come home with nothing if the trigger doesn't fire at the right instant. So start here.
You have two real options. A passive infrared (PIR) sensor watches a wedge of the scene for the combination of heat and motion that means "animal." A PIR is a single unit, it's quick to set up, it's easy to hide, and because it only listens for infrared rather than emitting anything, it sips battery. The Camtraptions PIR v3 — the most common aftermarket sensor in this hobby — has a detection range of around 5 meters and a field of view of roughly 120 to 150 degrees, most sensitive toward the center. The downside is that a PIR's detection zone is wide and a little fuzzy; it fires on movement somewhere in that wedge, which gives you less precise control over exactly where the animal will be when the shutter trips.
An active infrared (AIR) beam, by contrast, is a trip-wire: a separate emitter and receiver project an invisible beam, and breaking it fires the camera. The payoff is precision — it triggers at the exact spot you've aimed it, and it doesn't fire on wind or moving vegetation the way a PIR can. The cost is fiddle: two devices to conceal instead of one, more setup, and more money. Will Nicholls of Nature TTL frames the tradeoff plainly — AIR gives you "precise timing," PIR gives you "a wide field of view" and "only require[s] one device and [is] easy to hide out of view". For most people starting out, a PIR is the right call. If you're chasing a fast animal on a known line — a pine marten leaping a gap, say — the beam earns its keep.
However you trigger, the single most repeated mistake in this whole pursuit is putting the sensor right next to the camera. Don't. Nicholls is blunt about it: if the sensor sits by the lens, "you'll end up with images where the animal is too far away, and you'll potentially scare it off before it gets close enough". Instead, place the sensor off to the side, pointing across the scene at your focus spot, so the animal trips it exactly when it's standing where you want it. Scott Abraham keeps his PIR about 1 to 2 meters from where he wants the subject.
Then fight false triggers at the scene, not just at the dial. A PIR can be fooled by sun dappling through moving leaves or by vegetation swaying close to the sensor. Camtraptions' own advice is to manage the scene first — clear the foreground of anything that moves in the wind — and only then reduce sensitivity, because "you should try to position the sensor so that the subject will be much closer than anything that could cause false detections". Conservation Northwest's field crews say the same thing from the science side: be diligent about removing vegetation from the foreground, "as this can otherwise produce false triggers resulting from wind or shadows". On the Camtraptions sensor you can also flip out side "blinkers" to physically narrow the field of view when you need tighter control; the home-built crowd achieves the same thing by sliding the sensor deeper into its housing to choke the beam.
A note on sensitivity, because the dial is a genuine trap. Crank it up and you extend the range and catch smaller animals — but you invite false triggers and, on hot days when an animal is barely warmer than its background, you may need that extra sensitivity just to fire at all. Crank it down and you stop the wind-triggers, but you start missing animals. Abraham learned this the expensive way: with his sensor set too low on one project, "I had badgers, beavers and pine martens walk past my camera trap without triggering it". He now lives around the two-thirds mark as the sweet spot between triggering animals and rejecting false positives.
Two things worth knowing about trigger lag. First, a PIR fundamentally needs heat and motion. An animal generally has to be a couple of degrees warmer than its surroundings to register — the figure cited in the literature is about 2.7°C — which is exactly why PIRs are reliable on a deer and hopeless on a cold-blooded lizard, and why they struggle with small mammals on a warm day when the temperature differential collapses. Second, even when it fires, the chain of events that follows — waking the camera, achieving focus, charging the flashes — all adds up to your real delay before the first usable frame. One clever workaround from the Winterberry Wildlife blog sidesteps the weak-sensor problem altogether: rather than trust a bare PIR, they let a commercial trail camera (with its excellent, weather-hardened sensor) do the detecting, and read its aim LED with a photo transistor to fire the DSLR — no wires breaching the trail cam's moisture seal. Their honest reason for going optical instead of splicing in wires: "I didn't want to breach the plastic enclosure to get the wires out (and possibly wreck the moisture seal)". It's a reminder that in this hobby the integrated sensor in a good trail camera is genuinely hard to beat for "cost effectiveness, physical robustness, sensitivity, and false trigger rejection".
You can have perfect focus, perfect light, and a perfect composition, and still come home with nothing if the trigger doesn't fire at the right instant.
Focus and aperture: you're focusing on a place, not an animal
Here's the mental shift that makes DSLR trapping click. You are not focusing on the subject. You are focusing on a spot, and then building a zone of acceptable sharpness around it deep enough that wherever the animal actually plants itself, it lands in focus.
The whole technique is manual. Autofocus has nothing to grab in an empty frame, and you can't be there to half-press anyway. So you set the lens to manual focus, focus carefully on the exact point where you expect the animal — the center of the trail, the spot the beam crosses — and then you lock the lens down so it cannot move. Ross Harried tapes "down all buttons/rings on my lens with gaffers tape once I have achieved the focus I desire". Phil Riebel, writing for NANPA, does the same: "I always put a bit of tape around the lens so that I don't accidentally change the focus while handling the camera". This sounds trivial. It is not. A focus ring that creeps a few millimeters while you're sealing the case is how a month of deployment turns into a month of soft frames.
Aperture is what buys you margin for error. Stop down. Harried runs "an aperture of at least f/8 sometimes up to f/11 because it gives me the greatest chance to have an animal in focus. After all, let's be real, we have no control over where these critters are going to be in our scene". Abraham settles around f/9 for the same reason — enough depth of field that a good portion of the frame is sharp, but "not being so high that you need your flashes to be on high power" and drain their batteries. Riebel goes tighter still at f/14. The pattern across builders is consistent: f/8 to f/11 is the workhorse range, and where a particular setup lands inside it is a negotiation between how much depth you need and how much flash power (and battery) you're willing to spend buying it back.
One thing the wide-angle lens does for you here, beyond depth of field, is let you get close. The reason almost everyone reaches for something wide — an 18-55 kit zoom, a 24mm prime — is that a camera trap's signature look comes from being near the animal and showing it in its environment. A short, compact lens has a practical bonus, too: Abraham notes his small 24mm "doesn't protrude far outside the camera trap casing and prevents water droplets getting on your lens". For genuinely tiny subjects, close means close: for squirrels and rodents, Nature TTL recommends placing the camera "only a few inches away from where you want the [animal] to appear", and the small-mammal research literature lands in the same place — to identify a small animal to species you generally need it within about 1.5 meters.

Lighting: the part that separates a snapshot from a photograph
If the trigger decides whether you get a frame, the flashes decide whether it's any good. This is where most camera-trap images give themselves away — and where the craft lives.
The foundational idea: move the light off the camera and put it up high. A single flash bolted by the lens gives you the flat, red-eyed trail-cam look. Multiple flashes, positioned with intent, give you shape, depth, and shadow. Most builders run at least two — a key light that illuminates and shapes the animal, and a fill light on the other side that opens up the shadows — and often a third to light the background or rim-light the subject so it separates from the dark. Riebel keeps it simple and effective: one flash on each side, aimed at the target area at roughly 45 degrees.
Where you put them matters as much as how many. The most common flaw, per Cognisys, is flashes placed near the ground, which lights animals from below in a way nothing in nature does. Their fix is a rule worth memorizing: "Get them high! Most light sources come from high above; the sun, the moon, streetlights. The main (key) light sources should be as high as possible". Nature TTL's version of the warning is equally direct — don't "over-light" the scene, and don't "place the flashes too low to the ground, or you can end up with a very unnatural image". The bar to aim for, as Will Nicholls puts it, is that "a viewer should find it difficult to work out how exactly you lit the shot".
Now the settings, and this is the part beginners get backwards. Set your flashes to manual power, not TTL. TTL — where the camera meters the scene and sets flash output automatically — only really works with the flash on the hot shoe, and it's explicitly not recommended for camera traps; manual mode is "the recommended mode for camera traps" because it "ensures consistent brightness for every shot". You want every frame lit identically, not the camera guessing anew each time. As starting points: photographers shooting at night commonly set a main flash around 1/8 to 1/16 power and a fill around 1/16 to 1/32. Riebel works in the 1/4-to-1/16 range and drops to 1/16 in winter "because the snow provides a lot of reflection" — a nice reminder that your environment is part of your exposure.
And here is the genuinely counterintuitive payoff, the thing that makes low flash power a double win. In a dark scene, your flash is the only light, so the flash's own duration — not your shutter speed — is what freezes the animal. And flash duration gets faster as power drops. SLR Lounge's explainer nails the physics: "Imagine a pitch black room... fire a flash at some point. The time it takes for that flash to turn on and off will determine the time it takes for your photo to be exposed. If the flash takes a long time, then a moving subject will be blurred and vice versa". The key spec is the T.1 time (how long until 90% of the light has dissipated), not the T.5 number manufacturers love to quote, which is "pretty much a useless measurement for anyone interested in freezing motion". And critically: "the lower the power setting on your flash, the faster the T1 time". So running your flashes at 1/16 instead of 1/2 doesn't just save batteries — it sharpens the freeze on a moving animal. (You won't need the 1/5000s–1/10000s durations a water-splash photographer chases; a walking fox is far more forgiving. But the principle still pays you.)
That's also why xenon flashes work despite their hard limit on shutter speed, which brings us to the one camera setting that can silently ruin every night frame: sync speed. Set your shutter at your camera's maximum flash sync speed or slower — typically 1/200s or 1/250s. Go faster and you get black bands across your images, because these flashes don't support high-speed sync. The Winterberry blog has the cautionary tale: "I inadvertently set the shutter speed for the possum set to be below the camera's sync speed, leading to a dark band at the bottom of the DSLR frame".
If the trigger decides whether you get a frame, the flashes decide whether it's any good.
Camera settings: a starting recipe
Camera-trap exposure is awkward because you don't know in advance what the light will be when the animal shows. The practical answer depends on when your subject moves.
For nocturnal subjects, go full manual. Your flashes are doing the lighting, so you can lock everything down. A widely used night recipe from working photographers: aperture around f/9, shutter 1/100 to 1/160 (slow enough to let a little ambient bleed in, but the flash freezes the action so you won't get blur), and ISO somewhere from 400 to 1000, leaning on a full-frame body's clean high-ISO performance when you need it. Harried's variant: f/8–f/11, 1/100–1/160, ISO on auto but capped so it can't run past 3200. Riebel's: f/14, 1/200 synced to flash, ISO 400, manual focus, burst drive. These aren't contradictions — they're the same idea tuned to different lenses, flashes, and scenes. Start in this neighborhood, then test and adjust.
For daytime or unpredictable subjects, let ISO float. James Roddie's two methods for Nature TTL: aperture priority with auto ISO (cap the max ISO at 3200 or 4000 to avoid an ugly, noisy frame, and dial in at least -1 stop of exposure compensation to keep a bright sky from blowing out); or manual exposure with auto ISO when a species is predictable enough to plan around. Set the drive to continuous/burst so a single trigger grabs a short sequence — your best frame is often the second or third shot, once the flashes have fully fired and the animal has settled.
Want the dramatic, deep-background night look? That's a long exposure: a much wider aperture (f/4–f/5.6), higher ISO (1000–1600), and a genuinely long shutter — 8 to 15 seconds or more in aperture priority — so the flash freezes the animal up front while the open shutter records whatever light is in the sky behind it. Nature TTL pushes this to around 30 seconds to pull in sky glow. It only works on a moonless night, because any extra light leaks into the frame and muddies the effect. It's harder. It's also where some of the most striking camera-trap images come from.
One thing to plan for explicitly: the first frame of every sequence is often black if the flashes were asleep when the animal arrived, because the capacitor needs a moment to wake and charge — and that first frame is frequently the best one, with the animal exactly where you placed it. There are a few ways to beat this. Channel-routing tricks can wake the flashes a hair before the shutter fires (more on that below). Failing that, leaving a slightly longer gap between burst frames gives the flashes time to recover so later shots are properly lit. The right answer depends on your gear, but the problem is universal — expect it, and design around it.
Running your flashes at 1/16 instead of 1/2 doesn't just save batteries — it sharpens the freeze on a moving animal.
Wiring it together: channels and the first-shot problem
If you run a wireless system — a transmitter on the camera, receivers on each flash — the order you assign channels matters, because it's how you solve the black-first-frame problem at the source.
Scott Abraham lays out the routing that does it. With the Camtraptions program he uses, the sensor sits on channel 1, sending its signal to a receiver on the camera (also channel 1), plugged into the shutter-release port. A transmitter in the camera's hot shoe is set to channel 2, and all the flash receivers are on channel 2 as well. The whole point of staggering it this way is timing: "your flashes are woken up when motion is detected just before your camera takes a photo... this is very important as it means that your flashes will fire on the first shot of a detection". Skip this, and the most important frame in the sequence comes back dark.
If you're running multiple flashes on shared channels, keep separate setups from cross-firing. Cognisys' advice: when two camera boxes each control their own flashes, put each group on its own channel, and "if possible use wireless channels that are not right next to each other, for example use wireless channels 7 and 15 instead of channels 14 and 15". Their flash power recommendation for unattended traps is a medium setting that keeps the capacitors charged and ready, so there's no recharge wait when the animal is on the move.
Wired or wireless is a real fork. Wires are cheap and reliable in principle, but they get yanked by wind, falling branches, and animals; the connectors on the budget gear most people use wear out fast with repeated plugging; and cables dangling at head height can deter a wary animal. Wireless removes all that fuss but cuts battery life, which means more maintenance trips. Whichever you choose, use cables that lock into position and keep nothing under tension — a connection pulling against its port is how "you might return weeks later to no images".
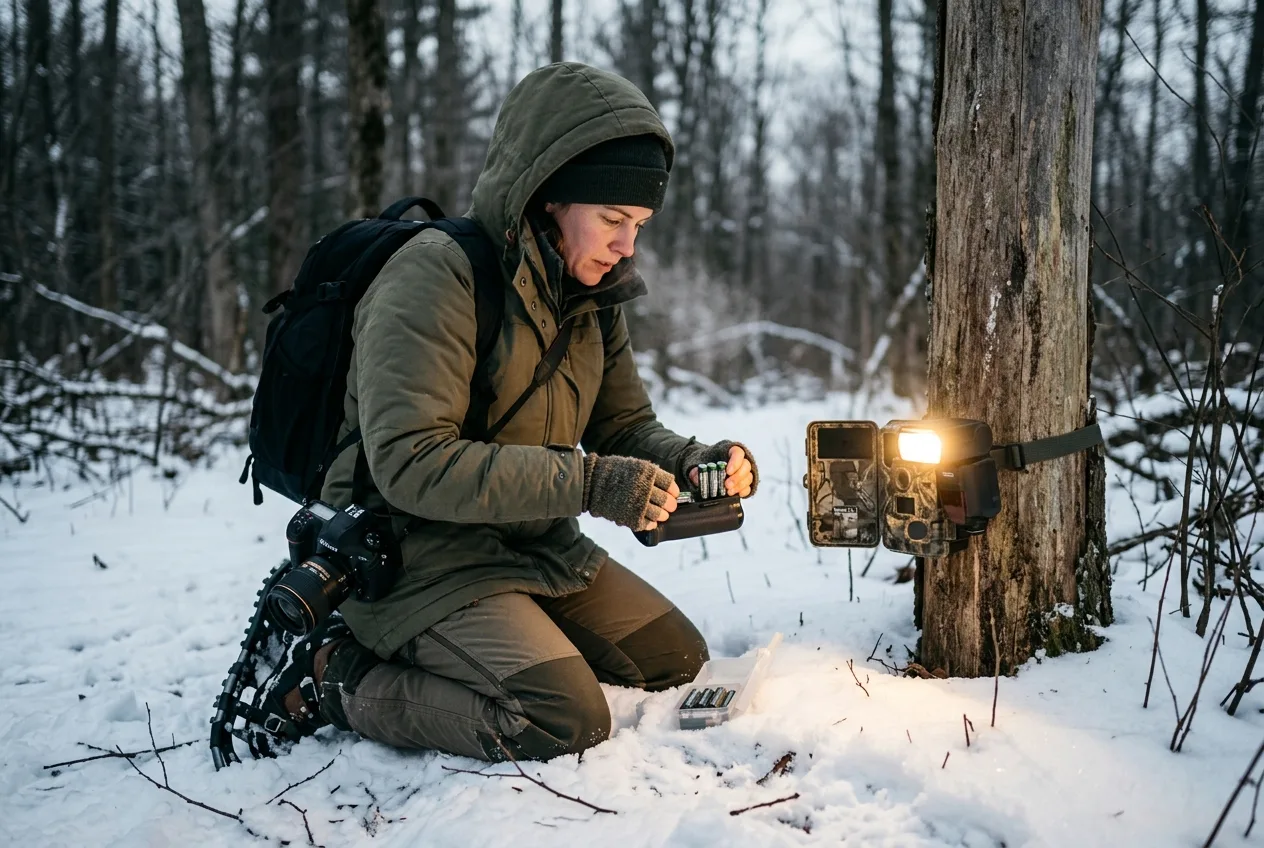
Weatherproofing: assume it will rain inside the case
Your camera is about to sit outside for weeks. Water is the enemy, and it is patient. The Winterberry crew has repaired their Canon 60D bodies more than once after early housings leaked: "It's a very bad day when you open your DSLR camera trap up expecting to find great pictures, but instead watch in horror as water pours out of the case".
The standard answer is a hard waterproof case with a window cut for the lens. A Pelican 1300 is the common choice for the camera; it's waterproof, crushproof, and dustproof, and packing the camera tight in its foam has a happy side effect — it silences the shutter. Nature TTL's detailed build cuts the lens window with an 86mm hole saw, seats an 82mm UV filter as the glass window, beds it in Tiger Seal sealant, and leaves it to cure for at least 12 hours; a quick-release plate bolted to the base lets you clamp the whole thing to a tree, and small holes drilled along the lid-to-base seam let the cables out. The flashes get their own smaller weatherproof boxes — Tupperware and Apache cases both show up — with a clear acrylic or plastic window where the light fires through. The whole rig runs around £140 ($190) in a typical build.
A few hard-won details that separate a dry case from a wet one:
- Mind the cable socket. On the Camtraptions sensor, water can trickle in through the cable socket if it's not facing down — so mount it the right way up, and for long deployments seal the socket with bathroom silicone once the cable's inserted.
- Beat condensation from the inside. Even a perfectly sealed case can fog the lens when the temperature drops fast at night. Drop silica gel packets (or a silicone desiccant bag) inside the housing; in cold weather, an elastic-banded hand warmer on the lens barrel keeps fog off for the critical hours. NatureSpy sees this constantly: "External moisture on the camera lens can lead to foggy images — particularly around sunrise and sunset".
- Shed water off the glass. A rain hood — even a strip of plastic folder on velcro — keeps droplets off the window. Treating the glass with a water-repellent like Rain-X helps rain run off instead of beading into image-ruining blobs.
- Aim away from the weather. Face the camera away from the prevailing wind, which keeps driven rain off the glass.
And if you're working in heat or near animals that could damage the rig, a foam-lined case does double duty — Riebel notes it would also muffle the shutter clicks that spook some species, while builders in bear or big-cat country lean on the toughest housings they can find.
Your camera is about to sit outside for weeks. Water is the enemy, and it is patient.
Placement and baiting: funnel the animal to your spot
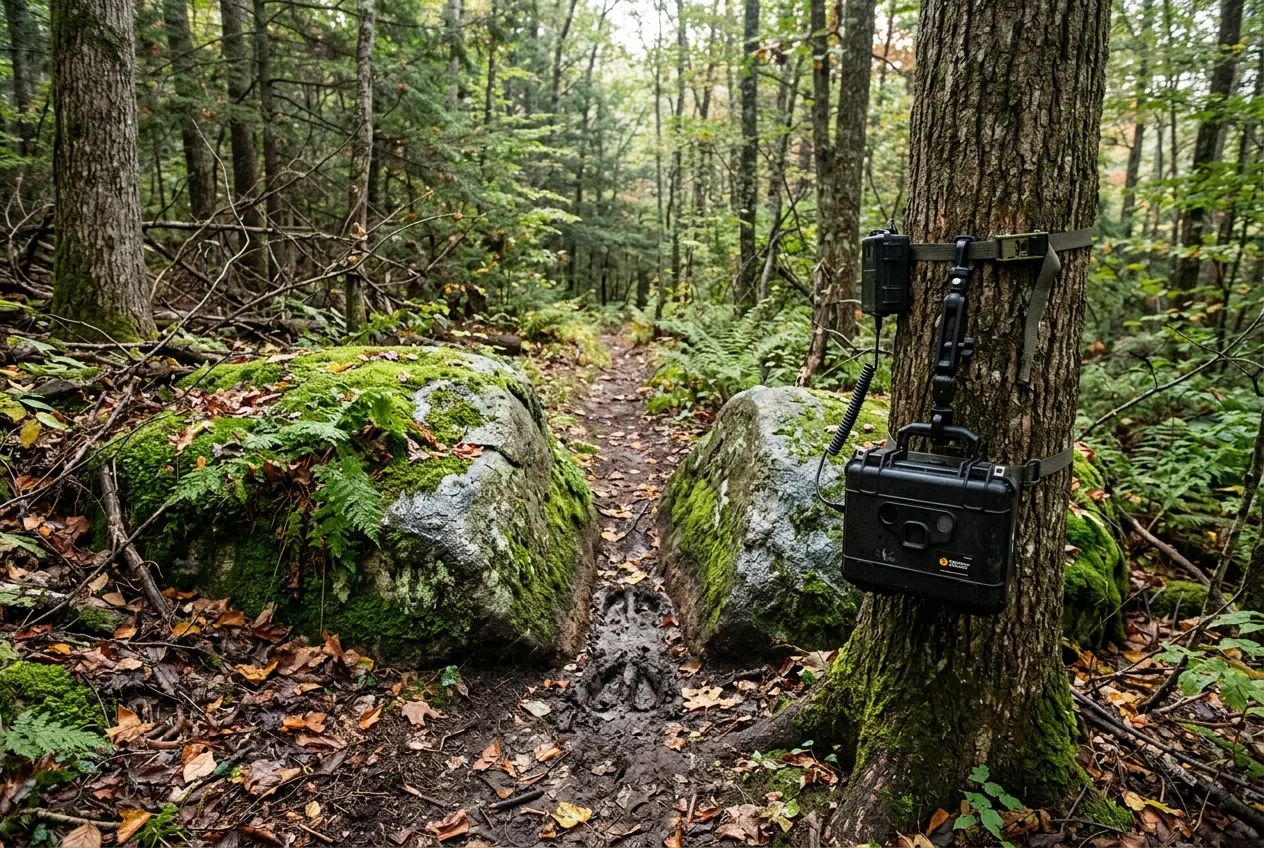
The best technical setup in the world is pointed at empty dirt if you've put it in the wrong place. Reading the ground is half the game.
Find the lines animals already use — game trails, dens, burrows, feeding areas, water — and then look for pinch points along them: a gap between bushes, a hole in a wall, a log over a stream, a narrow passage the animal is funneled through. A bottleneck is gold, because it tells you in advance exactly where the animal will be, which lets you nail focus, lighting, and composition around that one spot. Scout first: many photographers run an ordinary trail camera in a spot for a while to learn what's moving through and when before committing the DSLR rig. Look for fresh sign — scat, tracks, deer scrapes — and time your scouting just after rain so you know a trail is currently in use, not abandoned.
Height and angle, from the conservation field protocols: for a trail set, aim the camera at roughly a 45-degree angle to the trail rather than straight down it or square across it — that angle "generally captures the best images". Mount it above eye level or at chest height and point it slightly down, and err low: "Cameras are often mounted pointing too high, so aim on the low side". For lighting, if you're shooting daytime frames, a north-south orientation helps keep the sun out of the lens — though for the flash-lit night work many of these rigs are built around, lens-facing matters far less. For artistic impact, though, many photographers deliberately drop lower — Cognisys finds that "placing the camera box at eye level with the subject almost always provides images with much greater impact", and Abraham shoots at eye level or below "to create a feeling of intimacy". The protocols optimize for clean identification; the photographers optimize for drama. Know which you're after.
Bait and lures can pull an animal to your exact spot, and they cut both ways. On the practical side: scatter peanuts or hazelnuts and squirrels will become bold regulars; a dab of scent lure on a tree within the frame brings carnivores in to investigate. Conservation Northwest's lure method is precise — apply the attractant only on surfaces inside the camera's view, place the camera about 10 feet from the lure so you capture the whole animal rather than a cropped piece, and handle powerful lures carefully (and carry bear spray in bear country). On the ethics side, this is where you have to be honest with yourself. The strongest argument for the whole no-human-present approach is that it lets animals behave naturally instead of being baited, flushed, or crowded by a photographer. Don't set up at a den or sett entrance or an owl roost in nesting season — that's encroaching on the animal's home. Where you do use bait, use it thoughtfully and within local rules.
Two more placement principles that pay off over a season. First, don't over-visit. Every trip contaminates the site with your scent and disturbs the area; leave the trap alone for as long as the batteries allow. Second, light and noise can drive the very animal you want. Some species barely notice — badgers in the UK "do not seem to be bothered by flash at all", and Riebel's raccoons couldn't care less — but others are wary, and "certain species [are scared] due to the clicking and flash". The science backs the caution: incandescent white flash at night "can easily spook the target animals and negatively influence future visitation rates," and in controlled trials, three of six cats showed fright in response to a white flash. For genuinely flash-shy subjects, some photographers switch to infrared illumination, and opinions on flashing owls in particular are openly divided. Read your animal.
The best technical setup in the world is pointed at empty dirt if you've put it in the wrong place.
Field testing and longevity: the boring stuff that wins
Before you walk away, test the set the way the field crews do. Put the camera in test mode and walk through the frame along the path you expect the animal to take, covering the ground; check that the sensor catches you where you want it and review the captured frames to confirm framing, focus, and that all the flashes actually fired. Trigger it yourself a few times to check flash power and exposure. The whole point is to find the misaligned beam or the dark flash now, not in three weeks. (Capturing an "index photo" of yourself at each visit, as the protocols do, also gives you a clean record of every time the set was touched.)
Then plan for power, because battery death is the quiet killer of long deployments. Realistic numbers from the field: a DSLR on a battery grip stuffed with rechargeable AAs ran Harried's rig "up to if not over a month" in summer — but only "5-7 days" in a harsh Wisconsin winter, the cold cutting battery life hard. The Winterberry build gets months of standby from a dual-battery grip on the camera body, with the wireless flash receivers (always the first to die) giving about two weeks on an AA pack. Flashes themselves last a surprisingly long time if you keep the power low: a Camtraptions Z Pro on four AAs is rated for more than 1,000 firings at 1/4 power, 2,500 at 1/16, and 4,800 at 1/64 — yet another reason to keep flash power down.
Battery chemistry matters as much as count, and this is the single most common cause of a dead trap. Cheap alkalines are the usual culprit — low voltage and poor cold-weather performance. Standard NiMH rechargeables sit at 1.2V, below the ~1.5V many cameras want, and run flat in days, not weeks. NatureSpy's recommendation for reliability is fresh lithium AAs. And there's a safety limit on the flashes worth respecting: don't hammer them at full power in an unattended trap — keep the brightness below 1/4, "or even better, below 1/8," both to avoid overheating and to prolong the flash's life. Lower power, again, wins on every axis: battery, longevity, and motion freeze.
Frequently asked questions
What aperture and shutter speed should I use for a DSLR camera trap at night?
Go fully manual. A common night recipe is around f/9 for depth of field, a shutter of 1/100 to 1/160, and ISO between 400 and 1000, with your flashes set to manual power doing the lighting. Keep the shutter at or below your camera's flash sync speed — usually 1/200 or 1/250 — or you'll get black bands across the frame.
How do I keep my camera trap from triggering on wind and moving leaves?
Fix the scene before you touch the sensitivity dial. Clear vegetation out of the foreground, since swaying leaves and dappled sun are the main false-trigger culprits, and position the sensor so your subject will be much closer to it than anything else that could move. Aiming the sensor across the scene rather than down it, and adding "blinkers" to narrow its field of view, helps too.
Why is the first photo in each sequence black?
Because the flash was asleep when the animal arrived and its capacitor needs a moment to charge. The fix is to wire your trigger so the flashes wake just before the shutter fires — routing the sensor and camera on one channel and the flashes on another does this — or to leave a little more time between burst frames so the flashes recover.
Do I need an expensive camera for a DSLR camera trap?
No. Most builders use cheap, older bodies precisely because they'll sit out in the weather where something could damage them — a used Canon 60D, Nikon D7200, or a Rebel all work well. What matters is a low-power standby mode the camera wakes from in under a second and an accessible remote-shutter port for the trigger.
PIR sensor or infrared beam — which trigger is better?
A PIR is cheaper, simpler, a single unit, easy to hide, and battery-friendly, but its wide detection zone gives you looser control over exactly when it fires. An infrared beam triggers at the precise spot you aim it and ignores wind and vegetation, but needs two devices, costs more, and is fiddlier to conceal. Start with a PIR; reach for the beam when you need pinpoint timing on a fast animal.
How long will a DSLR camera trap run on one set of batteries?
It varies enormously with temperature and trigger rate. A camera on a battery grip can run a month or more in summer but as little as 5-7 days in hard winter cold. Keeping flash power low extends everything, and fresh lithium AAs hold up far better than alkalines or standard rechargeables in the cold.