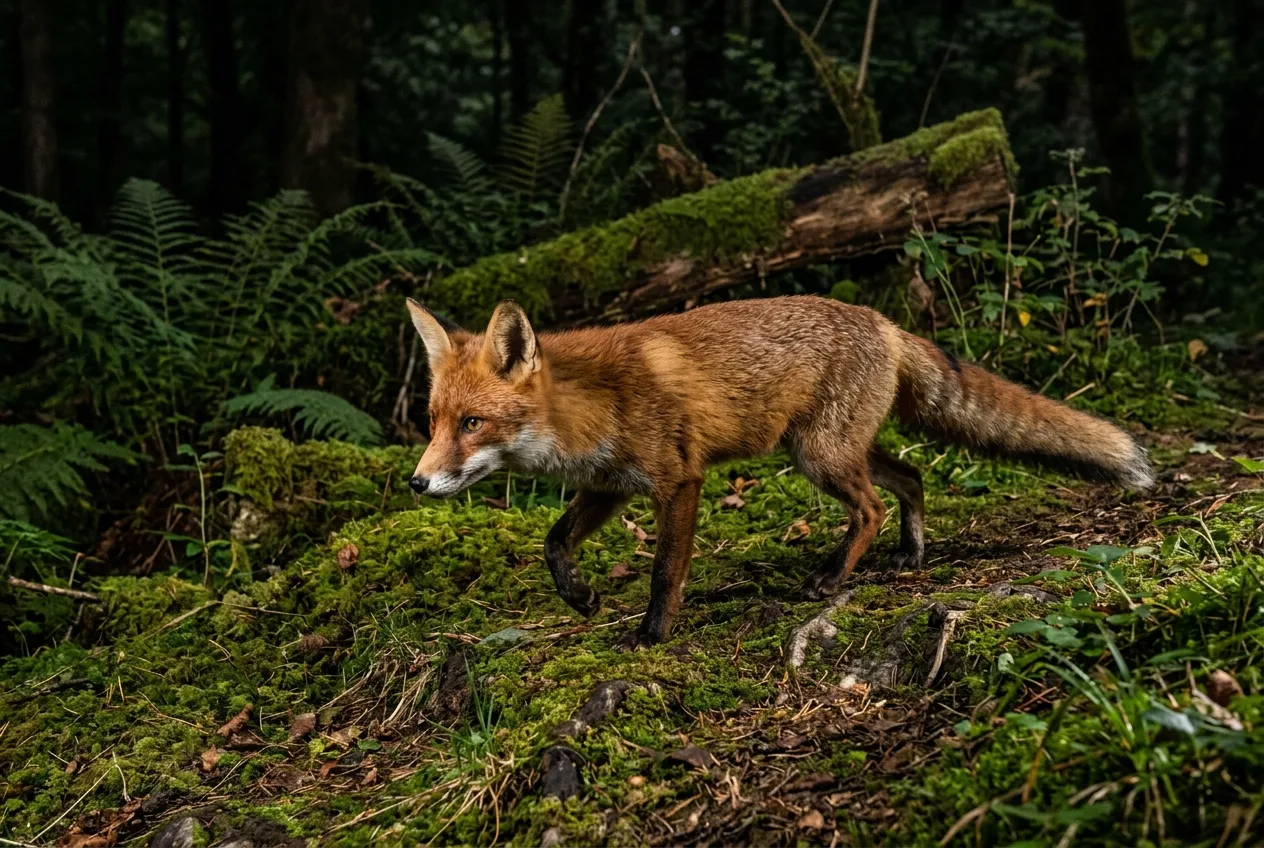
Will Burrard-Lucas left between five and eight camera traps running for more than a year to come back with a handful of frames of an African black leopard — a cat so rarely documented that his were, as far as he knows, "the first high-quality camera trap photographs of a wild melanistic leopard ever taken in Africa". That is the whole argument for a DSLR camera trap in one sentence. It is also, quietly, the whole argument against one. A year of waiting. A box of expensive gear hanging on a tree in the dark, exposed to rain and curious bears, for a payoff that might never come.
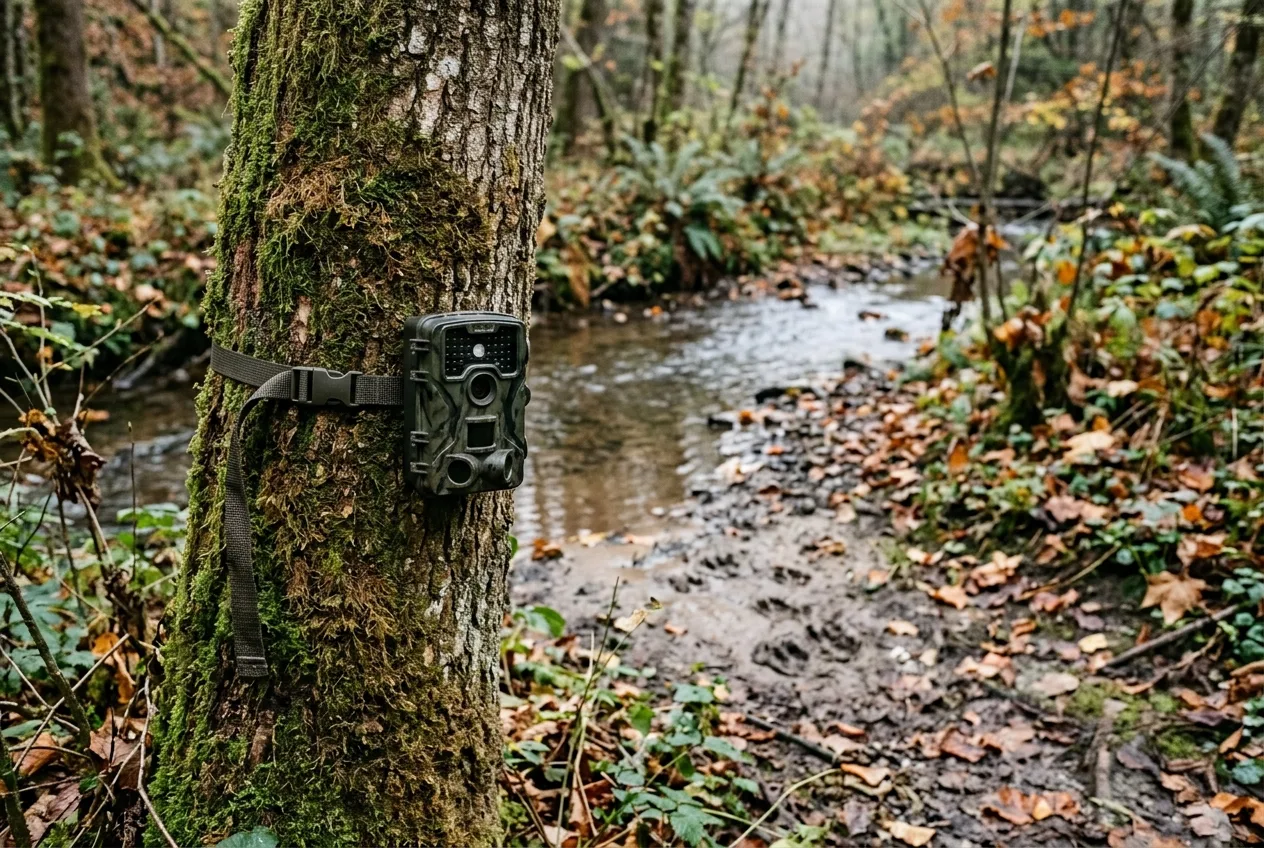
So before you spend a dime, let's settle the actual question, because the two devices people lump together are not the same tool at all. A trail camera is the small, sealed, self-contained unit you already picture — a low-resolution sensor, an infrared LED bank, point it at a trail and walk away. A DSLR camera trap is a real camera (a used DSLR or mirrorless body), a wide lens, two or three off-camera flashes, a weatherproof housing, and a separate motion trigger, all assembled by you and tuned to one spot. As photographer Randy Robbins puts it, "There is a very big difference between your typical 'trail cam' and what most photographers call a 'camera trap'".
Here's the short version. Buy or build a DSLR camera trap when the picture is the point — when you want a sharp, full-resolution, color-lit photograph of an animal in its environment that you could print, sell, or publish, and you're willing to trade money, time, and the real risk of losing gear to get it. Stick with a trail camera when you need to know what's there, not frame it beautifully — scouting, surveys, security, monitoring a property over months on a single set of batteries, or running several cameras across a lot of ground for the price of one DSLR rig. Most serious camera-trap photographers don't actually choose. They run a cheap trail camera to find the animal, then deploy the DSLR to photograph it. By the end of this you'll know exactly where that line falls for your own work.
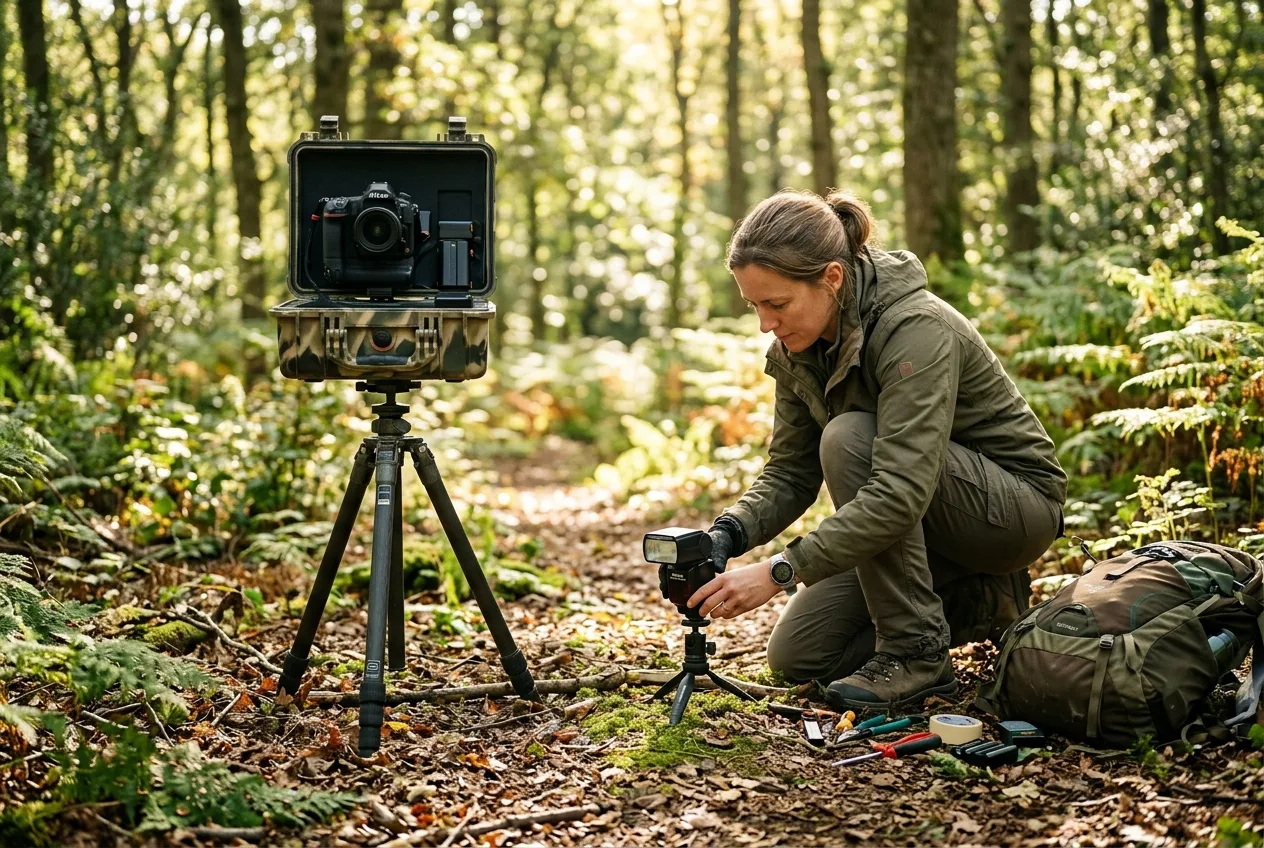
What a DSLR camera trap actually is
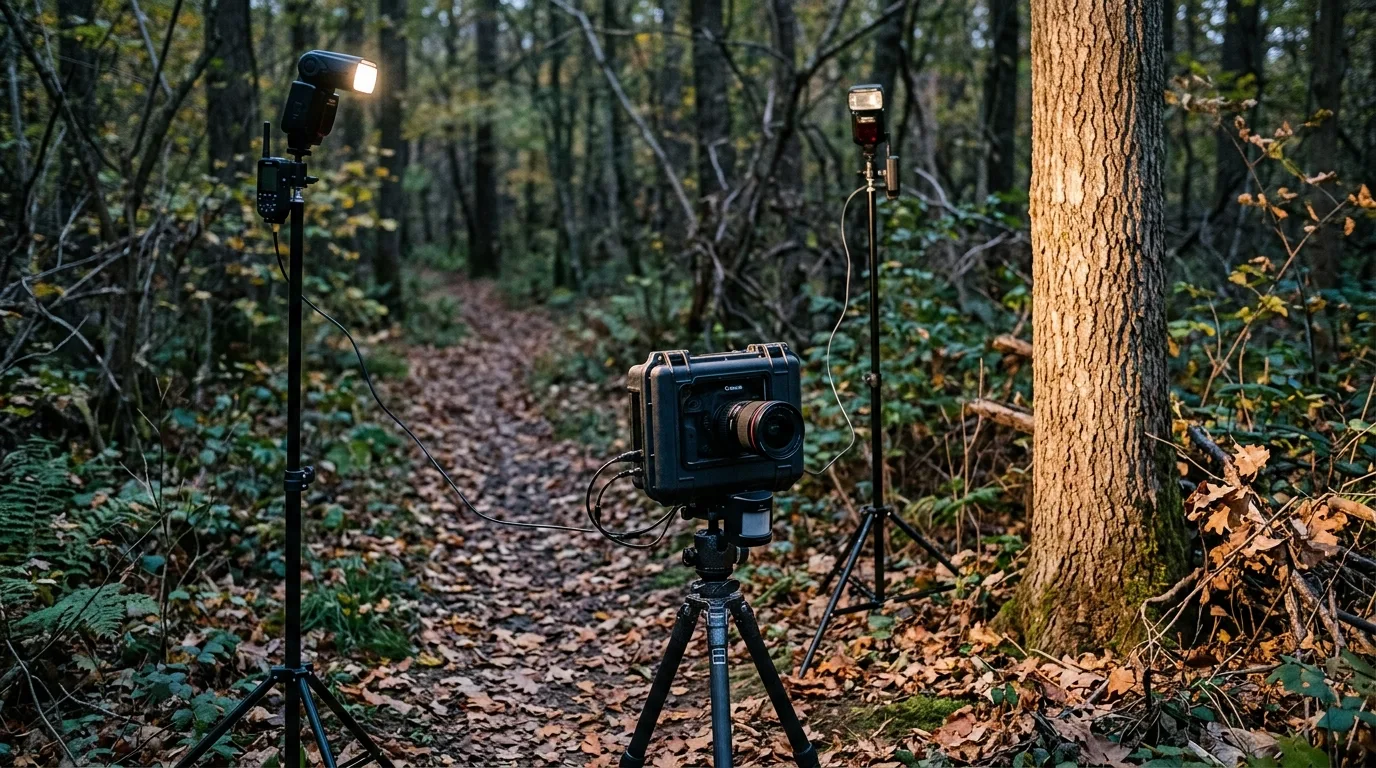
Strip away the jargon and a DSLR camera trap is five things that have to cooperate in the field, often for weeks, while you're not there:
- A camera — almost any older DSLR or mirrorless body with a low-power standby mode it can wake from in a fraction of a second, and a simple remote-shutter input (a three-contact 1/8-inch jack is the classic). It does not need to be new or fancy. People run decade-old Canon 60Ds and 5D Mark IIs, Nikon D300S and D810 bodies, Rebels — whatever holds a charge and takes a remote trigger.
- A wide lens. Because the camera sits close to the subject, a wide-angle lens (a 24mm, an 18-55mm kit zoom) pulls in the surroundings and tells a story instead of just filling the frame with fur.
- An external trigger — a passive infrared (PIR) sensor or a beam-break sensor that watches the spot and fires the camera. More on the difference below; it's a real fork in the road.
- Off-camera flashes. At least two, usually placed high and to the sides, so night shots look lit by moonlight rather than by a headlamp strapped to a lens.
- Power and a housing to keep all of it alive and dry. Each piece — camera, trigger, each flash, each wireless receiver — tends to want its own batteries and its own settings, and it's on you to keep them all in sync.
The trail camera, by contrast, is all of that collapsed into one weatherproof box you can buy for the price of dinner. The trade you're weighing is integration and toughness on one side, image quality and creative control on the other.
One terminology note worth your time. When practitioners say "DSLR," most of them now mean "DSLR or mirrorless" — the distinction barely matters for this use. The Winterberry Wildlife author is refreshingly honest about it: he titled his deep build guide "DSLR" partly because "'DSLR' is a better known term, and therefore likely to attract more search traffic," then adds that "the more modern 'mirrorless' cameras are the way to go, for sure". We'll come back to that choice, because it has one genuine catch.
Image quality: this is the entire reason to bother
If a DSLR rig didn't take dramatically better pictures, nobody would put up with the rest of it. It does, and the reason is mostly physics, not megapixels.
A trail camera uses a tiny sensor — typically the 1/2.3-inch format you'd find in a cheap point-and-shoot. The sensor in a DSLR or mirrorless body (APS-C or full-frame) has roughly 12 to 25 times the surface area of that, which means it gathers far more light and produces clearer, faster, cleaner images, especially in the dark. A full-frame sensor's light-gathering area (about 8.6 cm²) approaches that of the human eye. That gap is why a trail cam's "20-megapixel" image can still look soft: as one 2026 write-up put it, the tiny sensors mean "even their 20-megapixel images look soft, especially at night," and fur comes out "muddy". Bigger sensor, more light, real detail.
And be skeptical of that megapixel number on the box. A lot of trail cameras quote resolutions their hardware never captured — they shoot at a few real megapixels and then interpolate up to a headline 20MP+ by inventing pixels, which adds size but not detail. With trail cameras the base CMOS sensor size matters far more than the advertised count [GAP: needs a source on trail-camera interpolation and base-sensor megapixels — the on-disk NatureSpy page S09 covers their top research cameras but does not carry the interpolation explanation]. Even setting interpolation aside, a good agency guide makes the blunt point that "no matter how good or large the sensor, it will not overcome the limitations on picture quality imposed by an inferior lens," and "cheaper camera traps often have relatively large sensors but are let down by inferior lenses". A DSLR with a decent prime simply isn't fighting that handicap.
The difference shows up exactly where photographers care most: detail you can crop into and identify. A DSLR setup resolves "individual scars," the "patterns in a fisher's coat," "antler definition" — the stuff that makes an image printable and sellable. The NANPA photographer who built a DIY rig said it plainly: with his old trail cam "the quality of the photos is not great, especially when compared to a high-resolution DSLR". Burrard-Lucas, who makes his living from these images, is blunter still — trail cameras "have revolutionized the way that researchers collect data, but the image quality from these cameras is extremely poor (particularly at night) and so they are of limited use to photographers".
There's a related trap worth flagging for anyone tempted by a shortcut: you can't just grab a frame from a trail camera's video and sell it. Those clips are low-resolution and heavily compressed, so any frozen frame is a blurry mess. If you want a still good enough to print, you need a stills setup built for it.
Bigger sensor, more light, real detail.
The rig: triggers and flash are where the craft lives
Buying a camera is the easy part. The trigger and the lighting are what separate a snapshot from a photograph, and they're where most of the field headaches live too.
Triggers: PIR vs. beam-break
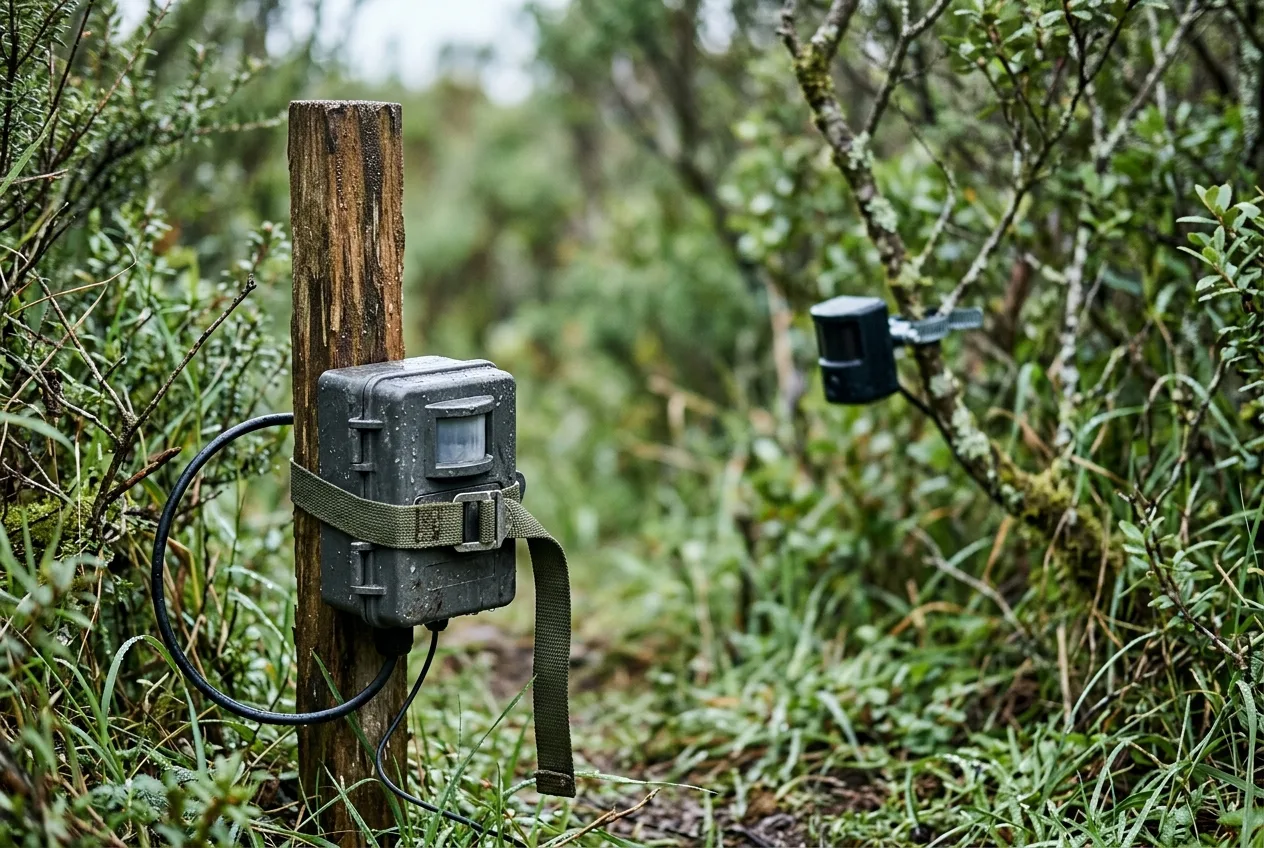
You've got two main ways to tell the camera an animal has arrived.
A PIR (passive infrared) sensor watches a wide arc for the combination of motion and a change in heat — the same tech in a burglar alarm or a patio light. It needs both at once: NatureSpy's mental model is a fox walking past (warm + moving = fire), then lying down to sleep (warm but still = no fire), then getting up again (fires again). PIR is the popular choice for DSLR traps because it's a single device, cheap, easy to hide, quick to set up, and sips power. The aftermarket Camtraptions PIR, for instance, detects out to about 5 meters across a 120-to-150-degree field of view and runs on six AA batteries.
A beam-break (active infrared) sensor is a tripwire of light — an emitter and a receiver — that fires the instant something crosses the beam. The payoff is precision: it triggers at the exact spot you focused on, and it shrugs off the wind-and-sun false triggers that plague PIR. The cost is complexity — two devices to align and conceal, more money, more fiddling. Cognisys builds its whole Scout system around a wireless beam sensor, and for big animals like mountain lions they recommend setting the beam "12-15 inches above the ground" so you capture the cat but not, in their words, the "2850 images of a playful squirrel".
Which to pick? For most people starting out, PIR. It's forgiving and fast to deploy. Move to beam-break when you need a precise, repeatable trigger point — a specific gap in a log, a branch a marten always uses — and you're tired of sorting wind-triggered blanks.
A quick, important caveat about PIR that the science nails down: it is genuinely bad at small, cold, or slow animals. An animal usually has to be a couple of degrees Celsius warmer than its surroundings and moving to trip a PIR sensor, and ectotherms — reptiles, amphibians, large insects — rarely differ from ambient by more than about 3°C. In a controlled USGS comparison, a standard PIR trigger detected targets with an overall probability of just 0.26, versus a perfect 1.0 for an active optical beam; for the smallest targets PIR managed 0.18, and at zero temperature differential it dropped to 0.10. If your dream shot is a salamander or a snake, plain PIR will miss most of them, and you'll want a beam-based or specialized trigger instead.
Flash: the off-camera secret
Here's the thing that surprises people: the single biggest reason trail-cam night shots look bad isn't the sensor, it's where the light comes from. A trail camera's infrared LEDs sit right above the lens, which produces flat, "horrible red-eye and unnatural shadows," and — because it's infrared — black-and-white. Move the light off the camera and up high, to the sides, and the whole image transforms: you get a three-dimensional, naturally-lit, full-color photograph.
That color point is backed by hard data. In a controlled small-mammal study, a white flash produced "clear, colour images" while infrared gave "black and white (and sometimes blurred) photographs" — and the difference mattered for identification: only 5% of white-flash stoat photos were unidentifiable, versus 33% under infrared. Color let researchers read the black tail-tip and contrasting belly that tell a stoat from a weasel or ferret.
The catch with off-camera flash is power. A flash has to charge a capacitor to fire, and that charge bleeds away, so a flash left fully "on" can drain its batteries in a single night. The field-proven workaround is a specific old unit: the Nikon SB-28, beloved because it "can sleep for many days and still have enough charge in the capacitor to fire instantly". Nearly every serious camera trapper names it — Burrard-Lucas, Scott Abraham, Robert Yone, the Winterberry and NANPA builders all reach for the SB-28 (typically two or three of them, found used). At 1/4 power an SB-28 can manage more than 1,000 flashes on a set of AAs. Cognisys solves the same problem differently with its Scout Flashes, which are "always ready" with no wake-up time so they expose the first shot correctly — handy when an animal is moving down a trail.
For settings, the consensus is remarkably consistent across practitioners: at night, go manual, around f/8 to f/11 for depth of field (you can't know exactly where the animal will stand), a flash-sync shutter near 1/200 (1/250 max before your flashes won't sync), and ISO held modest — Auto capped around 800-1,600, or a manual 400-1,000. The flashes themselves run low — a main flash around 1/8 to 1/16, a fill flash even lower — because you're close and you want detail, not a blown-out animal. The point isn't to memorize numbers; it's that this is manual photography in the dark, pre-composed for an animal that isn't there yet. That's the skill the trail camera spares you and the DSLR demands.
Cost and risk: the honest ledger
This is where a lot of enthusiasm meets reality.
A capable trail camera is cheap. The recent journalism here references a "$150 off-the-shelf game camera" for scouting; serious research-grade units run higher, but a perfectly good camera is a small purchase. Even in the research world, the spread is wide: an agency guide priced a top-tier Reconyx PC850 at $650 against a budget Scoutguard at $230 and a Bushnell Trophy at $303 (2015 USD), and noted that with camera traps "you get what you pay for".
A DSLR camera trap is a different order of spending, though less than you'd fear if you buy used. The NANPA builder put the all-in range at "anywhere between $400 to over $1,000," depending on what you already own. Scott Abraham's itemized British build is a useful template: a second-hand Canon 5D Mark II around £250-300, a used 24mm lens about £100, Nikon SB-28 flashes roughly £50 each (minimum two), and a Camtraptions PIR around £200 — plus a used Peli case for the housing. A manufacturer route runs higher: Cognisys lists the Scout Camera Box at $589, each Scout Flash at $499, each Scout LED at $459, and the Scout Beam Sensor at $439 — and a full two-camera rig stacks several of those together. The pattern is clear: buy used and DIY and you're in the low hundreds; buy new commercial components and a complete system climbs past a thousand fast.
But the sticker price isn't the real cost. The real cost is what happens to that gear in the field. Three risks stand out:
- Weather will get in. This is not hypothetical. The Winterberry author has torn down each of his two Canon 60Ds to repair water damage "several times," and water incursion "ruined a couple of battery packs, an SB28 flash unit, and a PIR trigger sensor" — he describes opening a case expecting great pictures and instead watching "in horror as water pours out". Even the purpose-built Camtraptions PIR will let water trickle in through the cable socket if you mount it upside down. Cheap housings (Tupperware, plastic bags) keep gear "dry and clean, that's about it" and are explicitly not bear-proof.
- Components fail, and one failure kills the whole shot. A DSLR trap is a chain of repurposed parts, and "a single component failure can take down the whole setup". Wired connections are a notorious weak point — one practitioner finds the cheap connectors most trappers end up using "have broken reasonably quickly," and a lost connection means you "return weeks later to no images". Wireless avoids the wires but adds batteries and cost.
- Leaving it out is a gamble. Expensive gear in the woods is "more financially risky" than a trail cam, full stop. Robert Yone's honest list of what camera trapping actually involves is worth tattooing on the inside of your eyelids: "weeks of checking without any results, dead batteries from small rodents triggering your camera, fogged lenses, near misses, out-of-focus photos, equipment malfunctions and other challenges". There's a reason the cheaper, infrared rig is sometimes the smarter one to deploy — an infrared trail camera draws less attention, and where theft is a real worry "a cheaper camera might become a much more viable option".
There's a subtler cost too: time. Setting one of these up right is slow, exacting work, and it takes longer than you think — camera trapping is "an ongoing project, and definitely not a quick means to getting great photos," demanding "time and patience". You compose, you light, you calibrate the trigger, you test, you come back days later, you adjust. Budget for that, not just the gear.
The real cost is what happens to that gear in the field.
Where the trail camera quietly wins
It would be easy to read all of the above as "DSLR good, trail cam bad." That's wrong. The trail camera wins decisively at a different job, and pretending otherwise is how people waste money.
Endurance. A good trail camera runs for the better part of a year untouched. A research-grade Reconyx HyperFire 2 can take 40,000 photos on one set of lithium batteries and carries a five-year warranty. Compare that to a DSLR rig where the SB-28 receivers might give you two to three weeks before a battery swap, and where "batteries deplete faster in cold". If you can only visit a spot every couple of months, the trail camera is the only honest option.
Scale and economics. For the price of one DSLR setup you can put "several standard trail cameras out," trading "a lower chance of getting something spectacular" for a much higher chance of catching something across more ground. That's exactly why researchers run them by the dozen — one tropical-forest study deployed 60 Reconyx cameras for 1,818 camera-days to map a whole mammal community. It's also why camera trapping has, in the words of one peer-reviewed overview, come to "democratize research" — the cameras are cheap enough, and need so little support infrastructure, that anyone from a national park to a private citizen can run a meaningful study. Trail cameras are, as one agency guide lists them, "relatively cheap to buy and deploy, highly reliable, able to be placed in the field for months at a time, low impact... low skill". Low skill is a feature when you're covering a landscape.
Toughness and simplicity. Cheap trail cams "are tough, simple, and run for months on a set of batteries with little maintenance". One sealed box. No flashes to align, no wireless channels, no capacitor to babysit. You point it and leave.
Now, none of this means trail cameras are reliable instruments in the scientific sense — the research literature is sobering on that point, and it's worth knowing before you trust one blindly. In a real Scottish field study, consumer Bushnells produced false-positive rates of 36-99%, missed 49-68% of sheep that walked right past them, and saw batteries rated for 12 months die in 3 days in winter cold; internal clocks reset so often that timestamps became "unusable," and two identical cameras watching the same carcass logged 32 images versus 2,459. That study's hard-won conclusion is one to carry into any buying decision: the cheaper unit isn't always the economical one, and "the performance of more expensive 'professional' models may prove more cost-effective in the long-term". Buy the camera the job needs, not the cheapest box on the shelf.
The honest summary: the trail camera is an information tool, the DSLR trap is an image tool. Ask which you actually need.
| Trail camera | DSLR / mirrorless camera trap | |
|---|---|---|
| Best for | Scouting, surveys, security, long unattended monitoring | Publishable, sellable, print-quality wildlife photographs |
| Image quality | Tiny ~1/2.3" sensor; soft, often muddy at night; B&W IR | APS-C/full-frame sensor, ~12-25× larger; sharp, detailed, color night shots |
| Night light | On-axis IR LEDs → red-eye, flat, grayscale | Off-camera flashes, high and to the side → natural, color, 3D |
| Setup | Point and leave; low skill | Manual, pre-composed, slow; real learning curve |
| Battery / deployment | Up to ~40,000 shots / many months on one set | Weeks between swaps; worse in cold |
| Cost | From ~$150; research units ~$230-650 | ~$400 to $1,000+ depending on used vs. new |
| Field risk | Tough, sealed, cheap to lose | Water damage, component failure, theft all costlier |
The move most pros actually make: run both
Here's the part that resolves the whole debate. You don't have to pick a side, and the most experienced people don't. They use the cheap camera to do the DSLR's homework.
The workflow is consistent across every photographer who talks about it. Find a likely spot — a game trail, a stream crossing, a choke point that funnels animals past one place. Hang an inexpensive trail camera there, ideally in video mode, and let it tell you what's really using the area, when, which direction it travels, and how it behaves. Robert Yone scouts exactly this way: "the image quality of those devices is often poor, but this is just for scouting," and it lets him confirm presence, timing, and movement before he commits an expensive rig to the woods "on a hope and a prayer". Only once the pattern is confirmed does the DSLR go in, composed and lit for that specific animal at that specific spot.
Even manufacturers who'd love to sell you the premium setup recommend keeping a cheap one in the mix: Cognisys advises setting up "an integrated trail camera for reconnaissance to monitor your setup," partly so you can see what triggered (or didn't trigger) your main camera and why. The trail camera also acts as a backstop — a standard game cam in video catches whatever passes behind the DSLR or slips its narrow trigger zone.
So the real answer to "DSLR camera trap vs. trail camera" is usually and, not or. The trail camera finds the picture. The DSLR takes it.
The trail camera finds the picture. The DSLR takes it.
A note on mirrorless vs. DSLR
If you're buying today, you'll wonder whether to bother with an actual DSLR. Two real considerations, and they cut in opposite directions.
In favor of mirrorless: it's the modern path, often lighter, and there are now good used bodies in the same low-hundreds range as used DSLRs. The "DSLR" in "DSLR camera trap" is really shorthand for "a proper camera with a big sensor and manual control" — mirrorless qualifies.
In favor of a classic DSLR: two stubborn practical things. First, battery life and standby — several builders deliberately avoid mirrorless because it "tend[s] to have a much poorer battery life, meaning you can't leave your camera trap out for very long". Second, and easy to overlook, flash compatibility: a camera trap leans hard on external flash, and not every mirrorless body plays nicely with the old manual speedlights and triggers this hobby is built around. Whichever you choose, check two things before you buy: that it has a genuine low-power standby mode it wakes from fast, and that it exposes an easy remote-shutter interface for your trigger. Get those right and the mirror, or lack of it, won't matter much.
Get those right and the mirror, or lack of it, won't matter much.
So, which should you choose?
Strip it all down and the decision is about what you're trying to walk away with.
If you want to know what's on your land — who's using the trail, when the bucks move, whether that den is active, is anyone messing with your gate — a trail camera is not a compromise, it's the correct tool. It's cheap, tough, runs for months, scales to cover ground, and asks almost nothing of you. Run several. Don't overthink it.
If you want to make a photograph — a sharp, lit, color image of a wild animal in its world that holds up printed on a wall or sold to a magazine — and you're genuinely willing to spend the money, learn the craft, lose some sleep over a fogged lens, and accept that a season can pass with nothing to show, then the DSLR camera trap is the only thing that gets you there. The black leopard didn't come from a game camera.
And if you're serious about that second goal, do what the pros do: buy a cheap trail camera too, and let it find the shot the DSLR will take.
Frequently asked questions
What is the difference between a trail camera and a DSLR camera trap?
A trail camera is a small, sealed, all-in-one unit with a low-resolution sensor and built-in infrared LEDs — point it and leave it. A DSLR camera trap is a real DSLR or mirrorless camera, a lens, off-camera flashes, a weatherproof housing, and a separate motion trigger that you assemble and tune yourself for far higher image quality. As one photographer sums it up, they're "a different thing altogether".
Are DSLR camera trap photos really better than trail camera photos?
Yes, and it's not subtle. A DSLR or mirrorless sensor is roughly 12 to 25 times larger than a trail camera's, so it captures far more detail and handles low light vastly better; trail-cam images look "soft, especially at night," with "muddy" fur. Off-camera flash also gives natural, full-color night shots instead of flat grayscale infrared.
How much does a DSLR camera trap cost to build?
Buying used, expect roughly $400 to $1,000 all-in, depending on what you already own. A typical kit is a second-hand DSLR body, a wide lens, two or three used Nikon SB-28 flashes (about £50 each), and a PIR sensor (around £200). New commercial components — Cognisys lists camera boxes at $589 and flashes at $499 each — push a full system well past a thousand.
Will a trail camera photograph reptiles, amphibians, or other small animals?
Often no. A standard PIR trail camera relies on a heat difference between the animal and its surroundings, and cold-blooded animals barely differ from ambient, so a PIR sensor misses most of them while a beam trigger catches them reliably. For herps and small ectotherms, you need a beam-break or specialized trigger, not a consumer trail cam.
Should I use a PIR or a beam-break trigger for my camera trap?
Start with PIR: it's a single, cheap, easy-to-hide device that's quick to set up and light on batteries. Move to a beam-break sensor when you need pinpoint timing at an exact spot and fewer wind- and sun-triggered false frames — it's more precise but needs two aligned units and costs more.
Can I just use a cheap trail camera to scout and a DSLR to shoot?
That's exactly what most experienced camera-trap photographers do. You hang an inexpensive trail camera (often in video) to confirm what's using a spot, when, and which way it moves, then deploy the DSLR rig once the pattern is clear. Even Cognisys recommends keeping a reconnaissance trail camera running alongside your main setup.