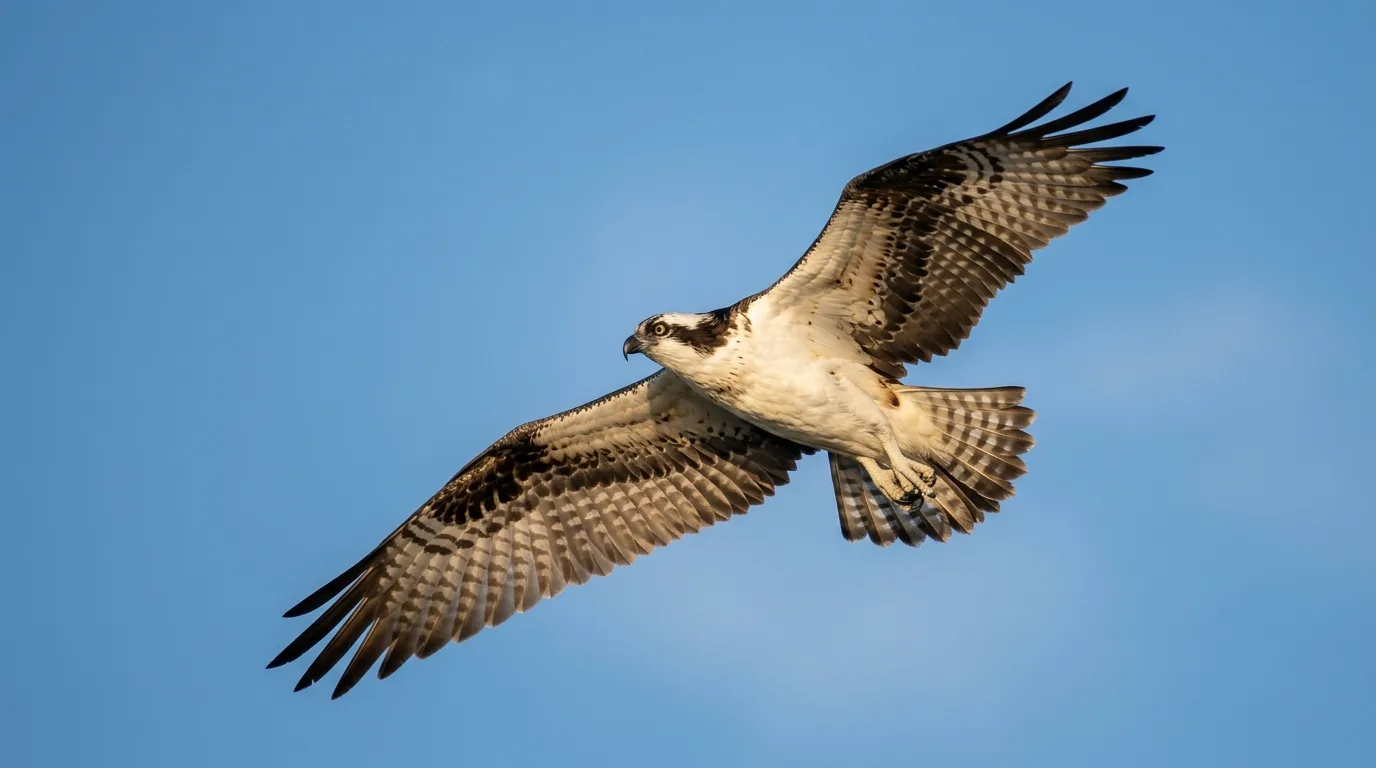
If every bird you wanted to shoot were a slow Osprey drifting across a clean blue sky, this would be an easy article. As Cornell Lab photographer Gerrit Vyn puts it, the trouble starts when you try "photographing a puffin flying 50 mph against a dark cliff in flat light" — at which point camera and lens limits, the bird's flight style, plumage that confuses autofocus, the quality of the light, and a busy background all gang up on you at once. Flight photography is hard for real reasons, and no single setting fixes it.
So let's front-load the honest answer to how to photograph birds in flight. You want a fast shutter speed scaled to the bird — roughly 1/2000 s as a working floor for true flight, climbing toward 1/3200 s and faster for small, quick birds, and only dropping toward 1/1000 s for big, slow soarers. You want continuous autofocus (AF-C on Nikon and Sony, AI Servo on Canon) with a focus area big enough to hold a moving target, your drive set to its fastest burst, and — this is the part people skip — a position chosen so the wind and sun are behind you and the bird is coming toward you in good light. Everything else is refinement. The rest of this guide is about getting each of those right, and about the field craft that separates a card full of soft frames from a handful of sharp ones.
Start with shutter speed — but scale it to the bird
Ask a room full of bird photographers what shutter speed freezes a bird in flight and you'll get a range, not a number. That's not them being vague. It's the correct answer, because the right speed depends almost entirely on how fast the bird's wings and body are actually moving.
Here's the physical reason, and it's worth internalizing because it tells you how to think, not just what to dial in. A peer-reviewed 2022 study in the Journal of the Royal Society Interface fitted accelerometers to 14 species flying in the wild and measured their mean wingbeat frequencies. A dunlin — a small wader — beats its wings about 13.2 times a second. A common guillemot, 9.7. A barn owl, 4.4. A northern gannet, 3.9. And the big ocean soarers barely flap at all: a wandering albatross averages 2.8 beats per second. That's the whole story of shutter speed in one dataset. A small bird's wingtips are sweeping through several beats in the time a large bird completes one, so the small bird needs a much faster shutter to stop that motion. Body size and wingbeat rate run in opposite directions.
Translate that into settings and the practitioners line up remarkably well. Vyn's guidance for Cornell is "1/2500, 1/3200, or even higher if light allows," dropping to 1/1600 or 1/1250 only when light is poor or the subject is slow — and accepting a lower keeper rate when you do. Photography Life lands in the same place: roughly 1/2500–1/3200 s for larger birds and 1/4000 s or faster for small, fast ones. Wildlife pro Melissa Groo is blunter about her own floor: "I don't like to drop below 1/2500-sec., if I can help it. Really I prefer to be at 1/3200-sec. at least," and for fast or small birds, "1/4000-sec. or even higher". Canon's own shooting examples sit right there too — waterbirds taking off at 1/4000 s, a kingfisher before landing at 1/3200 s.
The dissent, where it exists, comes from the manufacturers writing for a broader audience. Nikon's Tony Beck recommends a minimum of "1/1000 of a second (or faster)" and prioritizing shutter speed above all else, with his example frames shot at 1/1000–1/1250 s. Digital Photography School splits the difference: "at least 1/1000s, and 1/2000s and beyond is better". These aren't wrong — they're floors for larger, slower birds. Photography Life makes the reconciliation explicit: 1/1000 s is the "comfort zone" that handles slow flyers like herons, but "for aerial battles between hummingbirds, 1/1250s is usually not fast enough".
A few corrections to your intuition that the sources insist on:
- A bird flying straight at you is the hardest freeze of all. Its relative speed peaks in that direction. Photography Life notes that even a vulture you'd normally shoot at 1/1000 s "may require 1/2500s or faster when they're coming straight at you," and that even 1/4000 s isn't guaranteed for a griffon filling the frame.
- Closer birds need faster shutters for the same reason — the angular speed across your frame goes up as the distance comes down.
- You don't always want it frozen. Drop to something slow — around 1/30 s — set a low ISO, and pan with the bird, and you can render motion blur in the wings while the body stays sharp. Different goal, different speed. More on panning below.
The practical takeaway: pre-set your shutter for the fastest thing you might see. Photography Life's advice for the unpredictable moment — the pheasant that explodes from your feet, the osprey that suddenly dives — is to sit somewhere between 1/1000 s and 1/2000 s so you're ready, and assign a custom button to jump to a faster mode if you need it.
Body size and wingbeat rate run in opposite directions.
Feed the shutter: exposure mode, ISO, and aperture
Once you've decided the shutter needs to be fast, the rest of the exposure triangle is in service of keeping it there.
ISO is your lever, and you raise it without flinching. Nikon's order of operations is the standard one: set the fast shutter first, then "even if you have to raise your ISO, or open up your aperture to create a proper exposure, the priority should be given to a fast shutter". Groo's in-flight preset runs ISO 1600; Canon's takeoff example sits at ISO 1000 and climbs to ISO 1600 for the small, fast kingfisher; Mathieu Gasquet, testing the Sony a1, simply set Auto ISO with a ceiling of 12,800 and let bad weather push it there. Modern sensors handle high ISO well enough that noise is the lesser evil — as Photography Life says of dim roosting birds, "it is always better to deal with noise than motion blur". If you shoot in low light and the camera offers it, one Canon tip is to turn off high-ISO noise reduction, because it can slow your continuous shooting and cost you frames.
Which exposure mode? This is the one place the field genuinely splits, and the split is about backgrounds.
The case for Manual is changing backgrounds. Picture a Sandhill Crane crossing from open sky into shaded forest. In an automatic mode the meter chases that change, your exposure on the bird shifts, and your shutter can dip below a usable speed at the worst moment. In Manual, "nothing changes and the bird will remain properly exposed against any background as long as the bird remains in the same light". Audubon's Kevin Karlson recommends Manual specifically "when you have a changing background... It allows you to find the perfect exposure for light or dark birds and keep it constant". Gaurav Mittal makes the same call for "backgrounds of rapidly changing tonality", and Canon notes that a fixed-exposure Manual setup also reduces the split-second metering lag — and on a mirrorless body, the EVF lag — that an auto mode introduces.
The case for Aperture Priority is simplicity and uniform light. DPS argues for it so "you have control over your aperture and ISO at all times," letting you watch the shutter the camera picks and bump ISO if it's too slow. Paul Bannick splits by situation: Aperture-Priority "when the subject is either still or moving across backgrounds of similar tonal values," and Manual "when the background changes often". The one mode nobody defends is Program — as Bannick's friend jokes, "P" mode stands for "Pro Mode," but it's really the camera making your decisions for you. There's also a middle path: Canon suggests Shutter-priority (Tv) for the specific case of a bird flying from bright into dark, while still setting ISO manually so the camera isn't recalculating that too.
My read of the sources: if your background is consistent (a bird against clean sky), Aperture Priority is faster to work with. The moment the bird is crossing varied tones, switch to Manual and meter for the bird. And against a bright white sky, do what Vyn does — meter the sky and open up about two stops so the bird isn't a silhouette.
Aperture: wider than you'd think, but not always wide open. The instinct is to shoot at maximum aperture for the fastest shutter, and that's the default — wide open, ISO set to hit your speed. But several sources push toward the f/8 neighborhood when light allows, for two reasons. DPS calls f/8 the point "where your lens will be most crisp, plus it will give you enough depth of field to get wingtip-to-wingtip sharpness". Vyn agrees: if you've got light to spare, close down to f/5.6 or f/8 "for more depth of field and a better chance of getting all of the crucial parts of the bird in focus — the head, body, and forewing". Pangolin's guides shoot flight around f/8 to f/9 so both the bird's head and body land sharp, opening up only for deliberately shallow, creamy backgrounds. Depth of field on a bird in open sky is rarely your enemy; getting the whole bird sharp is the real prize.
Autofocus: continuous, always — then choose your area
If there's one universal in these sources, it's this: shoot moving birds in continuous autofocus, never single-shot. Nikon, Canon, Sony, DPS, Visual Wilderness, Pangolin, B&H — every one of them says it. The mode is called AF-C on Nikon and Sony and AI Servo on Canon, and it does the obvious thing: it keeps refocusing on the bird as it moves toward you, instead of locking once and going stale. Canon's Bird Branch describes AI Servo as the mode that "reacts to instantaneous movements and automatically maintains focus" — exactly what a soaring or erratic bird demands. Set it and forget it; this is the foundation.
The real decisions are about focus area — how big a target you give the camera — and they trade precision against the odds of holding a moving bird.
Single point is the most precise and the favorite of some old hands. Tony Beck sets a single point because it gives him "more control," placing focus exactly where he wants it, even though he acknowledges "many photographers prefer systems using more points". Vyn uses a single point "for birds that are larger in the frame" so he can put it precisely on the bird, switching to a pattern only when that gets too hard. The catch is obvious: keeping a single point glued to a fast, weaving bird is genuinely difficult.
Zone or group area is where most flight shooters live, because it forgives the small tracking errors single-point punishes. Vyn's all-around recommendation is Group-Area AF on Nikon, or a 9-point expansion / Zone AF on Canon. In Cornell's free course preview, Groo narrates the choice in real time over a hovering Osprey: "on my Nikon I've chosen Group Area focus mode. It's five different points that are gonna be able to grab that bird. And I think it's gonna be better than just my Single Point focus right now" — precisely because she's working against clean blue sky, "so that there's nothing that can grab those other focus points". That's the key nuance: zone shines against clean backgrounds, where stray points have nothing wrong to grab. Gasquet's testing of the Sony a1 reached the same conclusion — Zone as the primary area, because the camera "did a very good job in not losing the subject completely when it went momentarily outside the focus area". Sony's own setting guides recommend a wide Zone for flight, escalating tracking sensitivity for the hardest cases.
Within a system there's also a tracking-sensitivity knob worth knowing. On Sony, the guides recommend AF Tracking Sensitivity 3 (Standard) for larger birds and 5 (Responsive) for small or diving birds — and specifically bumping to Responsive for birds flying toward you, where focus "tends to be delayed". Vyn's Canon advice runs the other way for busy backgrounds: "the busier and more problematic the background, the lower (more delayed) you should set your AF Tracking Sensitivity," so the camera doesn't jump to the clutter behind the bird. Two opposite tweaks for two opposite problems — clean sky wants a responsive, sticky-to-the-bird setting; messy backgrounds want a slower, less twitchy one.
Two more high-value habits from the field:
- Use the focus limiter. Set your lens to ignore close distances. Birds in flight are at the far end of the range, and limiting the lens there lets it "focus and refocus faster".
- Pre-focus to get in the ballpark. Vyn's trick: before the bird arrives, point at vegetation or ground roughly where you expect to pick it up and set focus there, so the bird lands near your plane of focus instead of forcing the AF to hunt from scratch. Canon's parallel idea on a mirrorless body is setting an "initial Servo AF point" to tell the camera where to start searching, which "speeds up the process".
That's the key nuance: zone shines against clean backgrounds, where stray points have nothing wrong to grab.
Eye-detection AF: a genuine leap, with real blind spots
If you're on a recent mirrorless body, animal/bird eye-detection AF is the biggest practical change to this genre in years — and it's worth understanding what it does and doesn't do, because the sources are candid about both.
When it works, it's almost unfair. Dan Carr, testing Sony's dedicated Bird Eye AF on the a1, was "blown away": with very small birds "it would consistently pick out and lock onto an eye," even when the bird "occupied a tiny portion of the frame," and it handled "a black eye in a black head" with no issues. The size of the bird had "absolutely zero effect on the AF accuracy". Gasquet's numbers back the hype up: at a red-kite feeding station, the a1 returned a 97–99% sharp hit rate, and with eye AF engaged, "out of 2,991 pictures, only 18 were out of focus, which is less than 1 percent". He also found the same keeper rate "whether the bird was flying against a busy background, or the plain sky" — the kind of consistency that used to be a fantasy.
Now the blind spots, because they matter for how you set up:
- It can fail on non-standard shapes. Carr's headline finding was "100% failure with swans" — long-necked birds the a1 simply didn't recognize as birds, defaulting back to standard tracking. He suspected flamingos and ostriches would fail the same way. (Reader reports on his own page noted herons working fine, so it's specific shapes, not all odd ones.)
- It struggles with distance, darkness, and backlight. Gasquet's caveat: eyes "may not be detected if the subject is too dark... or in a backlit situation, or if it is too small in the frame". Sony's own guides say the same in their fine print.
- You may not want the eye. Both Sony setting guides warn that once eye recognition is active, "it will become difficult to move focus to the wings" — relevant if your composition wants the wingtip sharp rather than the eye.
The way the experts handle this is to keep eye AF as one tool among several, not the only one. Gasquet's most versatile approach for erratic birds is to let eye AF work inside a chosen focus area (like Zone): if it detects an eye, great; if not, the normal area keeps following the bird. And because you'll move between humans, mammals, and birds in a wildlife-rich setting, both Carr and Gasquet assign the subject-type toggle to a custom button so you can cycle without diving into menus and missing the shot. One more easy win on Canon: eye detection is often off by default — check that it's enabled before you wonder why it isn't working.
When it works, it's almost unfair.
Drive mode and the back-button focus debate
Drive mode is the simple part: set it to the fastest burst your camera has. Flight photography is, as Vyn says, "a numbers game" — the more frames you get off, the better your odds of catching the one with the perfect wing position. DPS, Canon, B&H, Photography Life and Visual Wilderness all say the same: fastest continuous mode, full stop. Groo shoots two Sony a1 bodies "up to 30 frames per second," though "typically more at 20," and her reasoning is the wings: "their wing flap can take so many different angles... Even just one or two of those frames might yield that obviously perfect shot where the wing is just so perfect". If you shoot fast bursts, mind your buffer and card — Gasquet measured the a1 holding 30 fps for about 5 seconds on a fast CFexpress card before the rate dropped, and far less on a slower SD card. A faster card buys you longer bursts.
Back-button focus is where the genuine disagreement lives, and it's worth laying out honestly rather than smoothing over, because the most authoritative source on flight specifically dissents from the popular advice.
The pro-BBF case is well made by Dan Carr, who'd "bet that the vast majority of people who try this technique will never go back." The idea is to separate focusing from the shutter: assign AF to a rear button (AF-ON, or a reassigned AE-L), so the shutter only takes the picture. In continuous mode, "the autofocus will start when you press the back button, and it will stop as soon as you release the button" — hold to track, release to lock. That gives you both modes in one setup: hold the button for continuous tracking, tap it for single-shot focus, no menu-diving to switch. Canon's Bird Branch is equally enthusiastic, arguing that photographers who avoid AI Servo because they can't recompose are "missing out on 90 percent of the camera's performance when shooting birds" — and back-button AF is the fix. For takeoffs it shows the technique cleanly: spot the bird far off, hold AF-ON to keep focus as it approaches, and fire when it's large enough in the frame. Mittal and Pangolin both recommend BBF for flight as well, partly because keeping focus locked helps with the camera shake of panning.
So why would you not use it for flight? Because Cornell's dedicated flight guide says so, for an ergonomic reason worth taking seriously. Vyn: "Though I recommend back-button focusing for most situations, don't use it for dedicated flight photography. Because you will be continuously focusing when shooting birds in flight, it will be more comfortable for your hands to half press the shutter button for focus and fully press to release the shutter, rather than having to hold two buttons at once". When you're going to hold focus the entire time anyway, the separation that makes BBF brilliant for static subjects becomes an extra thing to grip.
How to think about it: this is a real preference split, not a right-and-wrong. If you already shoot back-button for everything and your hand is trained, there's no reason to abandon it for flight. If you're choosing fresh and your sessions are pure flight, Vyn's half-press argument is sound and one less point of fatigue. Either way, Vyn adds a technique that helps with both — "bump focus." Instead of holding AF continuously while you acquire a far-off bird, press it intermittently to keep the bird "almost in focus," which "minimizes the chance that your focus point will fall off the subject and focus somewhere else entirely." Once the bird's in range, then hold. Groo does exactly this on her Osprey: "I keep bumping the focus even without pressing the shutter because I'm just trying to have my focus keep up with it".
When you're going to hold focus the entire time anyway, the separation that makes BBF brilliant for static subjects becomes an extra thing to grip.
The field craft that actually makes the picture
You can nail every setting above and still come home with soft frames, because the hardest part of flight photography is keeping a fast bird sharp in the frame while you fire. This is the part that only practice buys — but the sources are full of specifics that shortcut the learning.
Put the wind and the sun at your back. This single positioning choice does more than any setting. Birds take off and land into the wind, so when you stand with the wind behind you, birds approach you head-on — and, crucially, "fly much slower into the wind, which makes them easier to track." Pair that with the sun behind you and the same birds are "flying toward you at an angle... underwings showing and their heads in the lead," beautifully lit. DPS and Photography Life both make wind direction a planning step for exactly this reason. Roman Kurywczak's warning is the corollary: if the sun is at your back but the wind is in your face, "the birds will almost always fly away from you" — so check the wind before you commit to a spot.
Work the good light, and the clean background. Shoot the golden hours — Bannick's "magical light just after sunrise and just before sunset," when birds are also most active. And give your autofocus an easy job: it "will perform best when you shoot against a clean background with little contrast, like the sky or still water," and where you can't avoid clutter, remember that "the farther away the background is, the better". DPS turns this into an active tactic — wait for the bird to cross a contrasting background, or reposition so it will, rather than firing into a tangle the AF can't parse.
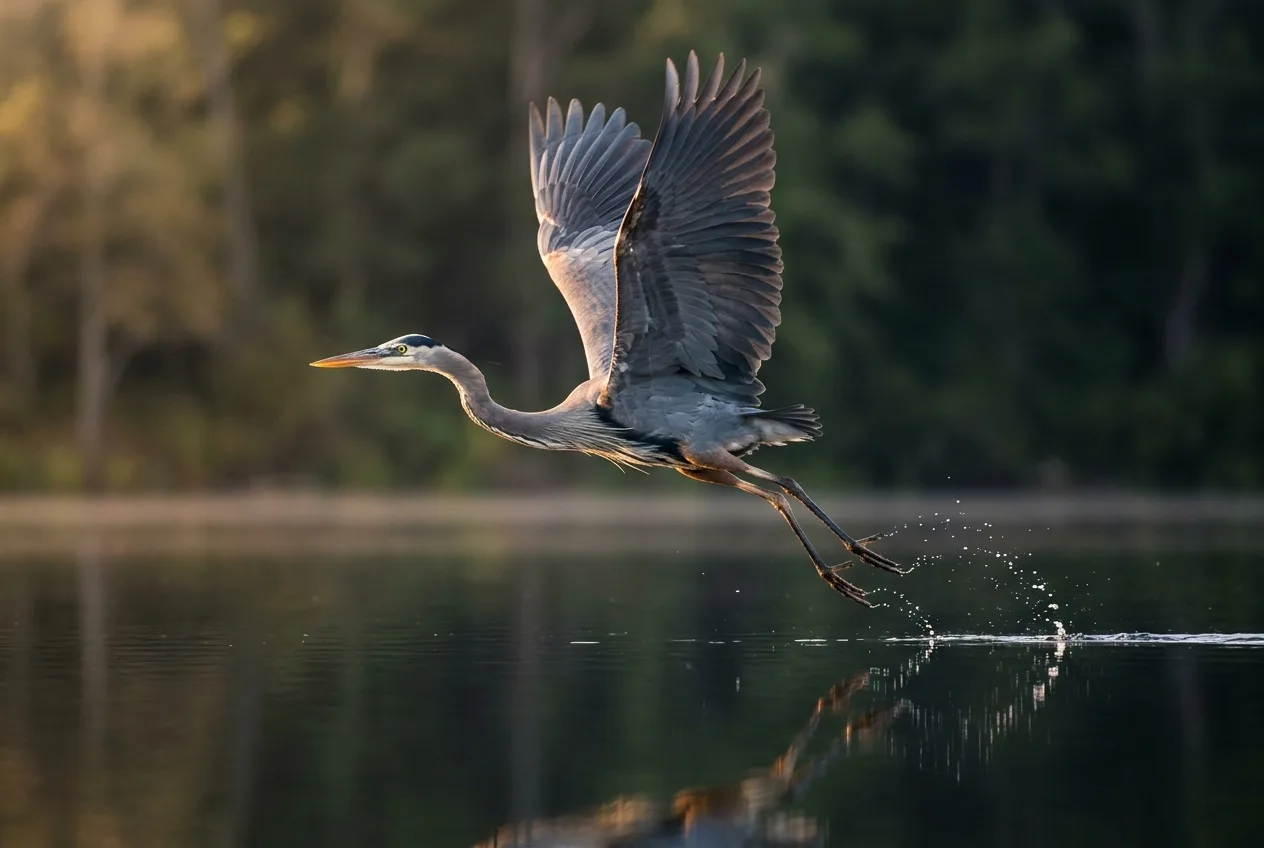
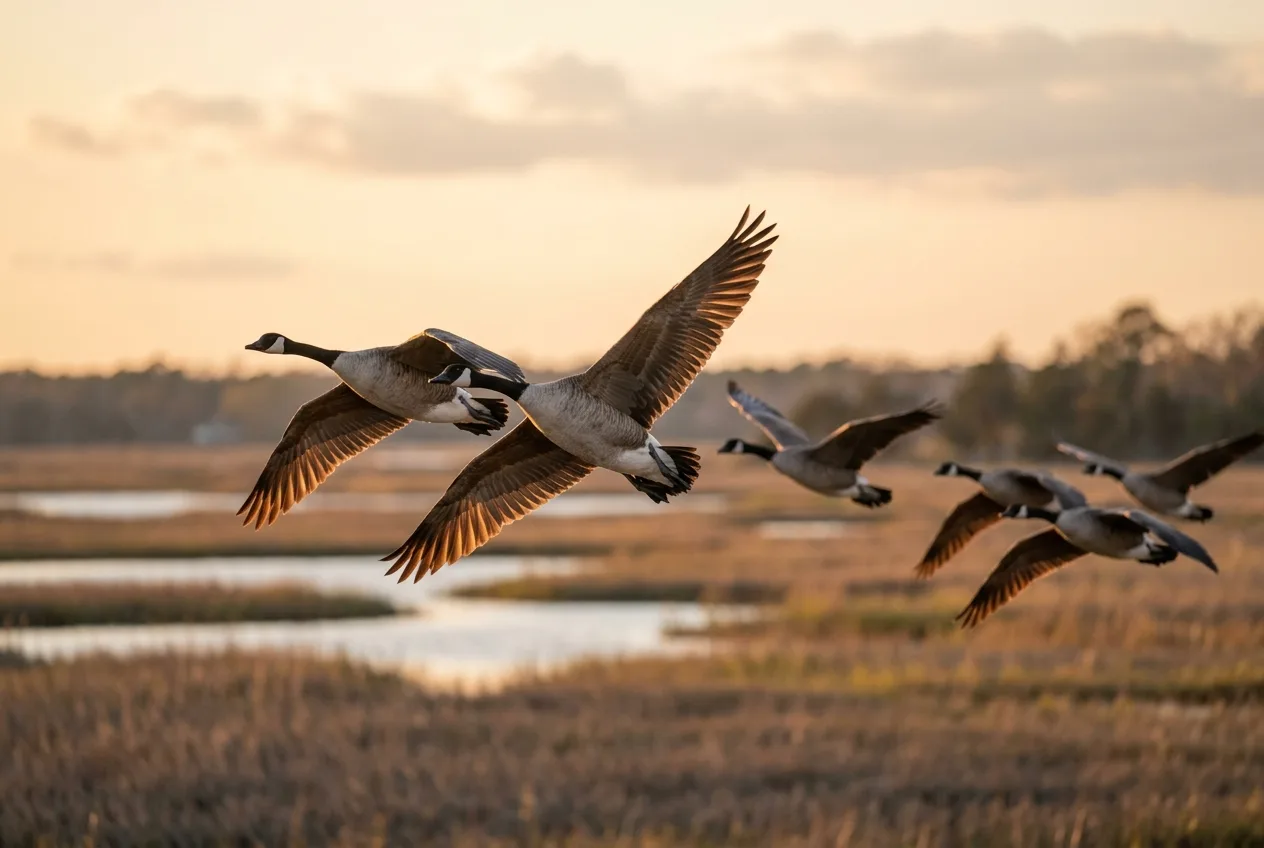
Anticipate, don't chase. The best flight images come to photographers who put themselves where the birds already go. Vyn: identify predictable flight paths from your knowledge of behavior — the spot the pelicans always cross at dusk, the ridgeline hawks follow on migration. Bannick's version is "let the birds come to you": study behavior and habitat, set yourself where the bird will be, and you get the intimate shot instead of a fleeing tail. This is also where reading the bird pays a concrete dividend — many larger birds, herons and eagles especially, defecate just before they take off, which is your split-second cue for a takeoff frame. And it argues for learning on the easy subjects first: start with big, slow flyers like herons, egrets, gulls and geese before you take on darting songbirds.
Then it's body mechanics. Acquire the bird before it's in your shooting zone and track it smoothly — Karlson's "synchronous panning" means "keeping the subject in the exact same location in your viewfinder while tracking". Tony Beck frames panning as a dance: "find the bird in your frame, and follow it as it flies. When you're confident the bird is in focus, blast off a number of frames as you continue to follow". Use a stable, athletic stance — legs apart, knees slightly bent, left hand well out under the lens, elbows tucked, and turn with your whole body rather than your arms. And the detail almost everyone forgets: follow through. As DPS puts it, "when the bird flies by, keep panning even after you've stopped shooting. This follow-through motion will keep your last image in focus better".
On support and stabilization, flight breaks the usual rules. A tripod is great for stationary birds but fights you on erratic flyers; Beck prefers a monopod or gunstock, which give support without locking you down, and notes that with a fast shutter and VR a tripod isn't really necessary handheld. And counterintuitively, at flight shutter speeds you can turn image stabilization off — those speeds "negate any need for image stabilization," and leaving it on "may make it harder to track subjects and may slow lens performance". (Canon's narrower version: turn lens IS off specifically when you're on a tripod.) On a monopod handheld in good light, your shutter is doing the stabilizing.
Glass and reach. You'll want length: Beck calls 300–400 mm the sweet spot, anything over 200 mm to fill the frame; DPS suggests at least 300 mm, with 500–600 mm better, and a wide aperture (f/4 ideal, f/5.6–6.3 workable). The pros run big primes and long zooms — Groo's Sony 600 mm f/4 (often with a 1.4× teleconverter) and 200–600 mm zoom, for instance — but the honest framing for most readers is DPS's: the best lenses cost thousands, so get the most reach and the fastest, sharpest glass you can afford, then learn to use it well. Practice is the real upgrade. As Vyn says, it simply "takes a great deal of practice," so put in the hours on common birds near home, keeper or not.
The special case: hummingbirds and high-speed flash
Hummingbirds deserve their own paragraph because they break the shutter-speed logic entirely. Their wings beat "over 60 beats per second," and as Tom Bol warns, even at a camera's top mechanical speed of 1/8000 s "you may still see movement in the wings".
That leaves you two honest paths. The first is to accept some wing blur as natural — a feeding hummingbird can hold its body nearly still, so a shutter around 1/200 s freezes the body while the wings blur, which many photographers prefer as the more lifelike look. The second, if you want every wingtip frozen, is to stop relying on shutter speed at all and let flash duration do the freezing. The principle, in Bol's words: "When flash duration is the only thing that is illuminating your subject, then flash duration, not shutter speed, will freeze the movement". His setup uses five Speedlights at low power, where the flash fires for about 1/30,820 s — "plenty fast to freeze wing movement" — at an actual shutter speed of just 1/200 s. The non-negotiable condition is eliminating ambient daylight so the flash alone exposes the bird; Bol shoots f/16, 1/250 s, ISO 100 in early-morning or overcast light, with 4–6 Speedlights at 1/16 power or lower, to make that happen.
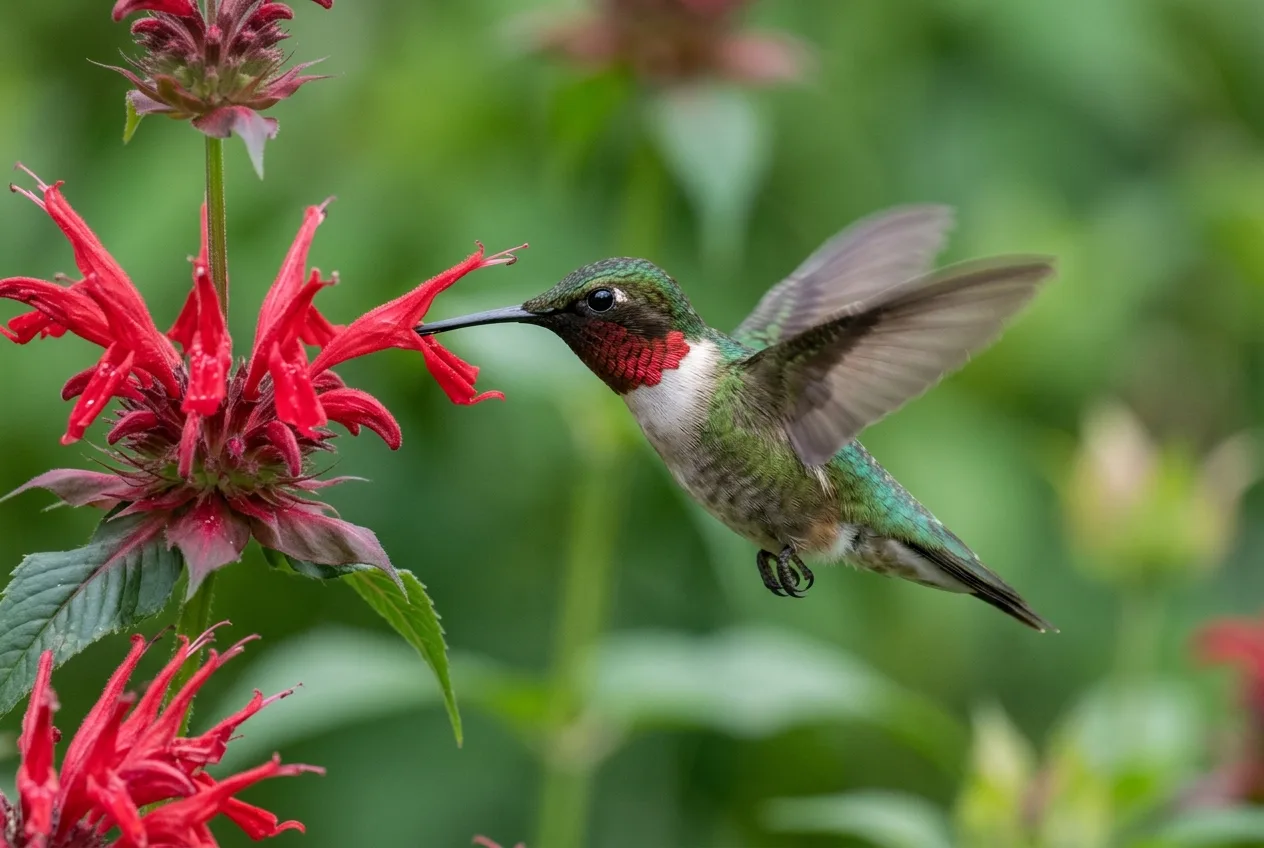
The field craft for hummingbirds is its own discipline, and the specialists agree it's mostly patience and observation. Roy Dunn — 600,000 hummingbird images in — says "Observation and Preparation are Everything," and that hummingbirds quickly ignore a tripod and camera if you set up gradually. The standard trick is to set up a feeder, then cover all but one feeding hole with tape so the bird comes to one predictable spot, and pre-focus there. A lens of 300 mm or more works, but mind your lens's minimum focus distance — that often matters more than focal length when the bird is close. Dunn's one aesthetic warning: hummingbird feathers are iridescent, so use soft light (open shade, or diffused/softboxed flash) to avoid blown-out specular highlights.
Hummingbirds deserve their own paragraph because they break the shutter-speed logic entirely.
Don't flush the bird for the shot
One ethical line runs straight through this entire topic, and it's the obvious temptation: don't startle a bird into the air just to photograph it flying. Audubon's guidance is unambiguous — "Never advance on birds with the intention of making them fly, whether they are lone birds or flocks of birds," because it disrupts resting, foraging, and hunting and burns energy the bird needs. The practical test: "If your approach causes a bird to flush (fly or run away) or change its behavior, you're too close". This is exactly why the anticipation approach above isn't just better technique — it's the ethical one. You let predictable flight paths and takeoffs bring the bird to you instead of forcing the moment.
The same guide rules out baiting predatory birds (hawks, owls, eagles, ospreys) with live or dead animals or decoys, advises using flash sparingly and never on nocturnal birds at night, and says not to fly drones at birds, especially near nests. Near nests generally, keep your distance and let a telephoto of at least 500 mm do the work; on beaches, give nesting birds a minimum of 25 yards and don't block their path to the water. Groo frames the self-interest of all this plainly: the less you disturb a bird, the longer it stays and the more natural the behavior you get to photograph — a silent shutter, a blind, or your car as a hide all help. Good ethics and good pictures point the same direction.
Frequently asked questions
What is the best shutter speed for birds in flight?
There isn't one number — it scales with the bird. A practical working range is about 1/2000 s for general flight, 1/3200 s and faster for small, quick birds, and as low as 1/1000–1/1250 s for large, slow soarers like herons; birds flying straight at you need the fast end. When in doubt, set 1/2000 s and adjust.
Should I use single point or zone autofocus for birds in flight?
Continuous AF either way — but for flight, most photographers favor a zone or group area, because it holds a moving, weaving bird far better than a single point, especially against clean sky. Reserve single point for birds that are large and steady in the frame, where precise placement matters more than tracking.
Is back-button focus better for birds in flight?
It's a real split. Many pros swear by it for the flexibility of separating focus from the shutter, but for pure flight work others recommend against it — holding two buttons while you continuously track is more tiring than a simple half-press. If you're already trained on back-button, keep it; if you're choosing fresh for flight, the half-press is a fair default.
What camera mode should I shoot birds in flight in — Manual or Aperture Priority?
Manual when the background changes tone (sky to forest), so your exposure on the bird stays put and your shutter doesn't dip. Aperture Priority when the light is even and the background is uniform, for simpler, faster shooting. Avoid Program mode.
Do I need a fast, expensive camera to photograph birds in flight?
It helps but isn't required. The features that matter are fast continuous shooting, good high-ISO performance, capable autofocus, and a viewfinder for tracking. Recent mirrorless bird-eye AF dramatically raises keeper rates, but plenty of great flight photos predate it — practice and field positioning matter more than the body.
How do you freeze a hummingbird's wings?
You usually can't with shutter speed alone — their wings beat over 60 times a second, and even 1/8000 s may show motion. To truly freeze them, light the bird with low-power flash in killed ambient light, so the very short flash duration (around 1/30,000 s) does the freezing; otherwise, shoot around 1/200 s and accept natural wing blur.