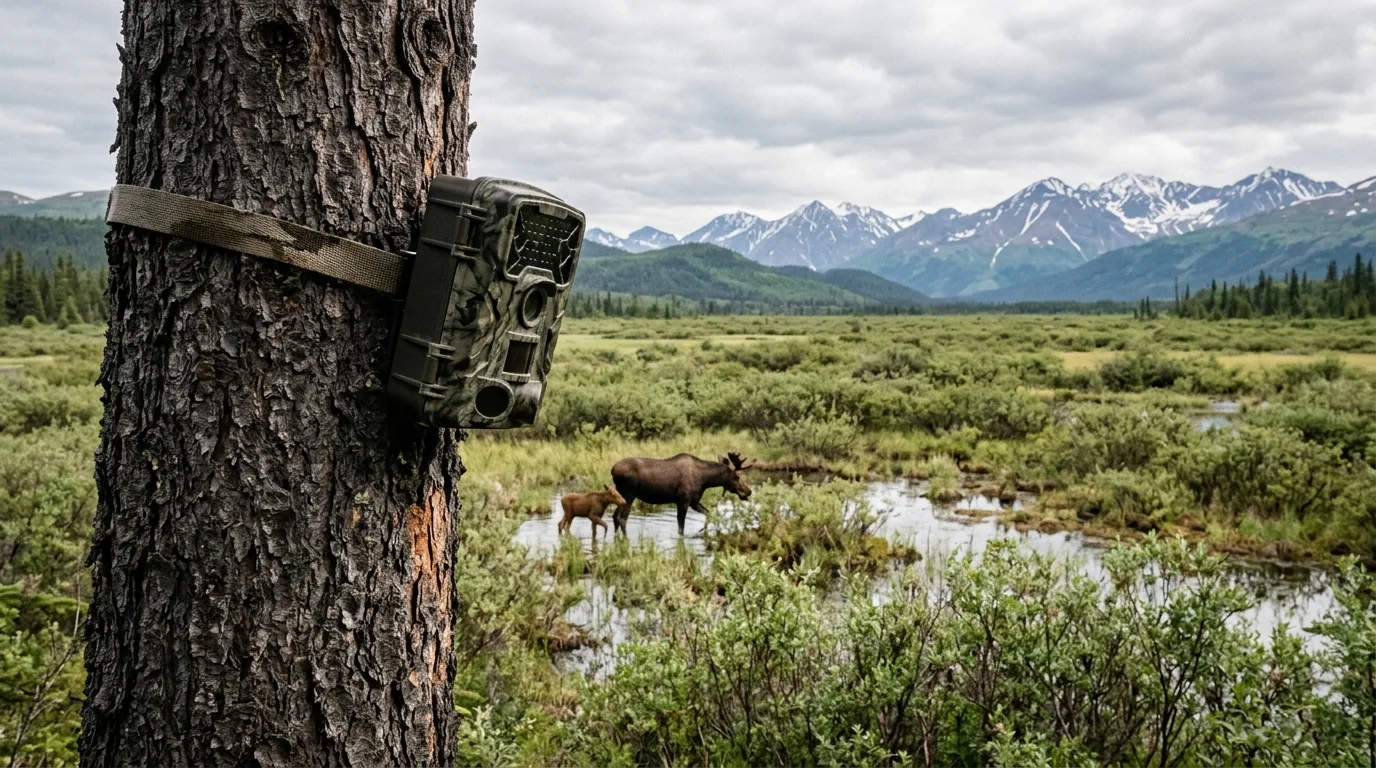
Set your camera at the height you'd use for whitetails and a bull moose will walk through the top of the frame with his legs cropped off and his rack out of shot — if the sensor even fires. The animal you're after stands almost six feet at the shoulder and weighs over half a ton. That single fact changes nearly everything about how you hang a camera for him.
So here's the short version, because it's most of the battle. Mount the camera higher than you would for deer — up where a moose's body actually is, with the lens kept roughly level rather than tilted steeply down. The research keeps landing on the same principle: detection is highest when the lens points at the animal's center of mass, and horizontal, in-line placement out-captures a steeply tilted one — and a moose's mass sits high, around chest height on a near-two-meter animal. Then put it where moose actually live and travel — willow flats, beaver ponds, mineral licks, browse lines, and real trails — feed it lithium batteries for the cold, and brace for the rut, when bulls thrash anything in reach. The rest of this is the why, plus the spots and settings that separate a card full of moose from a card full of swaying sedge.
Why moose break the deer-camera rulebook
Most of what's written about trail-camera placement is quietly optimized for a medium animal. The default advice — mount around knee height, keep the lens level — comes from work tuned to catch the widest range of species, where cameras get set "at or below knee height (~40 cm)" to grab everything from a mouse to a deer, or 30–45 cm off the ground and 3–5 m back from a trail to get full-body shots of big cats. One careful experiment that pooled a whole assemblage of body sizes found detection peaked with the camera under about 90 cm and roughly parallel to the ground. For deer, that's gospel, and it's right.
Moose are the exception that swallows the rule. In the same experiment, the largest body-size class — two people walking side by side at 160–195 cm, standing in for "wapiti, bison, and moose" — was detected well across a much wider band of heights and distances than the smaller proxies. A huge animal is simply easier to keep in the sensor's path. And the deeper principle the authors land on is the one that actually matters here: detection is highest "when cameras point at the centre body mass of target species". For a whitetail that center is low. For a bull moose it's chest-high on a six-foot frame. Run the camera at deer height and level, and the moose's body mass is sailing over the top of your detection wedge.
A huge animal is easy to detect — but only if the camera is looking where its body actually is.
This is why a moose set mounts up — but up, not steeply down. The principle the best-practice literature keeps returning to is that cameras belong "in line with an animal's mass": "if cameras are not in line with an animal's mass there will be missed captures," and horizontal cameras capture about 1.5 times as many images of the target as tilted-vertical ones. Mounting higher for a moose isn't about angling the lens down at the dirt; it's about lifting the lens up to where the animal's body mass actually is, then keeping it close to level. The one detailed moose deployment with a published rig did it differently for reasons of its own: at Isle Royale the team set every camera "1.5 m off ground angled 45 degrees towards the ground, north facing," which let them "obtain sex and age class information on moose easily while minimizing false triggers," with the height chosen because it "minimized temporary obstruction from snow and fast-growing vegetation". That steep tilt is a close-range, deep-snow compromise specific to their system — read it as one study's protocol, not the angle to copy.
Height, angle, and aim: the settings that matter
Put it together and the moose set looks meaningfully different from your deer set. Here's the working baseline, with the reasoning behind each choice.
| Setting | Deer-camera default | Moose set | Why |
|---|---|---|---|
| Mount height | ~40–50 cm (knee height) | Up at the animal's chest — far higher than a deer set | A bull stands ~1.8 m at the shoulder; lift the lens to its center of mass. |
| Lens angle | Parallel to the ground (~0°) | Roughly level, only a slight downward tilt, in line with the body | Aim at the moose's center of mass, not steeply down — horizontal/in-line placement captures ~1.5× more than a tilted one. |
| Facing | Toward the nearer pole to dodge sun | Toward the nearer pole if possible — north up north, south down south | Keeps the lens out of direct sun, reducing washed-out shots, sun-driven false triggers, and condensation. |
| Distance to target | 3–5 m back | ~5 m back | Detection "monotonically declined" once subjects were ≥6 m out; keep the lane inside that. A snow-stake set ~5 m away is a proven moose configuration. |
| Detection lane | Perpendicular to travel | Perpendicular to travel | The animal crossing the sensor's path triggers far more reliably than one walking straight at the lens. |
A few field notes that don't fit in a table. The goal is a slight downward tilt — just enough to keep a tall animal's body framed and the empty sky out of shot — not a steep angle that buries the view in the ground a meter ahead. The Alaska Department of Fish and Game's own field trick gives exactly that: jam a short "dowel-like stick behind the top of the camera" so it sits "high enough that it faces slightly downward at the target area," which both sets a gentle tilt and lifts the unit above the snow and brush that cause false fires.
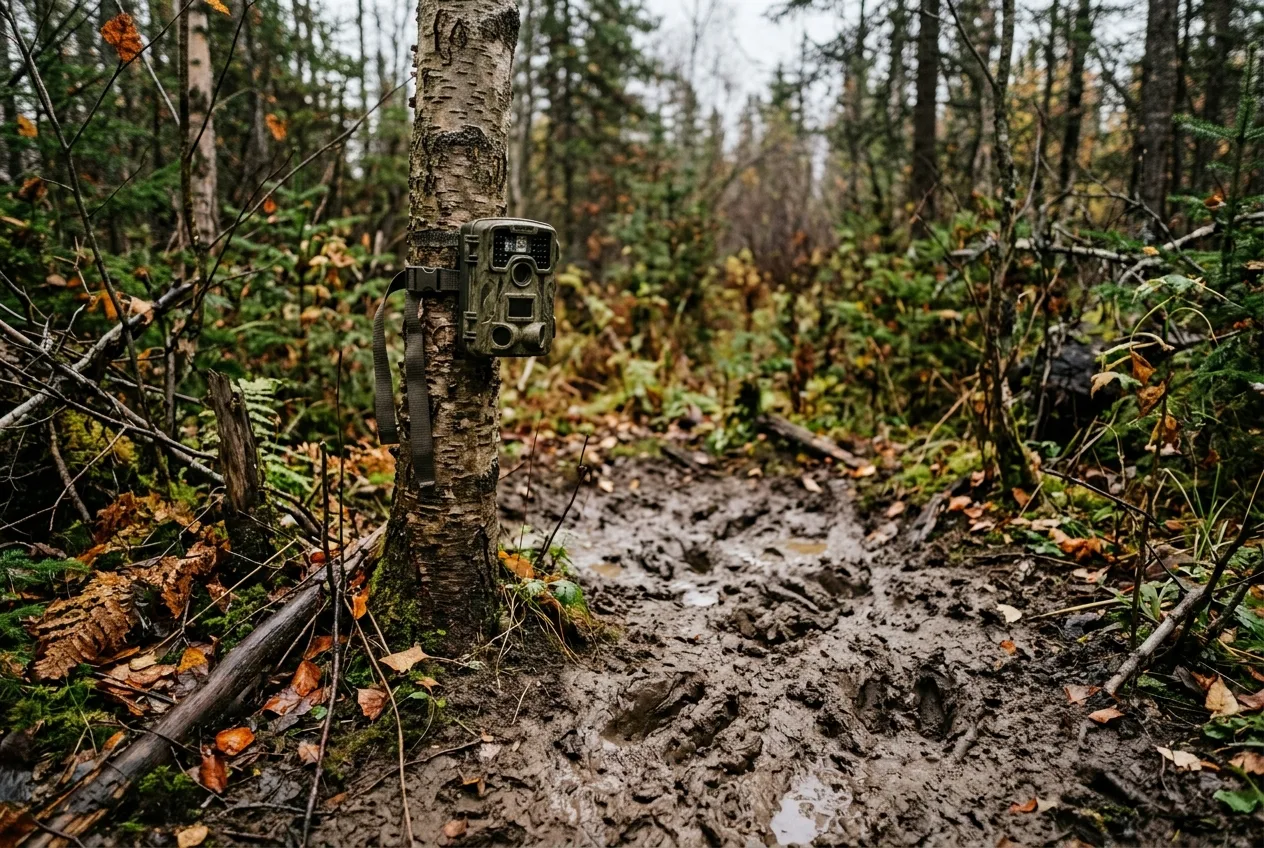
Mind your distance, too. Because detection falls off past roughly 6 m, a willow flat where moose might pass anywhere across 30 meters is a poor blind set — you want a pinch, a trail, a lick, a pond edge, something that funnels the animal through a five-meter window you've framed. And don't expect every moose to read the same. In a six-year camera study in Vermont and New Hampshire, detection probability was markedly lower for calves (0.18) than adults (0.38) — small, young animals slip through. If you're trying to document a cow-calf pair, that's an argument for a tighter, closer set on a spot they're committed to.
Past about six meters, detection falls off a cliff — so frame a funnel, not a field.
Where to set them: seven spots that actually produce
You can have the height and angle perfect and still shoot nothing if the camera's in the wrong place. Moose are a low-density, wide-ranging animal — a review of 89 studies put densities anywhere from 0.1 to 10.6 moose per km², and most estimates didn't even correct for how often moose go undetected. Translation: there's a lot of empty country between animals, so location selection is doing most of the work. These are the highest-odds sets, roughly in order of how reliable they are.
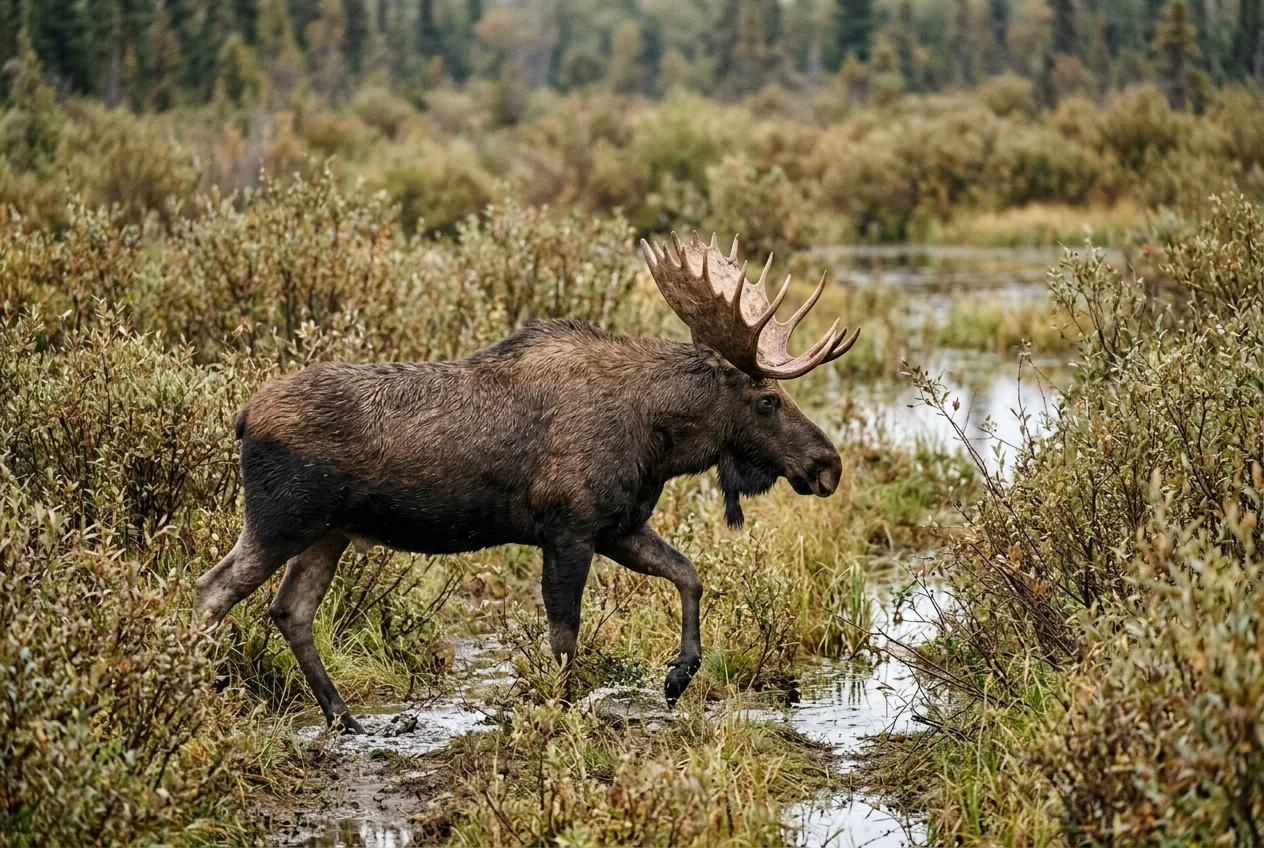
Willow flats and browse lines. If you set one camera for moose, set it on willow. In Rocky Mountain National Park, six willow species made up 91.3% of the summer diet by direct observation, with Geyer willow alone at 45.1%; park researchers put willow at about 91% of the diet overall and note a single moose can eat up to 60 pounds of vegetation a day. Moose "use riparian willow communities during the summer", and in the north they're "most abundant in recently burned areas that contain willow and birch shrubs… and along the major rivers". Look for the browse line itself — moose clip terminal shoots so heavily they "establish a hedge or browse line 6 to 8 ft (1.8–2.4 m) above the ground". That hedged, chewed-back willow is a sign you're in the right drainage, and it's a natural place to frame a lane.
Beaver ponds and wetlands. In summer, moose wade. They seek "shallow lakes, ponds and wetlands where they feed on aquatic plants for the mineral sodium," and beaver ponds are "a particularly important landscape feature, providing sunny, open expanses of shallow water with mucky bottoms" full of the plants they want. There's a real payoff driving the behavior: aquatic plants average "four times more nutrition than terrestrial plants" and are sodium-rich. A camera on a well-used pond approach or a trail between two wetlands is a strong warm-season set. (Mount it high — that water and the morning fog are exactly where condensation bites, so north-facing matters here.)
Mineral and salt licks. Licks are one of the most dependable moose magnets there is, and the timing is known. A year-long camera study at natural licks in British Columbia logged "over 1800 mineral lick visits by ungulates," visited "year-round, however, most visits were made between May and September during morning hours" — and moose were the single most frequent visitor, ahead of white-tailed deer, elk, and mule deer. The driver is sodium: an Alaska study found licks "are an important source of sodium for moose in early summer," with most lick use happening "in late evening" and bulls using them disproportionately. So a lick camera wants to be live spring through September, and you can expect peak action in the mornings and late evenings.
Of every ungulate hitting those mineral licks, moose showed up most — and you already know which mornings to expect them.
Travel trails and corridors. Putting a camera on a real trail beats random placement, and it isn't close. Across paired sets in Virginia, capture rates ran "1.7 to 9.67 times" higher on game trails and log features than at nearby random cameras, with detection-probability bumps of 11–33% for trail-using species; in India, trail cameras logged 693 tiger detections to a random camera's 4. The moose data agree — at Isle Royale, "on-trail cameras detected more moose than off-trail cameras". One honest caveat, though: that same study found on-trail sets, while they detect more animals, gave less precise bull:cow and calf:cow ratios, echoing a broader finding that trail placement can skew abundance indices. If you just want moose on camera, set the trail. If you're trying to estimate herd composition, mix in off-trail sets too.
Rut wallows and calling sites. In the fall, the rut concentrates moose and rewrites their movement. Breeding runs from roughly mid-September to early October — one long Denali study saw mating "as early as September 24" through "as late as October 8," peaking around October 1, matching the "mid-September to early October" rut window agencies report. Bulls move more and fight, and the pre-fight ritual includes "pawing the ground, thrashing their antlers against shrubs" — torn-up shrubs and pawed ground are rut sign worth a camera. Large bulls also hold groups of cows during the rut while smaller bulls roam the edges, so a spot with a cow group is a high-traffic fall set. Just know this is also when cameras die (more on that below).
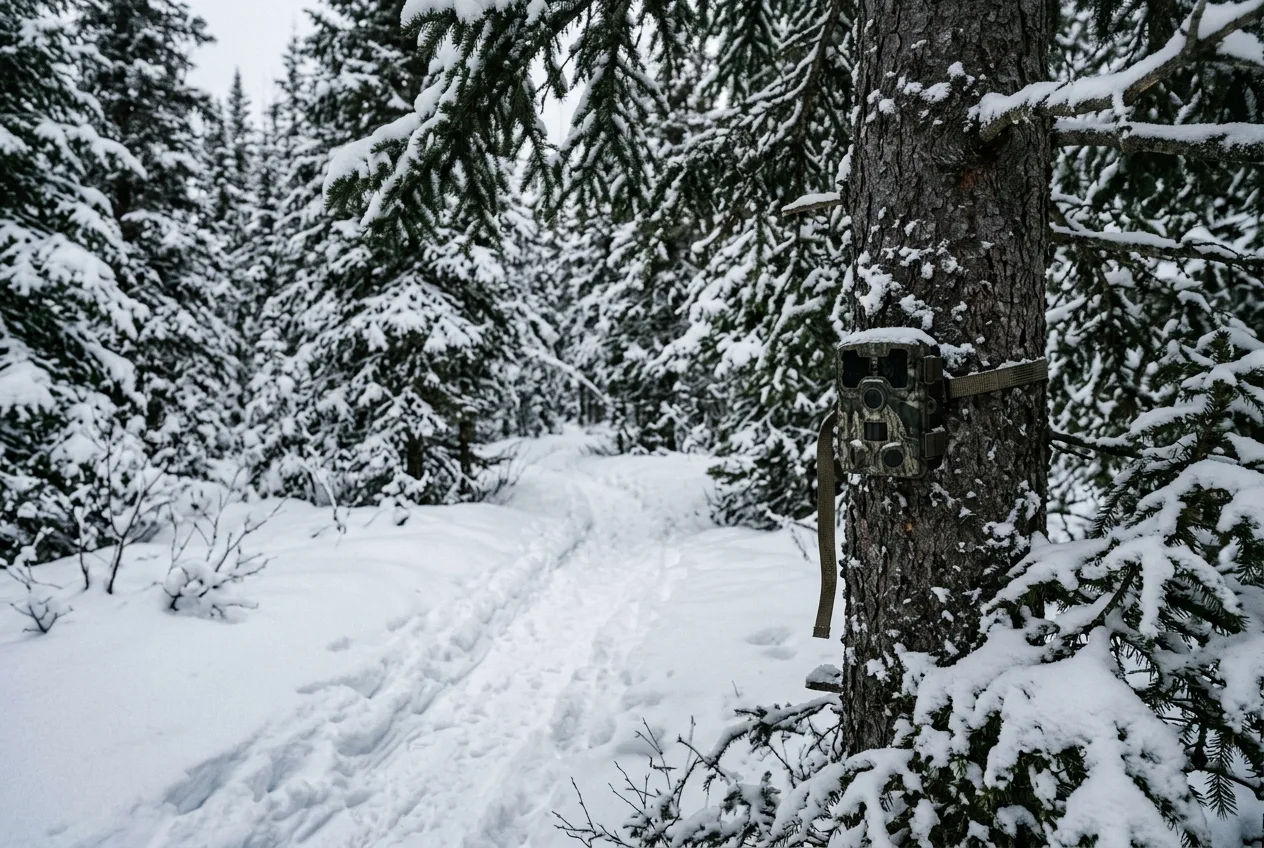
Winter yards and conifer cover. As cold sets in, moose shift. In New Hampshire, "by early winter, moose migrate from ponds and shallow lakes located in river valleys moving uphill into young forests" with woody twigs and sapling bark. Provincial surveyors fly for moose between December 1 and mid-February, after a fresh snowfall of at least 30 cm, in temperatures "colder than −5 °C when moose are more active" — that's when they're concentrated in winter cover and most countable. A camera in a winter yard or on a packed trail through conifer cover can be productive, but it's also the hardest on your gear (cold batteries, snow load), so this is a lithium-and-check-it-rarely situation.
Summer shade and water in the heat. One more seasonal wrinkle worth knowing. Moose are cold-adapted and genuinely heat-stressed at modest temperatures — the thresholds "of 14 and 20 °C are commonly used to study moose," and they "increase oxygen consumption and respiration rates between 14 and 20 °C… to reduce heat loads". They prefer summer temperatures below about 60 °F and "selected shade, indicating solar radiation affects heat stress". So on hot summer afternoons, bias toward shaded sites, conifer edges, and water — that's where the animal goes to cool off.
Detection, triggers, and flash for a big, slow animal
The good news about a moose is that it's enormous and unhurried, which is friendly to a trail camera's weakest link — trigger speed. The geometry is simple: a passive infrared sensor sees a wedge defined by a detection distance and an angle, and an animal only gets photographed if it breaks that wedge. A big-bodied animal crossing your lane breaks it easily and lingers in it, so you don't need the blistering trigger times a small, fast critter demands. What you do need is the body mass in the wedge — which loops right back to height and angle.
On flash, the question for moose is mostly "will it spook them or train them to avoid the spot?" The most relevant evidence comes from a German study on red and roe deer — the closest large-cervid analog with published flash data — across 900 deployments. Both species "were more likely to react to standard infrared than to black flash," because black (no-glow) flash "operates at a wavelength that is not visible for deer," around 940 nm versus standard IR's 850 nm. The reassuring part: "camera trapping rates of free-ranging deer did not significantly decline over time for any flash type" — no evidence the animals learned to dodge the cameras. The practical read: standard infrared is fine for simply getting moose on camera and reading sex and age; reach for no-glow (black) flash if you're skittish about disturbance or working pressured animals. White flash is the one to avoid where you can — tellingly, even this deer study couldn't put a number on it, because its "trigger delays prevented comparisons to white flash".
The moose is big and slow — kind to your trigger speed. Get its chest in the sensor's wedge and the camera does the rest.
A note on photo-versus-video and recovery time. A bull working a wallow or a cow feeding through a willow patch will be in frame for a while, so video or a multi-shot burst earns its keep here — but mind the recovery lag, especially with brighter flashes, and especially in the cold, where every flash drains a chilled battery faster.
Cold-weather power, condensation, and a card full of moose
Moose country is cold, and cold is where camera setups quietly fail. Battery chemistry is the whole game. Lithium cells start around 1.85 V and keep "performing as normal down to −15 °C"; alkalines start lower at 1.7 V and "can only output one fifth of their power below 5 °C". Since trail cameras typically need at least 1.5 V per cell to fire the night IR, a half-dead alkaline in January won't light the LEDs even if the camera "turns on". Lithium also carries more capacity — around 2900 mAh against a 2500 mAh minimum to power the LEDs at night — which buys you longer detection range, faster response, and brighter IR. For any cold-season moose set, run lithium. It's not a nicety; it's the difference between footage and a black frame.
Condensation is the other winter gremlin. An Alaska technician running cameras through hard freezes described "getting a little water in the cases, even with desiccant packages in there," and pinned it on "condensation because of the temperature changes between really cold nights and then sitting in direct sunlight during the day". His fix is the same pole-facing rule that helps with sun glare and false triggers — point the lens away from the midday sun, which means north up here in the northern hemisphere but south for readers below the equator: "Face it north, if possible," he says. Toss fresh desiccant in at every check, and keep the camera out of the day's direct sun.
Here's where the sheer volume becomes its own problem. A moose set on a good lick or willow lane will pile up images — agencies run this at a scale that's hard to picture, with one Maine moose-monitoring release alone containing 320,104 media files from autonomous cameras. Even your single card, after a rut on a pond edge with wind moving the sedge, can be thousands of frames to thumb through, hunting for the bull. That's the unglamorous tax on a productive set.
Durability: the rut, the weather, and the thieves
Plan to lose cameras to moose — and to people. The rut is brutal on gear. Bulls weighing up to 1,600 pounds, with neck muscles that "expand to twice their normal size," paw the ground and thrash their antlers against shrubs as part of their fighting display, and their clashes are "extraordinarily violent". A camera strapped to a sapling at a rut site is squarely in the line of fire. Mount to something solid, keep the unit out of obvious antler-height reach where you can, and accept that a fall-active bull may relocate your camera for you.
Then there's theft, which is bigger than most people assume. An international survey of 407 camera-trap practitioners found equipment losses of roughly USD $1.48 million between 2010 and 2015, with another ~$800,000 spent just trying to prevent theft. The countermeasures people actually use are camouflaging (73%), security chains (63%), and lockboxes (43%). One tempting trick — mounting high to put the camera out of reach — comes with a catch the same researchers flagged: when they placed cameras higher in trees (3 m) to beat thieves, people stopped finding them, but "detection rates of the target mammal species suffered, making this solution unviable". That's the tension in a nutshell. For moose you already mount higher than for deer, which helps a little, but you can't keep climbing without losing the animal — so for a real theft-prone spot, a steel lockbox and a cable through something immovable beats height. A camera that comes home is worth more than the perfect angle on one that doesn't.
Frequently asked questions
How high should I mount a trail camera for moose?
Higher than for deer — up at the animal's chest rather than down at knee height, with the lens kept roughly level (in line with its body mass), not steeply tilted. A bull stands roughly 1.8 m at the shoulder, so a low "deer height" set aims under him.
Where's the best place to put a moose camera?
On the food and water first: willow and riparian browse, which can be ~91% of the summer diet; beaver ponds and wetlands where moose feed on sodium-rich aquatics in summer; and mineral licks, where moose were the top visitor in a year-long camera study, mostly May–September in the mornings. Real travel trails beat random spots by a wide margin.
What batteries work best for moose cameras in winter?
Lithium. They hold up "down to −15 °C" and start at ~1.85 V, while alkalines fall to about a fifth of their output below 5 °C and may not power the night IR at all. In moose country's cold, lithium is the difference between footage and a black frame.
Will the camera flash scare moose away?
Probably not enough to matter. In the closest study — red and roe deer over 900 deployments — capture rates "did not significantly decline over time for any flash type," though the animals reacted more to standard infrared than to invisible black (no-glow) flash. Use no-glow if you're worried about disturbance; white flash is the higher-risk choice — so much so that this study couldn't even measure it, since "trigger delays prevented comparisons to white flash".
When should I run cameras for the moose rut?
Mid-September to early October. A long Denali study recorded breeding from "as early as September 24" to "as late as October 8," peaking around October 1; agencies cite a mid-September-to-early-October rut. Expect bulls to move more and to thrash shrubs and paw the ground — and expect more wear on your gear.
Do moose use the same spots all year?
No — they shift with the season, which should move your cameras. Summer means willow, wetlands, and shade (they're heat-stressed by 14–20 °C); the fall rut concentrates them at calling and fighting sites; and "by early winter, moose migrate from ponds and shallow lakes… uphill into young forests" and winter cover.