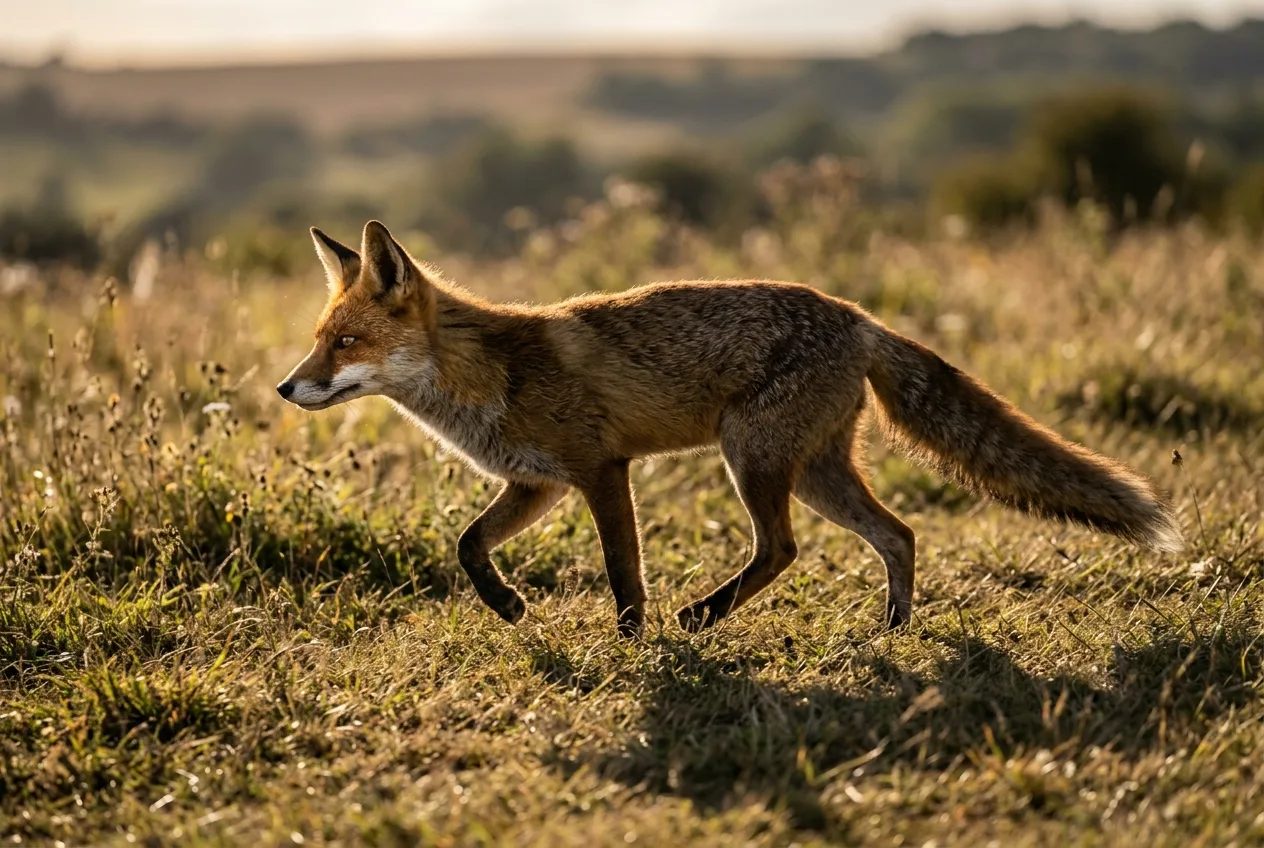
Here is the thing almost nobody tells you when you start: the animal is the easy part. You can have a once-in-a-season encounter with a fox in perfect cover, fire off three hundred frames, and come home with three hundred flat, gray pictures — because the light was wrong, or because you were standing in the wrong relationship to it. Light is the whole game. As wildlife photographer Kevin Morgans puts it, "A camera is just a tool; light is what can transform an image into something truly breathtaking". Learn to read it, and an ordinary subject in good light beats a rare subject in bad light every time.
So let's front-load the answer to what is the best light for wildlife photos, because you can act on it tomorrow morning. Shoot when the sun is low — soon after sunrise and before sunset — because that low-angle light is warm, soft, and reaches the animal's face and eyes. Then think about direction: keep the sun behind you (front light) for clean, well-lit detail and a catchlight in the eye; let it rake across your subject (side light) for texture and drama on big animals; or put it in front of you, behind the subject (backlight), for a glowing rim and the most atmospheric images of all. When the sun is high and harsh, or the contrast is brutal, go looking for overcast — soft, diffused light is often better, not a consolation prize. And carry one exposure habit with you: your camera meters for an average gray scene, so backlit and bright-sky subjects fool it into silhouettes unless you take charge with exposure compensation. The rest of this guide is the why and the how behind each of those moves.
Why low sun is warm light, and high sun is hard light
Before the craft, the physics — because it explains every piece of timing advice that follows, and it's the same in any hemisphere and any season.
Sunlight looks white, but it's the whole rainbow mixed together: a spectrum running from red at about 700 nanometers down to violet at about 400 nanometers. When that light hits Earth's atmosphere, the air molecules scatter it — and they scatter the short blue and violet wavelengths far more than the long red ones. That's Rayleigh scattering, named for Lord Rayleigh, "who first described it in the 1870's", and it's why the daytime sky is blue: the blue light is bounced all over the sky while the rest passes through. (It's blue and not violet only because our eyes are more sensitive to blue, and the sun emits more blue than violet.)
Now drop the sun toward the horizon. As the Royal Observatory Greenwich explains it, "When the Sun is low in the sky during sunrise and sunset, the light has to travel further through the Earth's atmosphere. We don't see the blue light because it gets scattered away, but the red light isn't scattered very much — so the sky appears red". NASA puts the consequence for your subject plainly: "Even more of the blue light is scattered, allowing the reds and yellows to pass straight through to your eyes". That is golden-hour light — not a filter or a mood, but the literal removal of the blue half of the spectrum by a longer trip through the air.
This is also why the warm window is a function of sun angle, not the calendar. Wildlife photographer Ben Hall notes that "in winter the sun's arc is lower, resulting in an extended period of warm, rich light," which is exactly why a winter day can stay golden far longer than a summer one. Wherever you are, the rule is the same: the lower the sun, the warmer and softer the light; the higher it climbs, the whiter and harder it gets. At noon the sun's light "travels a shorter distance through the atmosphere," scatters very little, and arrives close to neutral white — and from straight overhead.
One more thing worth knowing, because it changes which evenings are worth chasing: aerosols intensify the effect. The same dust, smoke, and haze that signal poor air quality also scatter away more blue, so "when there are more aerosols in the atmosphere, more sunlight is scattered, resulting in more colorful skies". A sunset after a passing storm or with haze on the horizon will often be the richest one of the week.
Warm light is simply low light: the lower the sun, the more atmosphere its rays cross, and the more of the blue half of the spectrum gets stripped away before it reaches your subject.
Color temperature, in plain terms
Photographers measure the warmth or coolness of light in kelvin (K), and the scale is famously backwards from how we talk about "warm" and "cool." Low numbers are the warm, orange end; high numbers are the cool, blue end. As Cambridge in Colour's Sean McHugh says, "As the color temperature rises, the color distribution becomes cooler" — counterintuitive, but it falls straight out of the physics, since shorter wavelengths carry higher energy.
A black metal pot makes the idea concrete. Heat it and "when a metal pot is first heated to a temperature of about 900 K, it begins to glow a dull red," shifting through yellow-red by 1500–2000 K, to "yellow-white" above 3000 K, and finally to "a bluish-white color" at 5000 K and above. Daylight sits in the middle. Here's the working table to keep in your head:
| Light source | Color temperature |
|---|---|
| Candlelight | 1000–2000 K |
| Sunrise / sunset (clear sky) | 3000–4000 K |
| Electronic flash | 5000–5500 K |
| Daylight, clear sky, sun overhead | 5000–6500 K |
| Moderately overcast sky | 6500–8000 K |
| Shade or heavily overcast sky | 9000–10000 K |
(Source: Cambridge in Colour.)
Two practical things fall out of that table. First, golden-hour light measures "in the region of 3,000 degrees Kelvin," which is why it renders warm and rich — and why daylight film was balanced for 5500 K, so that "in the early morning and late evening, when the color temperature falls to 5000 K and below," images take on "a warmer, redder color rendering". Second, shade and overcast are genuinely cooler (higher K) than direct sun, which is why an animal sitting in shade can pick up a blue cast.
What do you do about it? You set white balance. Ben Hall's approach during golden hour is deliberately to keep the warmth: "I usually switch to a cloudy white balance when shooting during the golden hour. This setting enhances the warmth in the light and will bring the colours to life." His warning is the important part — leave the camera on auto white balance and "the camera will partially 'correct' for the warm hues and the beautiful quality of the golden hour often becomes lost". The opposite problem shows up in shade: Samuel Cox notes that an animal in shade "may give a blue tone to your subject," which you counteract by "adding more warmth" in your white balance. The escape hatch for both is to shoot raw, which lets you set white balance after the fact "without any detrimental effects to your image".
Leave the camera on auto white balance during golden hour and it quietly cancels the very warmth you got up early for.
Direction is the decision that matters most
Time of day gets you good light. Direction — where the sun sits relative to you and the animal — is what turns good light into a particular kind of picture. There are three directions worth naming, and the old beginner's rule covers only one of them.
Front light: the safe, revealing choice
"When you first start learning wildlife photography a rule that you will hear often is to keep the sun at your back," writes Ray Hennessy — and it's a good default. With the sun behind you, the animal's face is fully lit. Mark Hamblin spells out the payoff: low front light puts "much more light in the subject's face, providing a catchlight in the eye and revealing the character of the animal". It's also the most forgiving light to expose. As Ben Hall describes it, front light "will illuminate your subject evenly, revealing detail and reducing the risk of unwanted shadows," needing exposure tweaks "only if there are predominantly pale or dark tones in the scene". If you want a clean, detailed portrait and you're still building your eye for light, this is where to start.
Side light: texture and drama, with a catch
Turn so the light rakes across the animal from the side and you trade even illumination for shape and texture. Side light "illuminates the subject on one side with the opposite side in deep shadow, which creates high contrast images," Hamblin explains. His honest caveat is the one to remember: with large animals "this can actually be very effective, especially when taking close-up portraits, but for small to mid-sized subjects it is unflattering and generally doesn't produce an attractive photograph". Side light is a scalpel — wonderful on a bison or a stag, often too harsh on a warbler. Used with intent and a little underexposure, those long shadows become a creative tool for "a low-key style and producing images that are full of atmosphere and mood".
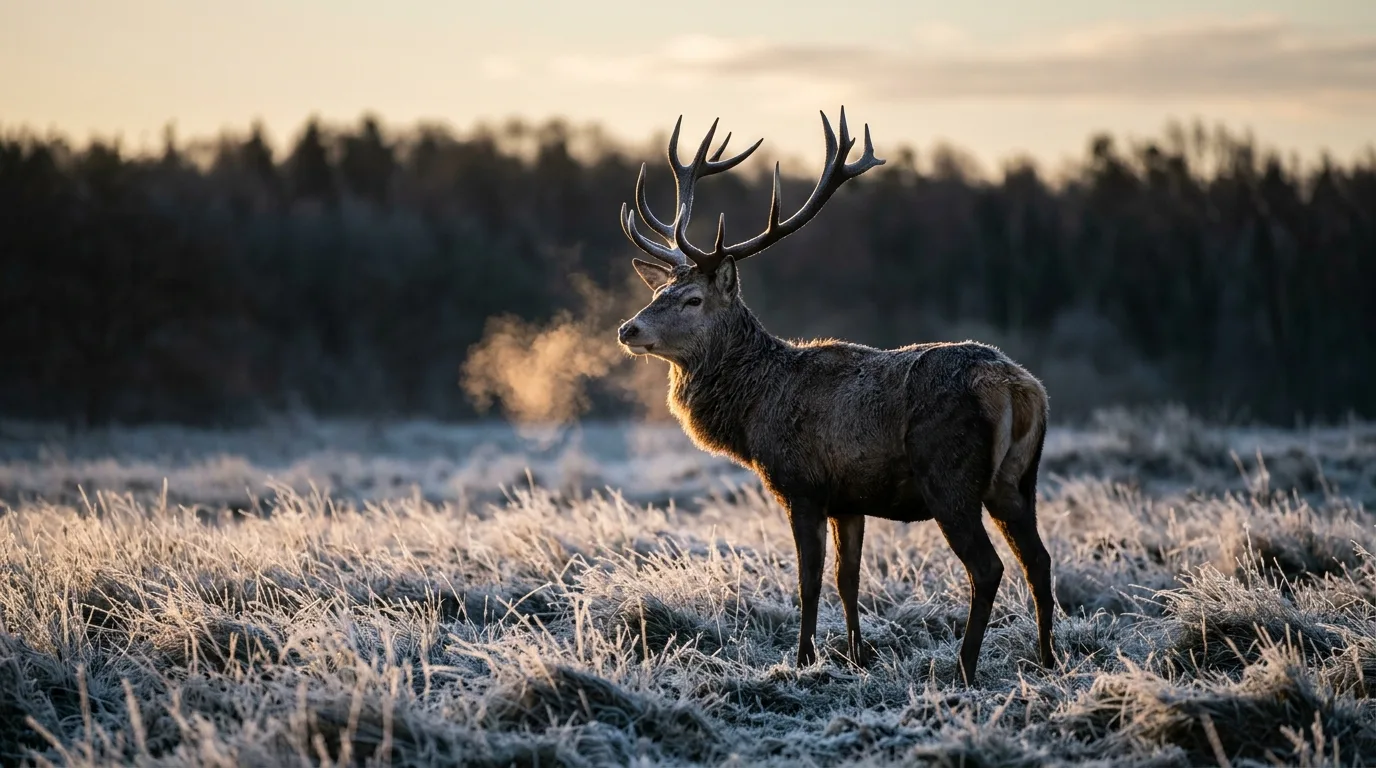
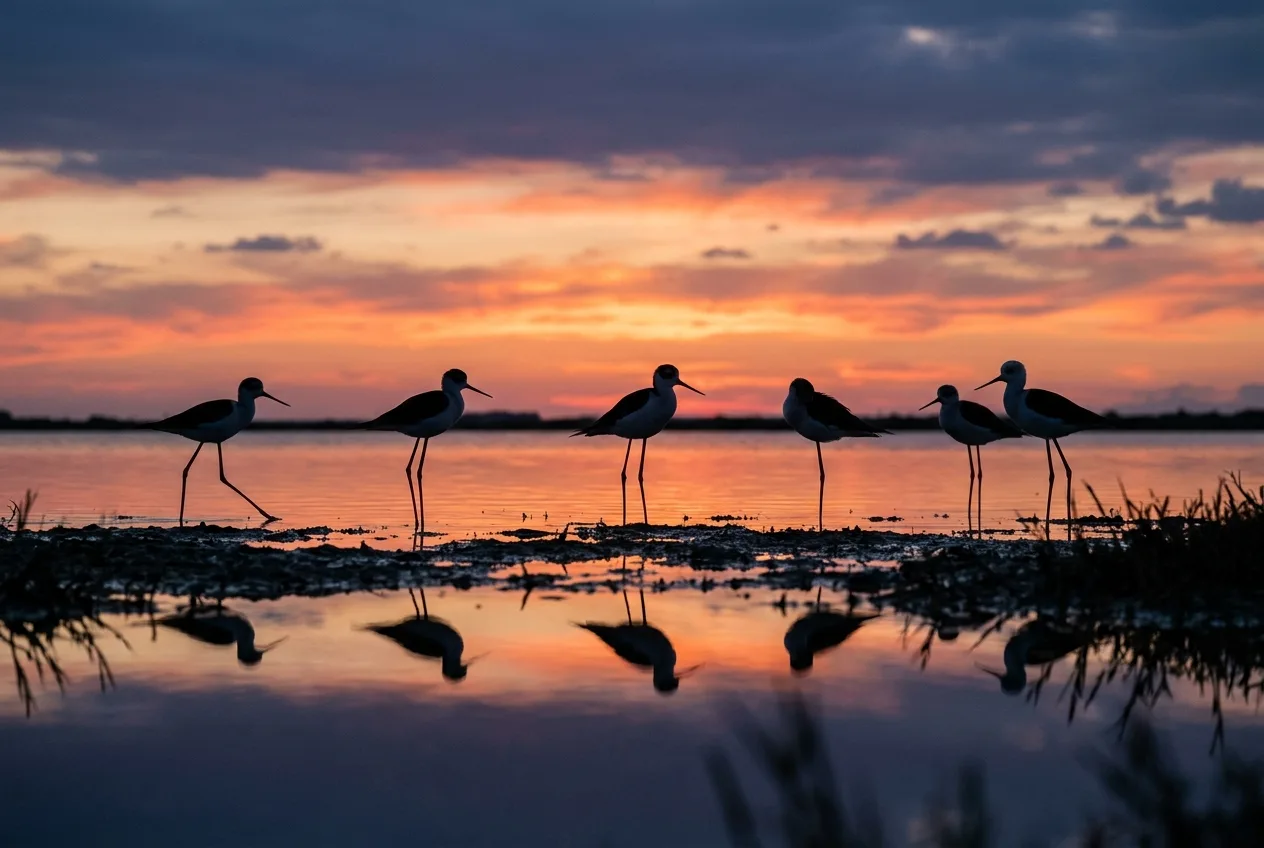
Back light: the most dramatic light there is
Now do the thing the beginner's rule warns against and put the sun in front of you, behind the animal. Morgans defines it simply: backlighting is "when the sun is in front of you, lighting the back of your subject". Hamblin calls it "a form of lighting that can create the most dramatic wildlife images of all". The signature effect is a halo — "rim lighting" — that Hall describes as "the halo of light that appears around the outline of the subject during backlit conditions," a way of "highlighting shape and form". It works best on the right subjects: backlight is "most effective with subjects such as mammals that have long hairy coats, as the backlighting emphasises their outline, or for birds in flight with semi-translucent wing feathers," where the light burns through and the feathers go "almost translucent".
Backlight is also a timing-and-weather discipline. Hennessy is specific about the window: "Generally speaking there is a very short window when this works best which is the first or last 30 minutes or so of sun," and "it also requires a clear day with bright sun to work best". Shoot into a high midday sun and the angle is wrong — "the light is coming from a high angle which will not create the effect we are after". Two field notes from the people who do this a lot: shoot against a dark background so the rim stands out, and expect lens flare when you point into the sun — a lens hood helps, and "you will need to position yourself slightly off-centre to eliminate the flare," though Morgans is happy to "embrace the flare and use it creatively" when he's stuck in a fixed position.
There's a quieter reason direction matters, and it lives in the eye. A catchlight — "the light reflection of something bright in the eye of an animal" — is, as Court Whelan puts it, the "spark" that "adds depth and really connects the viewer with the animal" and "can quickly turn a good photo into a great one". Front light and bright open sky produce it naturally; deep shade or hard backlight can leave the eye dark and lifeless. You don't need flash for it — "we wildlife photographers have one of the brightest light sources available to us already — the sky!" The move is patience: wait for the moment "when an animal tilts its head in just the right direction (often glancing to the side or up) such that the bright sky or sun reflects in its eye," and "think of the eye as a mirror, reflecting that light back to you".
A catchlight is the difference between a portrait that looks at you and one that looks past you.
When overcast beats sunshine
It is tempting to treat a cloudy forecast as a write-off. Don't. Diffused light solves the single biggest problem bright sun creates — extreme contrast — and for whole categories of subject it's the better light, full stop.
The mechanism is dynamic range. Overcast light, Hamblin explains, "lowers the dynamic range allowing you [to] capture detail in both the brightest and darkest parts of the subject." His example is the one every seabird photographer knows: try to shoot black-and-white plumage in bright sun and "it is easy to burn out the white plumage or conversely lose detail completely in the dark feathers," whereas on an overcast day "all of the detail can easily be recorded and the results are far superior". Anything very pale or very dark — a swan, a magpie, a puffin — is usually easier in soft light.
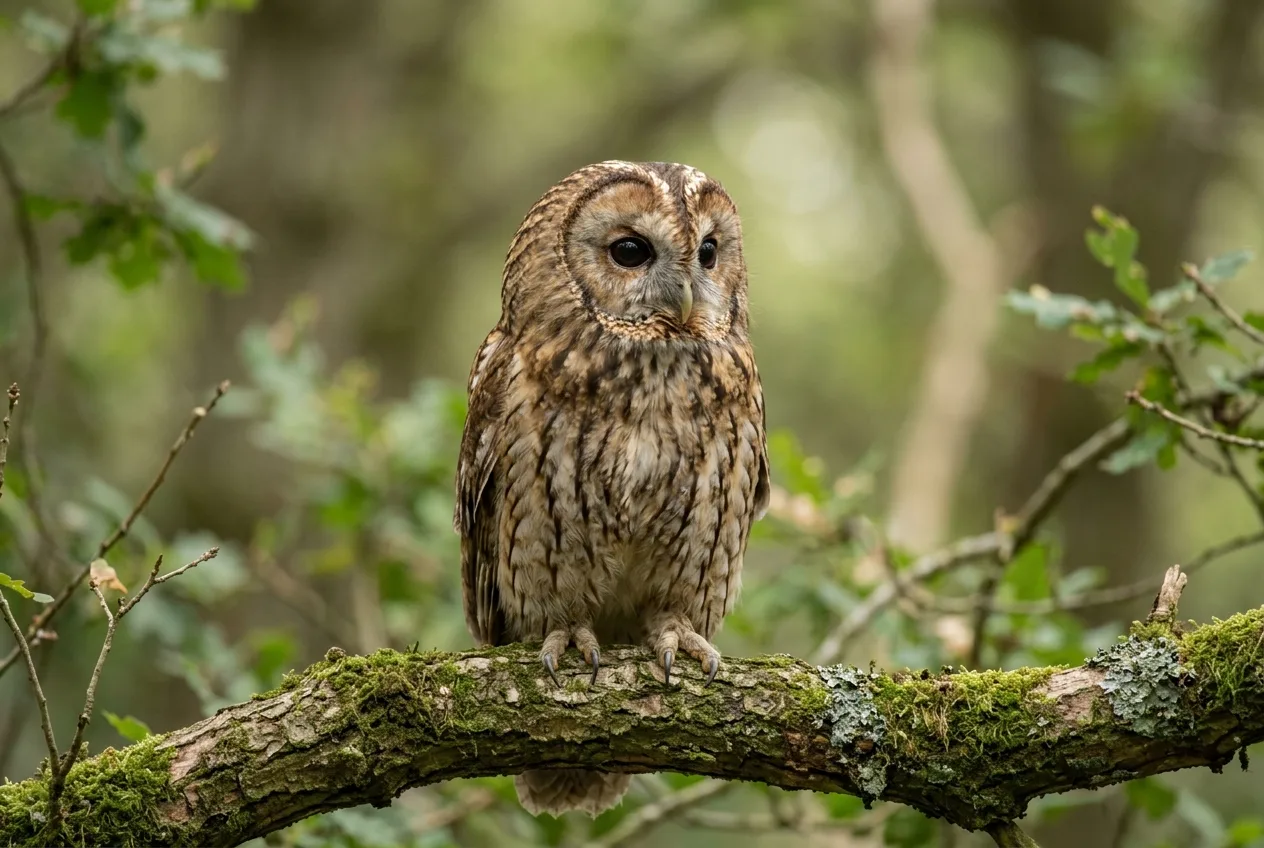
Hennessy's verdict, after changing his own mind over the years, is that "the short answer is that it depends on the location and subject" — and he draws the line by habitat. In forest and dense cover, overcast wins, for three reasons he lays out clearly: the "lack of heavy shadows" means no harsh shadows or "bright sunny spots either on the subject or in the background"; the light "generally stays the same all day," so you can shoot for "4–5 hours and still have usable light" instead of losing it "an hour or two after sunrise"; and the color improves, with "all the leaves of the forest" taking on "a soft saturated green that usually makes a colorful bird stand out".
But in the open, the call flips. "When photographing shorebirds on an open beach overcast light becomes very dull, flat and lacking contrast," Hennessy writes; out there, "sun is the light for me," because "those first 30–60 minutes of morning sun" deliver a "wonderful warm glow" and let you "use shadows to our advantage" to add dimension and separate the subject. The National Park Service's beginner's guide reaches the same split in plainer language: overcast makes light "much softer" and helps you "avoid the risk of overexposure," but "a lack of light makes it more difficult to capture motion shots of wildlife". So the working rule is by habitat, not by forecast: forest and high-contrast plumage lean overcast; open habitat and warmth lean low sun.
And midday sun? Mostly, wait it out. Hamblin's summary is blunt — "midday sunlight can be harsh leading to unflattering shadows and hot spots" — and the U.S. Fish & Wildlife Service's Matt Poole agrees that "midday is not a great time for photos because the overhead sun creates harsh shadows". If you're stuck shooting in the middle of a bright day, the move is to seek out diffusion: thin cloud over the sun, open shade, or simply a subject that isn't half in glare and half in shadow.
Overcast isn't the day light failed you — for a subject in forest cover or a bird in black-and-white plumage, it is often the better light.
Exposing for hard light: backlight, silhouettes, and the meter that lies
You can read the light perfectly and still come home with a black animal against a glowing sky, because your camera's light meter has one fixed assumption that breaks in exactly these conditions. It's worth understanding so you can override it deliberately.
Every in-camera meter "can only measure reflected light," and to make sense of that it assumes the scene averages out to a middle gray — "somewhere between 10-18% reflectance". Point it at a scene that's mostly bright sky, or a subject lit from behind, and the average is off: the meter "will incorrectly calculate" the exposure, darkening the whole frame to drag that bright background back toward gray and turning your subject into "an under-exposed silhouette against the bright background". The fix is exposure compensation — telling the camera to deviate from what it metered, in stops, where "each stop provides either a doubling or halving of light".
That gives you a clean way to handle the two backlit outcomes you'll actually want.
For a rim-lit subject with a glowing edge but visible detail, you push exposure up and watch the highlights. Shooting against a bright sky, Hall plans to "increase the exposure by up to two stops to prevent underexposure," checking the histogram constantly because "the exact amount of exposure compensation will depend entirely on the tones in the scene". If instead you want the rim itself to be the whole picture — subject in shadow, only the glowing outline showing — Morgans goes the other way: "dial in some negative exposure compensation. Try starting with -2 and adjust until only the rim lighting is visible". Same scene, opposite compensation, two completely different images — that's the control exposure compensation buys you.
For a clean silhouette, you commit to the dark subject. The recipe is consistent across the pros: put the light directly behind the subject and "expose for the brightest part of the image," which underexposes the subject into a black cut-out. Hall's version is to "take a reading from the brightest area of the sky" and lock it, so "the subject should naturally fall into silhouette due to underexposure," and to shoot "slightly upwards" from below to put the full shape against the bright background. The composition matters as much as the exposure: a strong silhouette, Cox notes, "is formed when the subject is clear from distractions, in the open, and perfectly side on to the camera," with an instantly recognizable shape — a stag's antlers, a heron's neck.
A few habits make low and tricky light survivable:
- Meter mode: Cox recommends "Evaluative / Matrix metering... for a more balanced exposure across the whole of your image, whilst giving a slight priority to where you're focusing". For a small backlit subject, spot or partial metering off the subject itself is the classic rescue — it's the standard fix for "a portrait of someone who is back-lit," metering "off their face" to avoid the silhouette.
- Protect the shutter, accept the noise. In dim light, "it's always important to prioritise your shutter speed over your ISO — a clean and noise-free image isn't much good if everything is blurred, whilst noise we can deal with".
- Expose for the mid-tones when a subject sits in shade ringed by harsh light, "as this is where detail lives," and lift the rest later.
- Shoot raw and trust the histogram, not the rear screen. Modern cameras have "extraordinary dynamic range," and "a slightly over / under-exposed image is easy to fix" — but a blown highlight is gone, so a slight negative compensation (around 0.3–0.5 stop) is cheap insurance in raw.
A note on the blue hour. Keep shooting after the sun is gone. That's when "the light transitions from the golden hour into the blue hour," which "can be perfect for capturing images with a serene and peaceful quality". If you want to know exactly how much usable light remains, the precise definition comes from the National Weather Service: civil twilight runs until "the geometric center of the sun is 6 degrees below the horizon," and during it "the brightest stars and planets can be seen, the horizon and terrestrial objects can be discerned, and in many cases, artificial lighting is not needed" — roughly the photographer's blue hour. Past that, nautical (12°) and astronomical (18°) twilight grow too dark for detailed work without artificial light.
Atmosphere: fog, mist, and steam
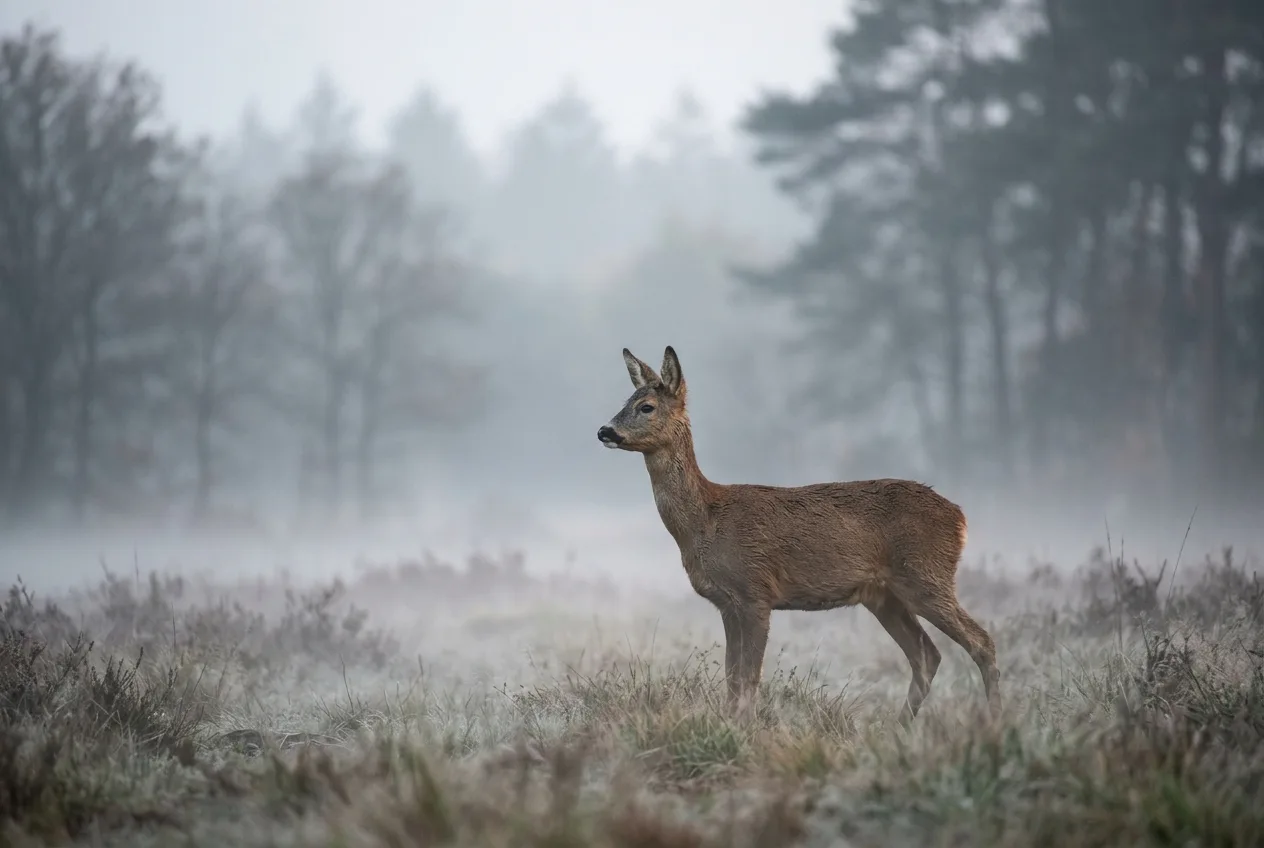
The most evocative wildlife images often have something in the air — mist on the water, fog in the trees, breath or steam catching the light. The physics is the same scattering that warms a sunset: more particles in the air mean more scattered light and more mood. When low sun rakes through it, you get backlit atmosphere. The National Park Service's Yellowstone guide captures the effect exactly: "As the mid-summer sun drops in the sky, it backlights the steaming hot springs and geysers," and a "misty dawn" over water is prime time for the silhouettes and rim light above.
You can plan for mist. Hall's tip: on "the morning following a cold, clear night, head to your local park lake; there's a good chance that as the sun rises, there will be mist clinging to the water," and "a dark background will help the mist to become more visible". Then it's the backlight playbook — low sun behind the subject, expose for the bright mist, shoot from a low angle, and let the animal go to silhouette or rim against the glow. There's no single magic setting here; the move is to recognize the conditions and apply the directional and exposure craft you already have.
The best light and the best behavior tend to arrive at the same hour — your job is to be standing in the right place when they do.
Planning around the sun — and the animal
All of this only pays off if you and the animal and the light are in the same place at the same time. Two kinds of planning get you there.
Planning the light means knowing where the sun will be and putting yourself on the correct side of the subject before the moment arrives. The reason it's hard for wildlife — and easy for landscapes — is that the land doesn't move. For landscapes "the position and time that the sun will rise can be predetermined," so you can place yourself precisely; with wildlife "there are other factors involved," but "the decision of what time of day you choose to photograph and in what lighting conditions remains your own". Decide in advance whether you're after front light, side light, or backlight, and that decision tells you where to stand relative to the low sun and the spot the animal is likely to be. Paul Bannick's reminder is that the obvious position isn't the only one: photographers "tend to position ourselves with the sun at our backs, and assume that the bird has a 'given background,'" and "as a result, we often miss the best shots" — changing your angle changes the background entirely, swapping a tangle of branches for "brooding dark-blue storm clouds" or "a warm blanket of gold".
Planning the animal is the other half, and the happy accident of this whole topic is that the two often coincide. The best light arrives exactly when many animals are most active. "Many subjects, especially mammals, are most active at dawn and dusk," Hamblin notes, "so photographing at either end of the day is beneficial not only for capturing the best light but also increasing your chances that your subject will be active". The agencies say the same in one line — "time your outing when wildlife is most active: ideally dawn or dusk" — and Bannick's version is the one to internalize: "The magical light just after sunrise and just before sunset is when color looks its best, shadows are farther from subjects, and birds are most active". Arrive early, stay late, and let the predictable patterns bring the animal into your light rather than chasing it through bad light.
This is the one spot where a camera doing the watching for you genuinely helps. If you can learn when a particular animal actually moves through a particular spot — not in general, but on your ground — you can be standing there, in position, when the low sun and the animal coincide instead of guessing.
A last word on ethics, because the best light is also when animals are doing the things you don't want to interrupt. Every agency source draws the same bright line: keep your distance and never push an animal for a shot. Parks Canada's test is the cleanest — "if your presence causes them to move, you are too close" — and it pairs that with real distances (at least 30 m from large animals like deer and elk, 100 m from bears and wolves) and a flat ban on drones. The Park Service echoes it: "if you cause an animal to move, you're too close," and "never approach or pursue an animal to take its picture" — use the telephoto instead. Good light is a reason to be patient, not a reason to crowd.
Frequently asked questions
What is the best time of day for wildlife photography?
Soon after sunrise and in the hour or so before sunset — the "golden hour." The low sun is warm and soft, shadows are gentler, and many mammals and birds are most active then, so you get the best light and the most behavior at once. Midday's high, hard sun "creates harsh shadows" and is usually worth waiting out.
Why is golden hour light warm?
Because when the sun is low, its light travels through much more atmosphere, which scatters away the short blue wavelengths and lets the reds and yellows "pass straight through to your eyes". That warm light measures around 3,000 K, versus roughly 5,000–6,500 K for midday daylight. It's a function of sun angle, so a low winter sun stays warm far longer than a high summer one.
How do you photograph a backlit animal without getting a silhouette?
Take charge of exposure, because the meter will underexpose a bright-background scene by default. To keep detail with a glowing rim, increase exposure up to about two stops and watch the histogram for blown highlights; metering (spot or partial) off the subject itself also helps. If you actually want the silhouette, do the opposite — expose for the brightest part of the sky so the subject goes dark.
Is overcast light good or bad for wildlife photography?
Often good. Soft, diffused light lowers contrast and lets you hold detail in both very pale and very dark subjects, which is why it's preferred in forest and for high-contrast plumage like seabirds. In open habitats it can look "dull, flat and lacking contrast," where low-angle sun and its shadows add dimension instead. The downside is less light for freezing motion.
What is a catchlight and how do I get one?
A catchlight is a reflection of a bright light source — usually the open sky — in the animal's eye, and it's the "spark" that makes a portrait feel alive. You rarely need flash: keep the sky as your light source, shoot with light on the face (front light helps), and wait for the animal to tilt its head up or to the side so the sky reflects in its eye.
What white balance should I use during golden hour?
A "cloudy" white balance is a good starting point because it preserves the warm tones; auto white balance tends to neutralize the warmth you came for. For animals sitting in cool shade, warm the white balance up to counter the blue cast. Best of all, shoot raw so you can set white balance precisely afterward with no quality loss.