
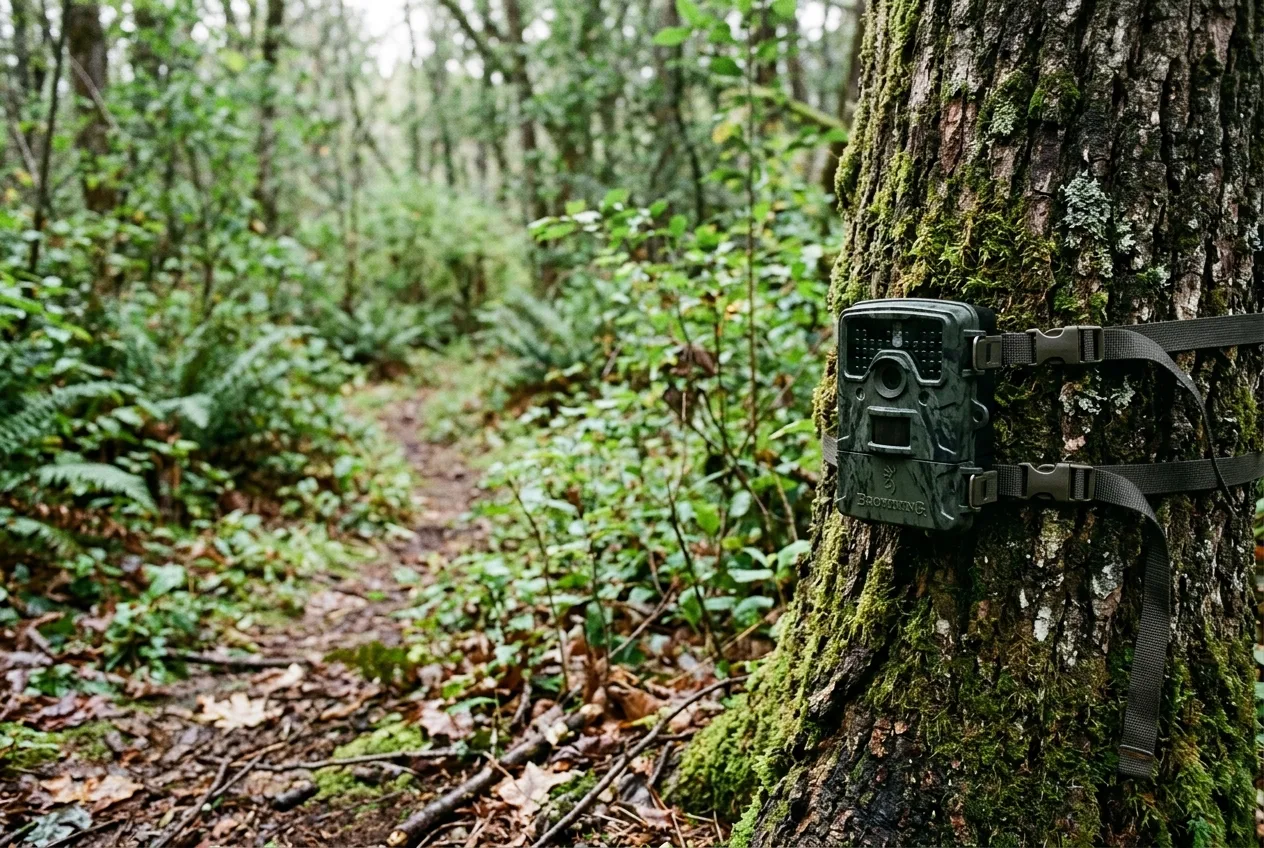
Somewhere on your SD card is a frame that matters to science. Not the 1,400 shots of waving grass and one curious raccoon's tail — the good one: the otter on the creek bank at 3 a.m., the bobcat you never see in daylight, the species your county has barely any records for. A camera left along a wildlife trail does its "observing" while you sleep, and some of the best mammal records out there exist almost entirely because of trail cameras — many nocturnal animals are documented this way and almost no other.
The catch is that a photo sitting on your card is invisible to everyone but you. To contribute trail camera photos to research, you have to get them somewhere a scientist can actually use them — and do it in a way that doesn't accidentally point a poacher at a den or bury a researcher under thousands of empty frames. That's the whole job, and it's more learnable than it looks.
There are really two front doors into wildlife camera citizen science, and they ask different things of you. You can contribute your own camera's photos as records of what lives where. Or you can help classify other people's images — sitting at your laptop, tagging animals in photos a project has already collected. This guide covers both, plus the unglamorous but critical parts almost nobody explains: location precision, obscuring sensitive species, licensing, and what researchers do with your data once they have it.
For typical trail-camera subjects — deer, foxes, raccoons, the medium-to-large mammals most cameras catch — volunteer identifications turn out to be remarkably accurate, north of 90% in several large studies. So this isn't busywork. Done right, your contribution is real data.
Why bother? What your photos actually become
It helps to see the scale of what you'd be joining. North Carolina's Candid Critters project handed cameras to 580 volunteers across all 100 counties and, in three years, pulled in 120,671 wildlife records from 2.2 million photographs — roughly five times the verified mammal records the state had from all prior sources combined. That's not a rounding error in a database. That's a step change in what's known about an entire state's wildlife, built almost entirely out of ordinary people's camera photos.
And it scales further. One large analysis found that a single community-science platform had accumulated over 200 million observations from 3.3 million people across 128 countries, with the data feeding peer-reviewed research at a rate of nearly four publications a day in one recent year. The single most common use? Mapping where species live — their distribution and range. Your raccoon on the creek is a dot on that map.
A reviewed, well-labeled photo is worth more to science than a thousand frames of empty grass.
There's a practical argument too, not just a romantic one. Candid Critters cost about $217,087 to run — and the researchers calculated that getting equivalent data through paid professional monitoring would have cost more. Volunteer camera networks aren't a charity version of "real" science. For some questions, they're the more cost-effective way to get the data, full stop.
The two ways to contribute (and how to choose)
Path 1: Submit your own camera's photos
This is the one most trail-cam owners assume citizen science means: you took the photos, you upload them, they become records. The basic shape is the same across platforms — record what you saw, when, and where, then let the data flow into a public scientific record.
The most camera-specific version of this is eMammal, the Smithsonian's data system built expressly for camera-trap projects. It describes itself plainly as "a data management system and archive for camera trap research projects" — designed not just for scientists but for "the citizen scientists who aid scientists in photo collection". Its workflow is more involved than a quick phone upload: you typically create an account, complete training, deploy a camera for a set period, upload through a desktop app, tag your species, and then your identifications go through expert review before the data is archived. That review step is the point. It's also why eMammal is best thought of as how organized camera projects run, rather than a place to dump a random shoebox of old photos.
Other platforms let you upload individual sightings more casually — you add a photo, the system's computer vision suggests an identification, and a community of people confirms or corrects it. The mechanics are worth understanding because they're how your photo earns the "research-grade" label that scientists filter for (more on that below).
Path 2: Help classify other people's images
You don't need a camera — or even any background in biology — to do real work here. A whole class of projects collects camera-trap images at scale and asks volunteers to tag what's in them. This is the Zooniverse model, and its flagship wildlife projects are Snapshot Serengeti and the wider Snapshot Safari network across Africa, where more than 150,000 volunteers worldwide have classified over nine million photographs. In Australia, DigiVOL (run by the Australian Museum with the Atlas of Living Australia) does the same thing — it hosts camera-trap "virtual expeditions" where volunteers identify and tag animals in the images.
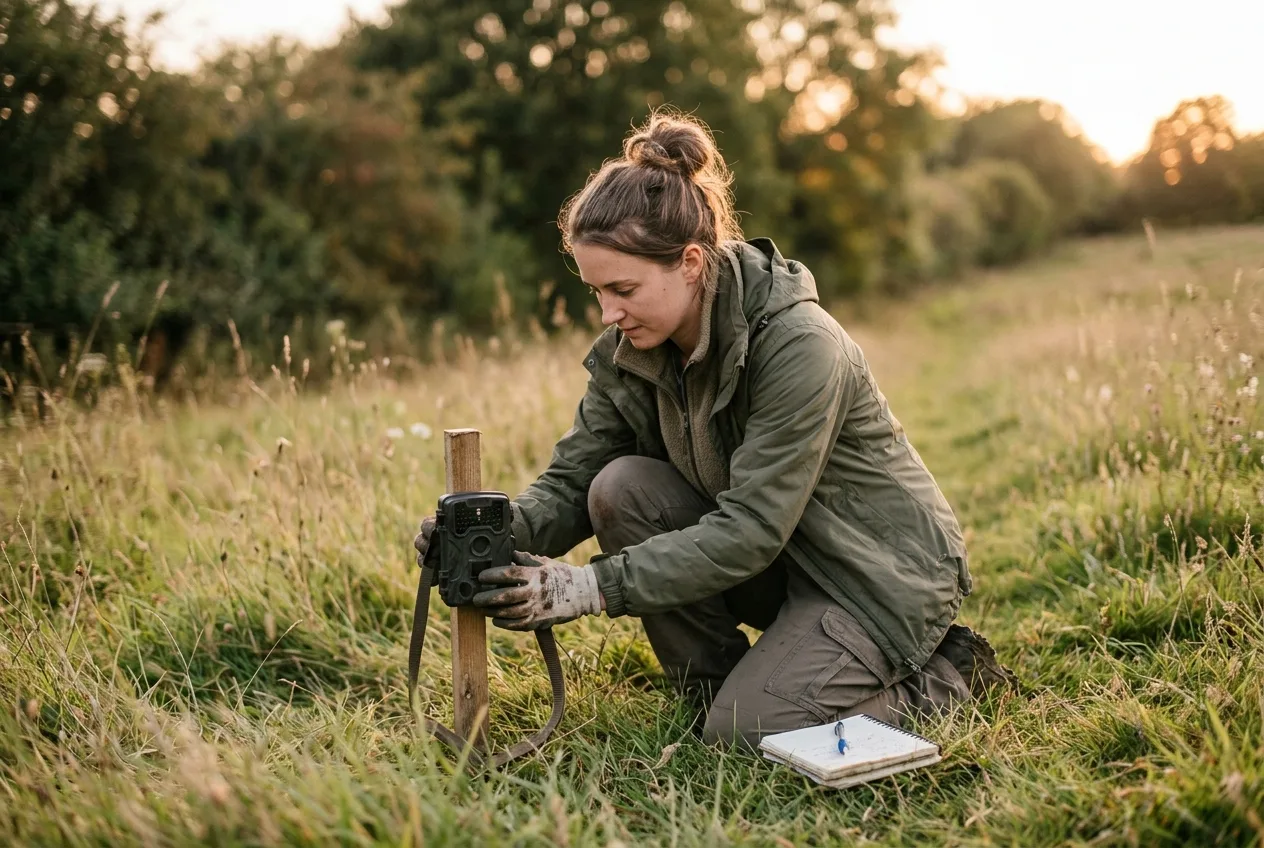
Some programs let you do both. Snapshot Wisconsin, run by that state's natural-resources agency, offers two clear tracks: apply to host a trail camera on your own land and send the photos in, or classify photos from across the state on Zooniverse from anywhere in the world. It's a clean illustration of the whole landscape — contribute photos, classify photos, or both.
So which path is yours? If you have a camera out on land you care about and want your records to count, Path 1. If you want to help and you've got time but no camera — or you want to learn to identify wildlife fast — Path 2. Honestly, doing some of Path 2 makes you better at Path 1: a few hours classifying other people's images teaches you exactly which frames are useful and which are hopeless.
You don't need a camera, or a biology degree, to do real science — you need to look carefully at photographs.
What to actually submit: quality beats quantity
Here's the mistake that makes researchers wince. A camera fires on heat and motion, so a season's card is mostly misfires — sun-warmed grass, branches, an empty trail. In one project, camera sensitivity left on "auto" caused misfire rates as high as 81% of all triggers. If you upload all of that, you've handed a volunteer or a scientist a haystack and asked them to find your needle.
The fix is simple discipline, and experienced contributors say it bluntly: trail-camera photos are welcome "as long as you're vetting the images, e.g. not just uploading 1500 photos that triggered the camera, whether or not an organism is in frame". Go through your card. Keep the frames where there's actually an animal and where someone could plausibly identify it. Drop the empties and the unidentifiable blurs. You are not obligated to post every deer — you're looking for the records that add something.
This isn't just etiquette; it's accuracy. When researchers compared volunteer classifications against expert review across several projects, the errors were dominated by false empties — images volunteers (or the camera) flagged as containing an animal that didn't. In open grassland, false-empty errors ran around 27%, versus about 10% in woodland. Cleaner input, cleaner science.
And if you control the camera, a couple of settings choices make every downstream photo more usable:
| Setting | What helps | Why |
|---|---|---|
| Burst mode | A burst of three consecutive photos per trigger | Multiple angles make a species far easier to confirm than a single frame |
| Sensitivity | Test it on-site, don't just trust "auto" | The right sensitivity for your spot cuts the flood of empty misfires |
| Field of view | A shorter, framed view (vegetation can help) | Animals fill more of the frame and are easier to identify |
A camera fires on heat and motion — most of what it catches is grass. Your job is to find the records inside the noise.
The three things that make a record count: what, when, where
Across platforms, a photo only becomes usable scientific data when it carries three pieces of information: an identification (what), the date (when), and the location (where). As one platform's help docs put it, your records don't strictly need all three to exist — "but they do in order to become research quality observations for science". Miss one and your beautiful bobcat is just a nice picture.
What — the identification — is the part people fear most, and the part you can relax about. You usually don't have to know the species yourself. Some community-science platforms run computer vision that suggests an ID the moment you upload, and then a community of identifiers confirms or refines it. The way that consensus forms is the engine behind the "research-grade" label: a record reaches it when the community agrees at species level — in practice, when more than two-thirds of identifiers land on the same species. So even a "what is that?" frame can become solid data, as long as it's clear enough for someone to call.
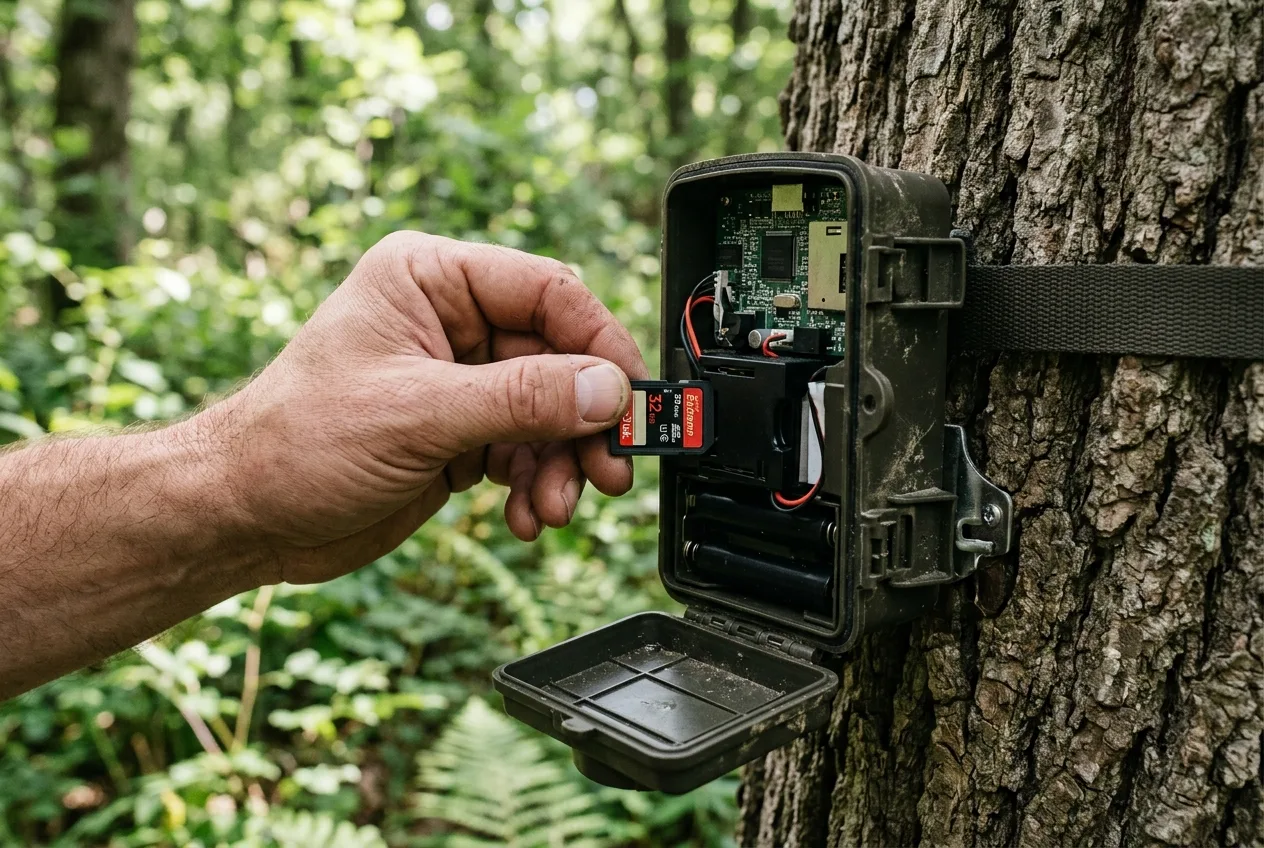
When and where usually ride along inside your photo's metadata. Apps will read the date and location straight off the file when it's present. Two things to watch with trail cameras specifically: make sure your camera's clock and date are set correctly before the season — a wrong timestamp quietly corrupts the "when" on every photo it takes — and be deliberate about location, which deserves its own section.
A quick word on wild vs. captive: these systems care. Records get flagged as casual (not research data) if the animal isn't wild — a zoo lion, a garden plant. Trail-camera animals are wild by definition, so this rarely bites you, but it's why the distinction exists.
Location precision — and obscuring sensitive species
Location is where well-meaning contributors do real harm, so slow down here.
First, precision. A camera sits in one fixed spot for weeks, which tempts you to drop a perfect pinpoint on the map. Resist the false pinpoint and set an honest accuracy circle instead — the radius that genuinely describes where the animal was. Platforms expect this: you place a marker and then "adjust the marker position and accuracy circle size" to reflect reality. A larger, honest circle is not a defect — reviewers are explicitly told not to reject records just for having big accuracy circles, only for clearly wrong locations. Precise-looking and accurate are not the same thing.
Then, the part that actually matters for wildlife: sensitive species. For some animals, publishing an exact location is dangerous — it can lead a poacher straight to them. The mature platforms handle this in two layers:
- Observer-set privacy: you choose to obscure or hide a location — say, a sighting near your home, or a den you'd rather not broadcast.
- Automatic taxon protection: the platform itself blurs locations for species known to be threatened by disclosure, whether or not you ask. Pangolins and certain orchids are the textbook cases — every record of them is obscured automatically, and that override beats your own setting if you left it open.
It's worth understanding what "obscured" actually does, because it's cleverer than a simple on/off. When a record is obscured, the true coordinates are hidden and the public location is widened to a large cell — on one major platform, a 0.2° × 0.2° box, roughly 500 km² near the equator — with the public point dropped randomly inside it, and even the locality notes and exact date coarsened (a specific June date might show only as "June"). Researchers who genuinely need the precise spot can request it through the project. The public sees "this species, somewhere in this region"; the science still works; the animal stays safe.
One honest caveat the platforms themselves admit: obscuring isn't bulletproof. Landmarks in your photo can give a location away, and if you also post open records nearby at a similar time, someone can triangulate the obscured one. The standing advice is not to post open observations close in space and time to an obscured one. If you run a camera on a sensitive species, think about the whole pattern of what you share, not just the one record.
This protective instinct runs through the research infrastructure too. On platforms built around camera-trap data packages, public downloads are stripped of the exact locations of sensitive species, any images of humans, and unconfirmed identifications before anyone can pull them. Protecting the animal — and people's privacy — is baked in, not bolted on.
The most important thing a beginner can learn isn't a camera setting. It's not to broadcast the exact location of an animal that something wants to kill.
Licensing: who gets to use your photo, and how
When you contribute, you're also making a quiet legal choice: the license on your photo, which sets what others may do with it. The common options are a small family of Creative Commons licenses — roughly, open with attribution (CC BY) or open for non-commercial use with attribution (CC BY-NC).
This matters more than it sounds, because the license is often the gate to the data actually being used. On at least one major platform, a research-grade record is added onward to the global biodiversity network following its licensing requirements — in practice, when the license is one of those open ones. Lock your photos down tight and they may never reach the scientists who'd want them. If your goal is to contribute trail camera photos to research, an open license is usually the whole point — but it's your call, and you can change it.
Where your data actually ends up
Upload a good record and it doesn't just sit on one website. There's a real plumbing system underneath, and it's worth seeing, because it's the answer to "does this go anywhere?"
The hub is the Global Biodiversity Information Facility (GBIF) — an international open-data network that aggregates biodiversity records from many sources into one searchable place. Research-grade community-science records flow into it; so do national portals like Australia's Atlas of Living Australia, which offers "open access to Australia's biodiversity data" and lets anyone search what's been recorded near a given place. Your photo becomes one queryable record among hundreds of millions.
To make all those sources actually fit together, the camera-trap world has been converging on a shared format. The Camera Trap Data Package (Camtrap DP), developed under the international Biodiversity Information Standards body in consultation with GBIF, is a common exchange format that structures camera-trap data into three simple tables — deployments (where and when each camera sat), media (the files), and observations (what was found in them). You'll never touch this directly as a contributor, but it's why a camera record from Wisconsin and one from the Serengeti can end up in the same analysis. It's the standard that lets your photos travel.
What researchers actually do with it
So a scientist downloads a pile of records that includes yours. Then what?
Mostly, they map and model. The dominant use is species distribution — building and refining the maps of where animals live and where their ranges are shifting. From clean camera data, researchers run occupancy models (is a species using this area?), activity patterns (when is it active?), and even density estimates (how many are there?) — all of which the standardized data format is explicitly designed to support. Agencies use it for management: Snapshot Wisconsin's data feeds real wildlife-management decisions, and Australia's WildCount program — the first large-scale, multi-species camera-trap monitoring effort in New South Wales, which ran from 2012 to 2021 — was built to track how species occurrence changes across a whole region over time.
There's a nuance worth carrying, though: your contribution is usually complementary to professional surveys, not a replacement for them. When researchers compared community-science records against structured camera and acoustic surveys across 916 sites in the United States, the two approaches landed on similar overall species richness but captured different species — each documented animals the other missed. The takeaway is genuinely encouraging: the right move is to use both together, and your photos fill gaps that structured surveys leave open. You're not the understudy. You're a different instrument pointed at the same wild.
How good is the data, really?
A fair question, and the honest answer has two sides.
For the bread-and-butter of trail cameras — the medium-to-large, visually distinctive mammals — volunteer accuracy is high. Across three Zooniverse projects measured against expert review, volunteers hit 97.9% on Snapshot Serengeti, 93.5% on AmazonCam Tambopata, and 83.4% on Wildwatch Kenya. Candid Critters averaged 91.2% accuracy across all species, with familiar animals like white-tailed deer identified almost perfectly. Snapshot Safari volunteers came in around 97%. For the animals most readers' cameras catch, the crowd is genuinely good.
Two things lift those numbers further. Training helps a lot: in one experiment, novices with no biology background averaged just 51.8% accuracy on their own — but after a short, just-in-time training tutorial, they jumped to 81.9%, statistically indistinguishable from professional biologists at 85.1%. A few minutes of guidance turns a beginner into a reliable classifier. And multiple eyes matter: these projects route each photo to several volunteers and aggregate the answers, which is why the crowd's verdict is so accurate even when any one person isn't.
The other side: research-grade is a strong signal, not a guarantee. In a study deliberately targeting a hard group — non-native marine invertebrates, the kind of look-alikes even experts argue over — only 52% of records were correctly identified, and about a quarter of those labeled "research grade" were inaccurate or uncertain. The authors concluded the quality grade was "an inadequate proxy for accuracy" for that taxon. Keep the context: that's a worst-case group. The mammals and birds a trail camera photographs sit at the easy end of that spectrum, where the 90%-plus figures apply. But the lesson generalizes — the clearer your photo, the easier the ID, the better the data.
Train for ten minutes and you can classify wildlife about as accurately as a professional biologist. That's the quiet superpower of these projects.
Getting your collection contribution-ready

Most of the friction in contributing isn't the upload — it's the shoebox. A season produces thousands of frames across multiple cameras, and the work of finding the keepers, getting timestamps and locations straight, and pulling out the handful of records actually worth submitting is where good intentions go to die.
The principle holds whatever tool you use: contribute deliberately. A small set of well-chosen, correctly-dated, honestly-located, properly-licensed photos does more for science than a data dump ten times the size. The otter on the creek bank is in there. Your job is just to find it and send it somewhere it counts.
Frequently asked questions
Do I need to identify the animal myself before submitting?
No. Some platforms suggest an identification automatically when you upload, and a community of identifiers confirms or corrects it — a record reaches "research grade" when more than two-thirds of them agree at species level. Submit a clear photo and let the crowd do the naming.
Can I upload old trail-camera photos, or only new ones?
Old photos are fine, as long as you know roughly when and where each was taken — that's what turns a photo into a usable record. The bigger issue isn't age; it's vetting. Don't bulk-upload every frame your camera ever triggered; submit the ones with an identifiable animal in them.
How do I keep from revealing the location of a rare or sensitive animal?
Obscure the location before sharing. You can set a record to obscured yourself, and good platforms automatically blur locations for species threatened by disclosure — every pangolin record, for instance, is obscured by default, overriding your own setting. Just don't post open records nearby at a similar time, which can give an obscured location away.
Do I have to host a camera to participate?
Not at all. You can volunteer to classify camera-trap images other projects have already collected — on Zooniverse projects like Snapshot Serengeti, or DigiVOL in Australia — entirely from your computer, with no camera and no biology background. A short training tutorial gets beginners to near-professional accuracy.
Does my photo actually get used, or does it just sit on a website?
If it's research-grade and openly licensed, it flows into the global biodiversity data network and becomes part of the searchable record researchers draw on. The most common use is mapping where species live; cleaner camera data also feeds occupancy, activity, and density models.
Is volunteer-identified data accurate enough for real science?
For the medium-to-large mammals trail cameras usually catch, yes — large projects report accuracy above 90%, and around 97–98% for the easiest species. It drops for genuinely hard-to-tell-apart groups, where even "research grade" can mislead, so accuracy tracks how identifiable your subject is.