Here's the thing nobody tells you when you pull your first trail camera out of the box: where you hang it matters more than which one you bought. You can spend $400 on a camera with a blistering trigger speed and a no-glow flash, strap it to the first tree you find at eye level, point it down at a trail, and come back two weeks later to a memory card full of swaying grass and the occasional deer butt. Meanwhile someone with a $90 camera mounted at the right height, kept level, and facing the right way is pulling clean, full-body shots of everything that walks past.
So let's get the short answer out of the way first, because it's genuinely most of the battle. For general wildlife, mount the camera at about knee height — roughly 20 inches, or 50 cm, off the ground — keep the lens parallel to the ground instead of tilted down, and face it away from the midday sun — north in the northern hemisphere, south in the southern — so the sun never sits in front of the lens. Give it a clear, open view of four to five feet in front, and put it where animals actually travel. That's the whole recipe. Everything below is just the why, plus the handful of situations where you'd bend the rules.
Why height is the one thing you can't get wrong
If you only fix one part of your setup, fix the height. There's a good, concrete reason the standard exists, and it comes straight from how these cameras detect anything at all.
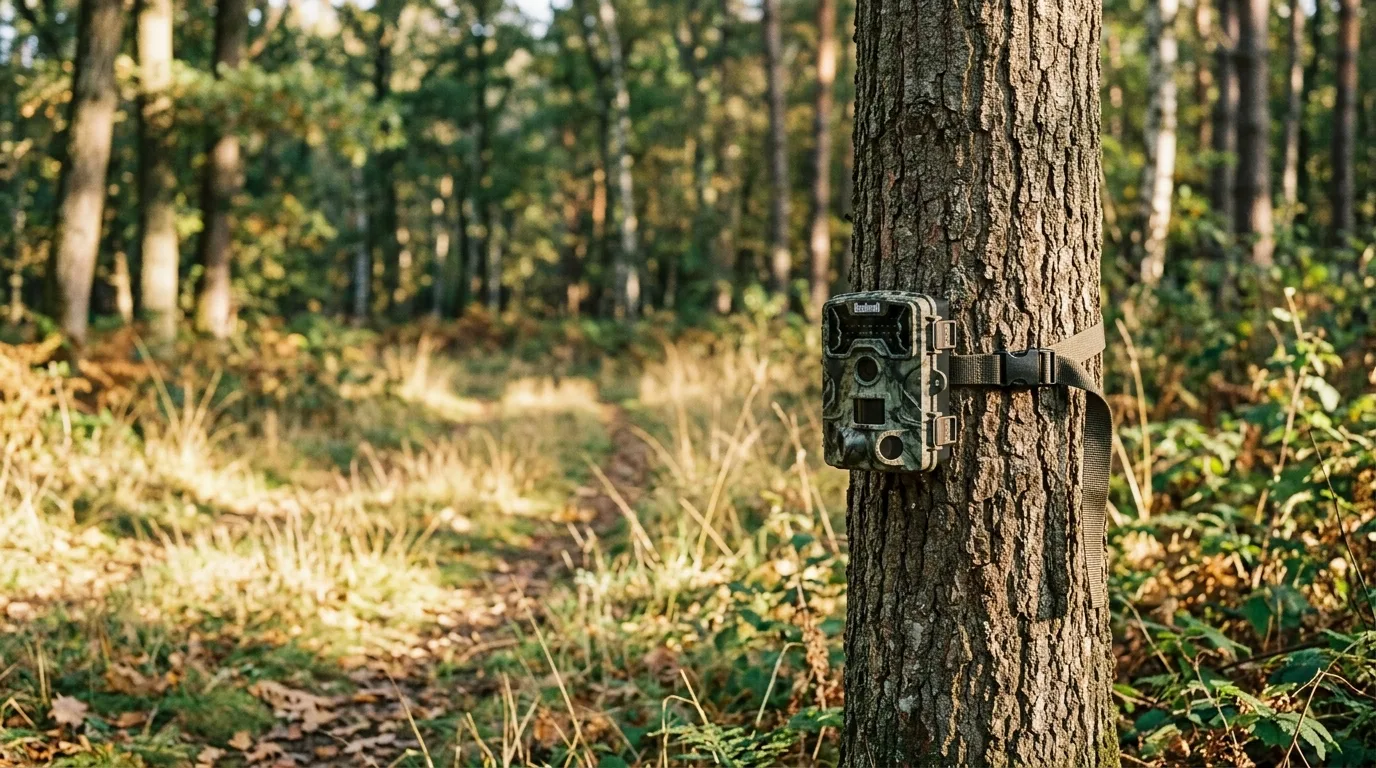
Almost every trail camera you can buy works off a passive infrared (PIR) sensor. It doesn't "see" an animal the way the camera lens does — it watches for a sudden change in surface heat moving across its field of view, and that change is what fires the shutter. The catch is that the sensor is tuned to detect a heat signature about the size of a deer. That's not an accident: the whole consumer camera market grew up around North American deer hunting, so the sensors are built around a deer-sized, deer-height target. Mount the camera at the height of a deer's body — knee height on you is about chest height on a deer — and the sensor is staring right at the warmest, biggest part of the animal as it passes. Mount it too high, aimed over the animal's back, and the heat signature shrinks, the trigger gets unreliable, and you miss things.
The university extension folks have boiled this down to a number that's easy to remember. The University of Florida's guide calls for placing the lens about 20 inches (50 cm) off the ground, "often around knee height," and points out that you can just set it at or slightly above your own knee and skip measuring entirely. The Smithsonian's research protocol is even more precise: "Mount the camera on a tree with the lens 50 cm above the ground" — measured with a tape, because, in their words, "camera height is a major determinant of what animals are recorded; smaller species will be missed if the camera is placed too high". And this isn't just hunting-and-extension folklore. The national SNAPSHOT USA survey — thousands of cameras across all 50 states — sets its unbaited cameras at "approximately 50 cm height" as the scientific standard. When the casual guides and the peer-reviewed protocols land on the same number, you can trust it.
Why does 50 cm in particular work? Because it threads the needle. Set the camera there and you catch smaller animals at the bottom of the frame while still keeping a deer or a bear from getting cut off at the top. A little higher — call it waist height, 2.5 to 3 feet — is common and perfectly fine for deer specifically. Texas A&M's primer puts the deer sweet spot at "3–4 feet above the ground" but adds the important caveat in the same breath: at that height, "smaller species (rodents or small carnivores) may be missed". That tradeoff is the whole game. The higher you go, the more you bias your camera toward big animals and away from everything small.
The myth worth busting: mounting high to beat thieves
Here's a belief that's common enough to be worth calling out directly: that you should mount your camera up high, above eye level, so people can't spot it or steal it. It feels smart. It quietly wrecks your data.
A team of Australian researchers actually ran the experiment, and the title of their paper says it all: "The higher you go the less you will know." They paired cameras on the same trees — one at the normal 0.9 m, one up at about 3 m — and the high cameras "significantly reduced the detection rate of all species" compared to the low ones. The high placements also threw more false triggers (about 17% versus 12.5%), because branches that high move in the wind. They'd started out trying to solve a theft problem — these were real losses, tens of thousands of dollars of stolen gear — and instead discovered that the cure was worse than the disease for anyone who actually wants the pictures. A broad research review reached the same verdict: cameras work best at "trunk-level" for your target species, and lifting them out of reach to deter theft means missed captures when the animal isn't in line with the camera. If theft is a real worry, lock the camera in a steel security box or run a cable lock and keep it at the right height — don't trade away your detections to hide it.
It feels smart. It quietly wrecks your data.
Angle: keep it level, and resist the urge to tilt down
The second rule is just as simple and just as commonly broken: keep the camera's view parallel to the ground. Don't aim it down at the dirt.
When you tilt a camera downward, you shrink its detection zone into a small patch of ground right in front of it, and you give up the longer reach the sensor was built for. The Smithsonian protocol is blunt about it — the camera "must be aligned parallel to the ground, so that the 'horizon' is in the centre of the image". The Ontario study that modeled this across hundreds of trials found that deploying cameras low (under 90 cm) and parallel to the ground, near zero degrees of tilt, produced the highest detection probabilities — which lines up with the simple idea that detection peaks when the camera points straight at the center body mass of the animal.
The downward-facing setup fails for the same reason high mounting fails. In that Australian trial, the researchers also tested cameras aimed straight down at the trail from overhead, and the results were lopsided: the level, horizontal cameras caught 93% of all the foxes in the comparison, while the down-facing ones caught a handful. The vertical cameras also generated the lion's share of the false triggers. Pointing down feels intuitive — you're "covering the trail" — but you're really just starving the sensor.
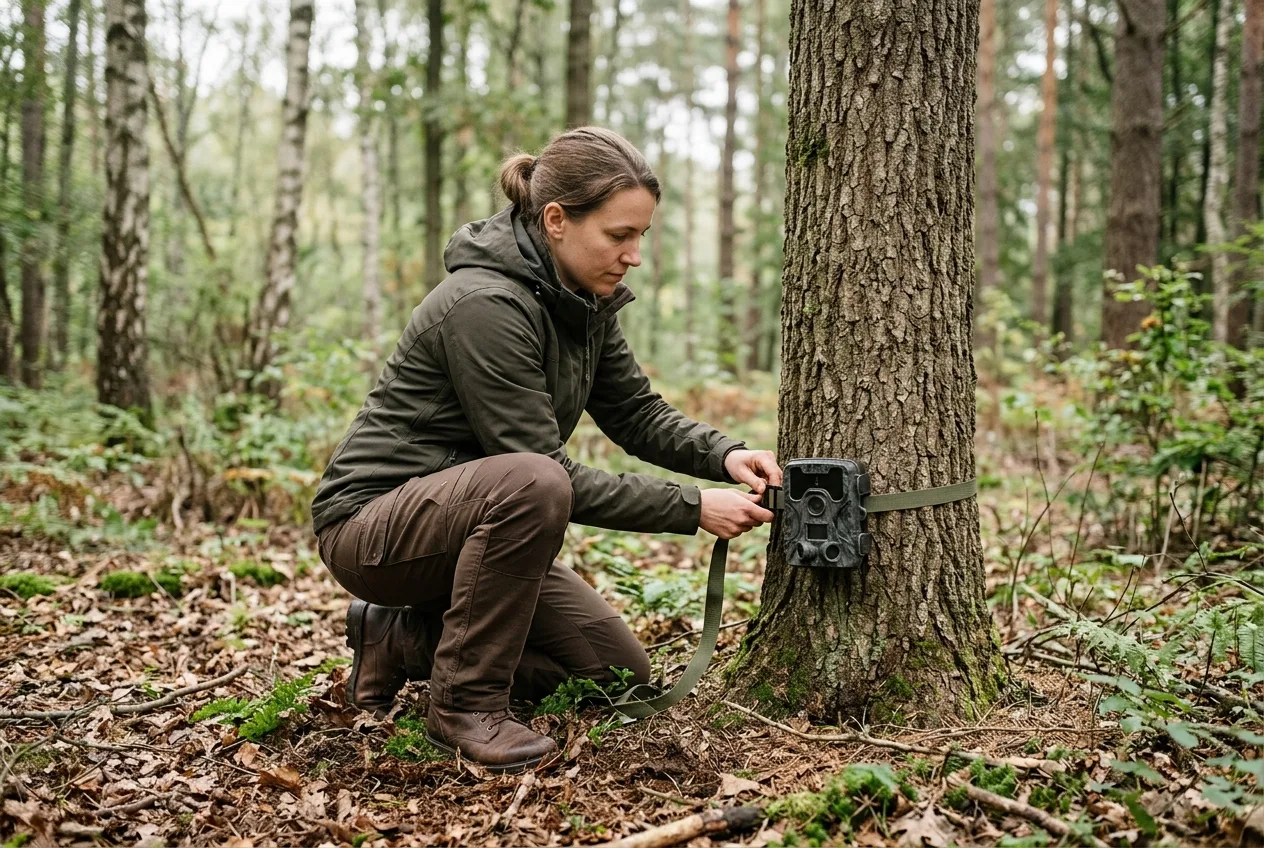
The practical problem, of course, is that trees don't grow at the angle you need. The fix is delightfully low-tech: shim it. Wedge a stick between the camera and the trunk to tip the lens back to level, even if the tree is leaning. The Smithsonian crews literally "slide sticks between the tree and the camera" to get it parallel on a slope. If there's no good tree at all, skip the tree — mount the camera on a sturdy stake or a tripod, which also lets you put it exactly where you want at exactly the right height.
One honest exception. In thick brush, where a level camera would just be staring into a wall of leaves a few feet away, Oregon State's guide suggests mounting a little higher and angling slightly downward to see over the undergrowth and improve your odds on both large and small animals. Treat that as a deliberate adjustment for a specific problem, not as a license to point every camera at the ground. The default is level.
Direction: face it toward the pole so the sun stays out of your shots
The third rule is about where the camera faces, and it's the one beginners skip most often because it isn't obvious until you've been burned by it. Aim the camera toward the nearer pole — north if you're in the northern hemisphere, south if you're in the southern — and keep east and west for last resort. The point is to put the camera's back to where the daytime sun sits: that's the southern sky up north, and the northern sky down south.
The reason is the sun. Point a camera east and the sunrise blasts straight into the lens; point it west and the sunset does the same. You get washed-out, backlit frames where the animal is a black silhouette, and worse, the low sun and its moving shadows heat surfaces in the detection zone and trip the PIR sensor over and over, filling your card with empty photos. Facing the pole sidesteps all of it. These US guides say "north" — that's the pole-ward direction in the northern hemisphere; below the equator you flip it to south. The Texas A&M screwworm-monitoring guide puts it plainly: "orient the camera to face north to minimize false triggers and low-quality photos caused by shadows and sun rays". The National Deer Association says the same for survey work — and again, that "north" assumes the northern hemisphere; "orient the camera facing north to avoid backlighting caused by sunrise or sunset". North or south, depending on your hemisphere — the point is to keep the sun off the front of the lens.
There's a subtler wrinkle here that's worth a beginner's awareness, even if it doesn't change what you do. That Ontario study found cameras detected animals slightly better when the sun was behind them, and it noted that the usual "face toward the pole" advice is really about photo quality and glare — it wasn't designed around this small detection effect. But the effect was tiny — the detection rate moved by about four hundredths between morning and afternoon — so the takeaway doesn't change: face toward the pole, mostly for clean images, and don't lose sleep over the rest. The 2025 South African study reinforces the practical version: north- and south-facing cameras outperformed west-facing ones, which "suffered sunset glare".
Facing the pole sidesteps all of it.
Distance and the detection zone: closer than you think
People wildly overestimate how far a trail camera reaches. The box might claim 60 or 80 feet, and the flash might throw light that far, but detection is a different story.
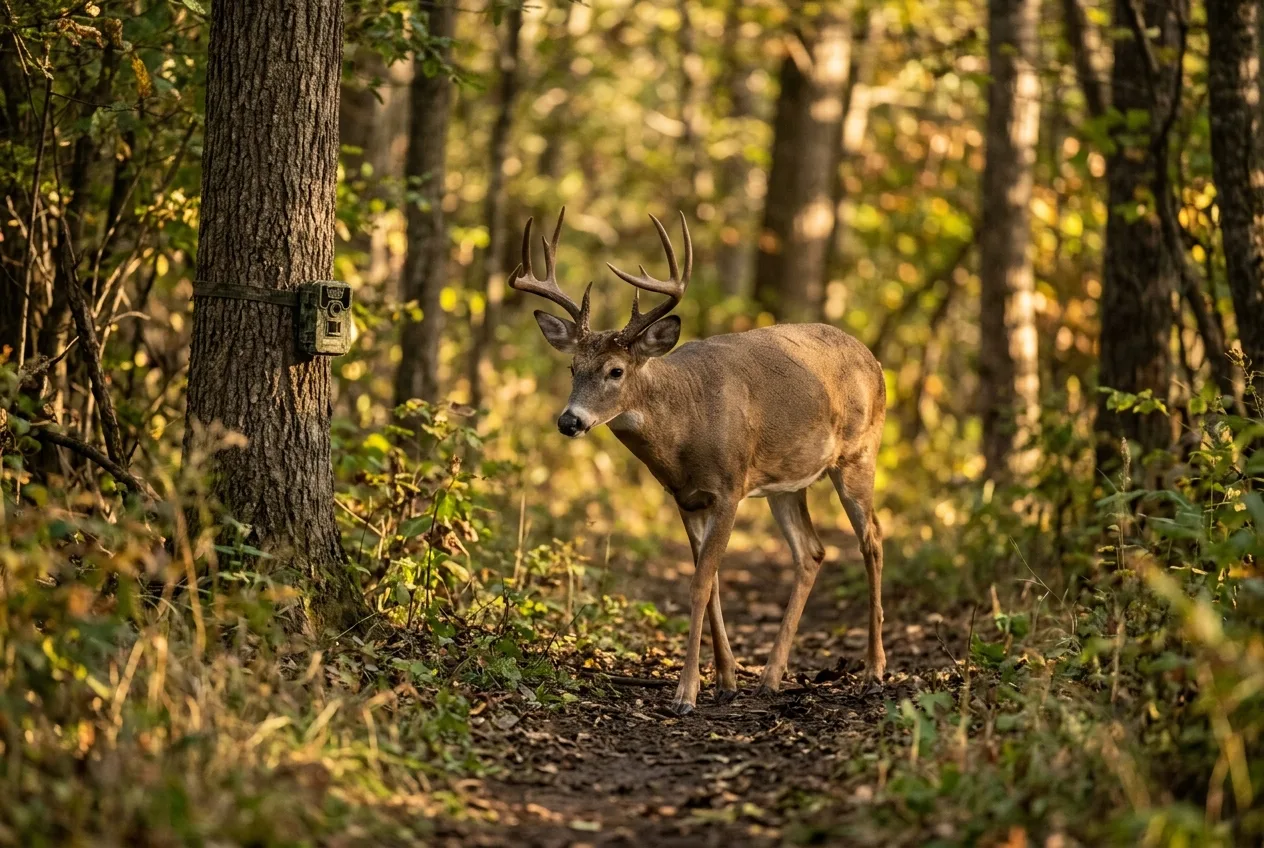
Picture the detection zone as a cone in front of the camera, defined by an angle and a distance — that cone is the only place an animal can trigger a photo. And it's not as deep as you'd hope. The Ontario trials found detection declined steadily once an animal was more than about 6 meters — roughly 20 feet — from the camera. So aim for that range. The deer-survey guides, where animals are pulled in over bait, settle on 12 to 20 feet from the target spot, which keeps the whole animal in frame without it shrinking into the distance. For general scouting, the same logic holds: set your trail or funnel about 15 feet out and you're in the sensor's wheelhouse.
Knowing the detection zone also fixes the single most common framing mistake. If you aim a camera straight across a trail at a 90-degree angle, a fast animal can cross the narrow zone and be gone before the shutter fires — there's always a small lag between trigger and photo. The fix is to aim up or down the trail, or set the camera slightly off the path at a bend so the animal walks toward the lens rather than darting across it. You get more time in the zone, more full-body shots, and fewer blurry tails — especially helpful if your camera's trigger speed is on the slow side. This is also why "perpendicular to the direction of travel" shows up again and again in the research: you want the animal moving across the sensor's narrow detection bands, giving it the best chance to register.
When to break the rules: matching placement to the species
The 50-cm, parallel, pole-facing default is built for the broadest sweep of medium-to-large wildlife. The moment you have a specific small animal in mind, you adjust — mostly by getting lower.
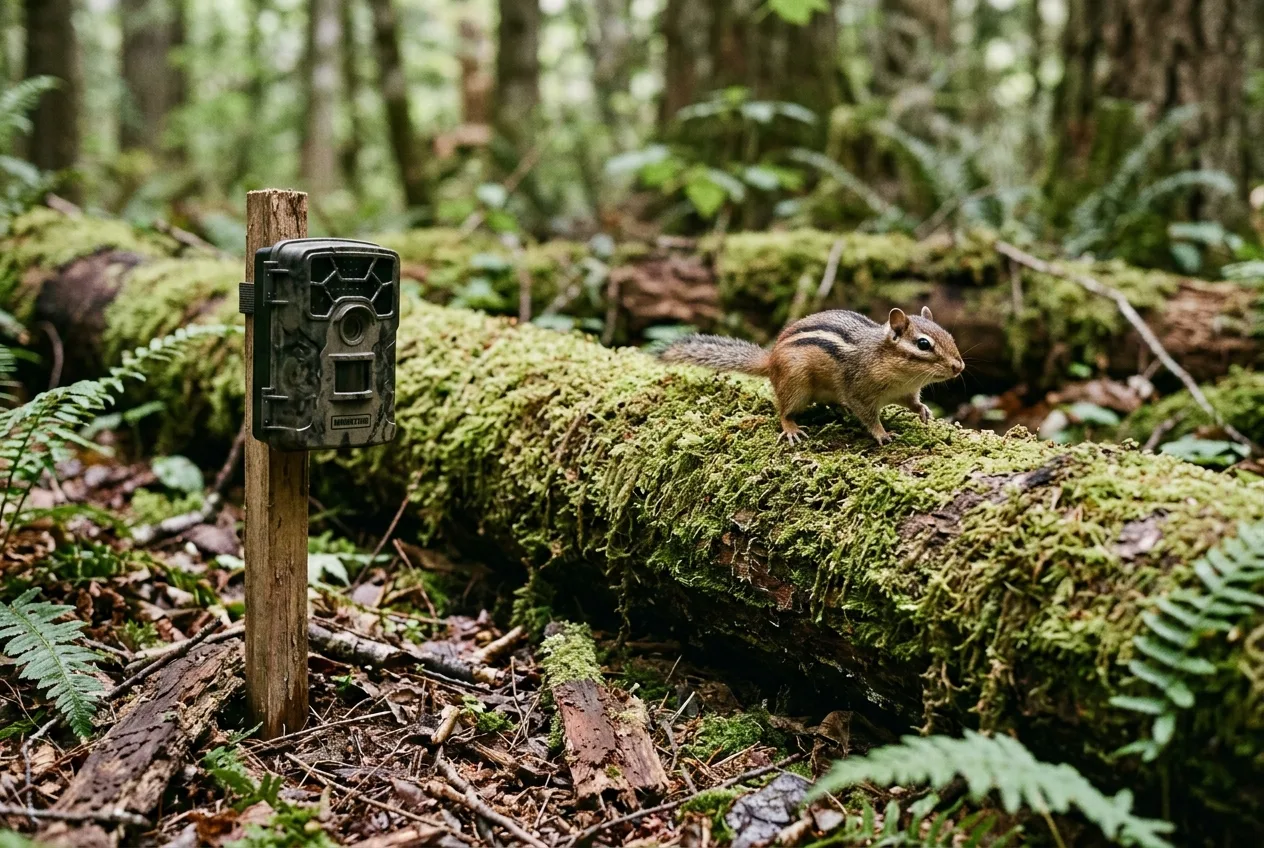
A mouse or a chipmunk barely registers on a sensor built for a deer. Utah State's small-mammal guide explains why: at the standard 1-meter height, a small animal "can miss detecting" entirely, because it moves too fast and "may not have a large enough heat signature to set off the camera's infrared light sensor while moving". The result is that familiar useless photo — a gray streak across the frame. The fix is to drop the camera below a meter, sometimes to within inches of the ground, and give the animal a reason to pause: a log to run along, or a "small mammal tube" set as a focal point so it lingers inside the detection zone long enough for a clean, identifiable shot. Lowering the sensitivity a notch helps too, so blowing leaves and grass don't bury you in false triggers.
The bigger principle underneath all of this: one camera, placed for one height, sees a slice of what's out there. Researchers found that a single well-placed camera nails a common, large animal like a deer — better than a 75% chance of detecting it in just 30 days — but that same lone camera might have only a 13–14% shot at a bobcat or an opossum over an entire season. Add a second camera and those low numbers jump dramatically. You don't need an array in your backyard, but it's worth knowing why the camera that's perfect for deer keeps "missing" the fox you know is around. Often it isn't missing it — it's mounted and aimed for something bigger.
A mouse or a chipmunk barely registers on a sensor built for a deer.
A quick word on courtesy and the law
Two last placement habits, quick but real. First, clear the junk in front of the lens — a single branch or tall blade of grass waving in the wind will trip the sensor hundreds of times and drain your batteries — but don't clear so much that you change the spot or draw attention to your camera. Second, if you're running a camera around your home or property line, aim it inward, onto your own land, not out across a neighbor's yard or a public path. It's good manners and it keeps you on the right side of privacy expectations. The risk of theft on private land is usually low, but a labeled camera with your name, or one tucked in a lock box, buys peace of mind.
If your goal is a full deer survey — actual population numbers, sex ratios, fawn counts — that's a more involved process with its own rules on baiting, timing, and how many cameras to run. The short version: roughly one camera per 100 acres, a baited site, and a 10-to-14-day run captures up to about 90% of the herd. But that deserves its own walkthrough.
Frequently asked questions
How high should a trail camera be off the ground?
For general wildlife, about knee height — roughly 20 inches or 50 cm — which puts the sensor level with the body of a deer-sized animal. For deer specifically, waist height (2.5 to 3 feet) is also fine. Go lower, toward the ground, when you're after small animals like mice or chipmunks.
Which direction should a trail camera face?
Face it toward the nearer pole — north in the northern hemisphere, south in the southern — so the rising and setting sun never sits in front of the lens. Pointing east or west causes glare, washed-out backlit photos, and false triggers from low sun and moving shadows heating the detection zone.
Should I angle my trail camera down toward the trail?
No — keep the view parallel to the ground. Tilting down shrinks the detection zone and lowers your detection rate. If the tree leans, wedge a stick behind the camera to level it. The only common exception is thick brush, where a slight downward angle helps you see over the undergrowth.
Why is my trail camera missing animals or taking blank photos?
Usually it's mounted too high, tilted down, or facing into the sun — all of which weaken the sensor or trip it on shadows and wind-blown vegetation. Small, fast animals also slip past a camera set for deer because their heat signature is too small to reliably trigger it. Clear vegetation from the detection zone and lower the sensitivity if blowing grass is the culprit.
How far away will a trail camera detect an animal?
Closer than the box suggests. Detection starts dropping off past about 6 meters (20 feet), so place your target trail or bait within roughly 12 to 20 feet of the camera. The flash may reach farther, but the motion sensor is what has to fire first.
Should I mount my camera high up to prevent theft?
It's tempting but counterproductive. Cameras placed high (around 3 m) detect significantly fewer animals than ones at normal height, and they false-trigger more from moving branches. Use a lock box or cable lock and keep the camera at the right height instead.