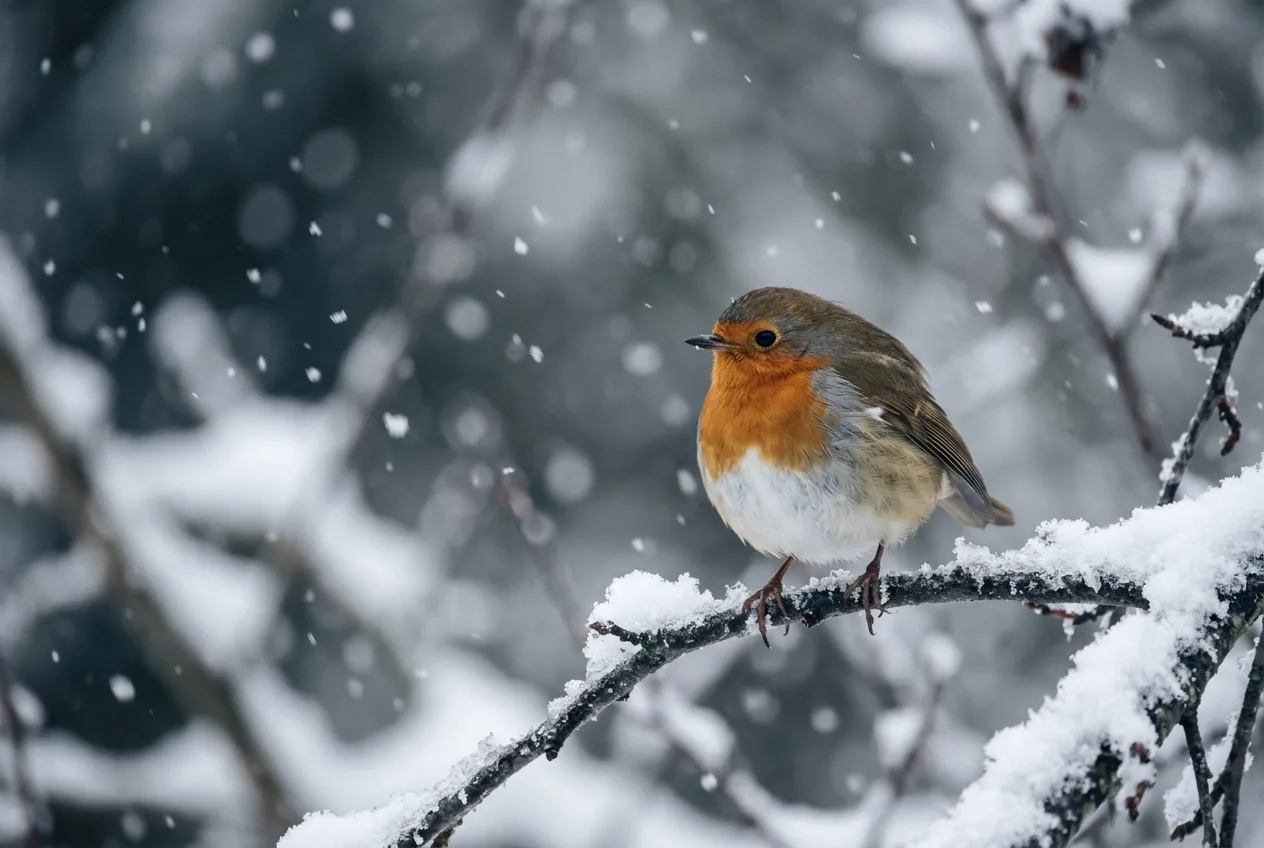
The first hard truth about photographing wildlife in winter is that your camera is, in a quiet and persistent way, working against you. Point it at a field of fresh snow and it will hand you back a flat, gray, underexposed mess — not because it's broken, but because it's doing exactly what it was built to do. The second hard truth is that this is the best season you'll get. When the snow comes down and the food gets scarce, animals stop hiding. They move into the open to feed, they pack into the few places still worth being, and every step they take is written out behind them in the snow. The whole job is learning to take the gift without being beaten by the conditions that come with it.
This isn't a piece about a particular month. "Winter" here means a condition — snow on the ground, cold in the air, a low, weak sun — and that condition arrives at wildly different times depending on where you stand on the planet. A high-country winter in July is just as real as a January one. So nothing below is tied to a calendar or a hemisphere; it's tied to snow, temperature, and light, because those are the things that actually change how you shoot.
Why snow lies to your camera
Your camera's light meter has one stubborn assumption baked into it: that the world, on average, is a middle gray that reflects about 18% of the light hitting it. Aim it at something that reflects far more than that — a snowfield reflects most of the visible light that lands on it — and the meter panics and darkens the exposure to drag all that brightness back down to gray. The result is the classic beginner's winter shot: dingy, bluish, lifeless snow, and a subject lost in the murk.
The fix is counterintuitive but simple: tell the camera to brighten the picture. You overexpose, relative to what the meter wants, until the snow reads as snow. How much depends on the light. A rough field guide that several photographers converge on:
| Conditions | Exposure compensation |
|---|---|
| Snow, bright clear sun | +2 to +3 EV |
| Snow, light overcast | +1 to +2 EV |
| Snow, heavy overcast or open shade | +⅔ to +1 EV |
Those numbers come from one practical metering guide, and a second source lands in the same territory with a working range of about +0.7 to +2.5 EV depending on how much snow and light dominate the frame. Treat them as starting points, not gospel — the exact value shifts with how much of the scene is white.
Whatever you dial in, verify it with the histogram, not your eye on a bright LCD in the cold. For a snow-heavy frame, you want the data pushed up near the right edge — that's pure white rendering as white — but not jammed past it, which means you've blown the highlights and lost detail you can't recover. Turn on your highlight alert, the blinking overexposure warning some shooters call "the blinkies." A few blown specular sparkles are fine; large blinking areas, especially on your animal, are not.
Snow doesn't need you to expose it correctly so much as it needs you to stop your camera from exposing it wrongly.
The trick the snow plays on moving animals
Here's where winter wildlife work diverges sharply from winter landscapes, and where a lot of otherwise-good advice quietly fails you. Exposure compensation — that +2 you just dialed in — only holds while the scene stays mostly white. The moment your subject moves off the snow and against a dark tree line or open water, the average brightness in the frame drops, the meter swings the other way, and your carefully brightened exposure blows out.
Wildlife photographer Martin Bailey describes proving this to his own workshop clients: a single white swan on snow, +2 stops dialed in, came out perfectly. Moments later a flock flew in against a darker background, "which fooled the camera into increasing my exposure and the result was this totally over-exposed photograph" — what he cheerfully calls a firm candidate for deletion. The animal you most wanted is the one the meter ruins.
The answer for anything that moves is to stop letting the meter vote at all. Switch to manual exposure and lock it down. Fill the frame with snow, set your aperture and shutter for the subject, then adjust until the meter reads around +2 stops for overcast snow or about +1⅓ for brightly lit snow — then leave it. Now it doesn't matter whether your subject is on white, on dark timber, or against blue sky: the snow stays white and the animal stays correctly exposed, and you're free to think about focus and framing instead of frantically thumbing the exposure dial. There's a genuinely lovely bonus to working over snow, too — all that reflected light bounces up and fills in the shadowed underside of a bird in flight, doing a softbox's job for free.
The cost of manual is that you become the light meter. On a day of patchy cloud, you have to notice when the light shifts and nudge your settings, because the camera won't do it for you. That's a fair trade for not throwing away the best frame of the day.
One more wrinkle that's specific to winter: your subject is often dark and its world is blindingly bright, and that contrast can be more than the sensor can hold. The photographer Joshua Leforestier, who shoots in temperatures down toward −40°, handles it partly by avoiding harsh midday sun and shooting in softer light — heavy overcast, a slight haze, or actively falling snow, all of which tame the gap between a dark animal and white ground. When he does have to choose, he tends to overexpose slightly to protect the animal and let the snow go bright, "without hurting the white snow" — while warning there's such a thing as too much. His most useful line is almost philosophical: "Don't over think your exposure so much that you miss the shot." Moments with wildlife are fleeting, and a slightly imperfect exposure you can nudge in editing beats a perfect one of an empty space.
In manual mode you're not handing the meter control of your best frame — you're taking it back.
Why your snow looks blue, and how to fix it
Even with the exposure right, winter photos have a habit of coming out cold and blue, especially in shade. That's not a defect — it's physics, and understanding it makes the fix obvious. Snow on a sunny day is lit partly by direct sun and partly by the blue sky overhead, and in shadow it's lit only by that blue skylight, so it picks up the colour. There's a deeper effect at work too: as light travels through snow, the ice preferentially absorbs red and lets blue through, so over any real distance — a meter or so — what comes back out is bluer than what went in. It's the same reason a hole poked in deep snow looks blue inside.
You don't have to live with it. A few ways to warm it back up, in rough order of convenience:
- Use a white-balance preset. The "Shade" setting is built for exactly this — it adds warmth to cancel the blue, and many cameras pull it to around 7000K automatically. Some bodies even have a dedicated "Snow" setting.
- Dial in a colour temperature by hand. As a starting point, try around 8000K for snow and about 7500K for shade; if it's still too blue, go higher, and if it tips pink, ease back down. A second source recommends experimenting in the 7000–8000K band and adjusting by eye.
- Shoot RAW and fix it later. RAW keeps far more colour information, so you can leave white balance on auto in the field and correct the cast precisely on the computer — sometimes with a single click.
Two cautions. First, don't murder all the blue. A little cool tone in deep shadow is natural; scrub it completely and your snow can look strange and artificial. Second, remember white balance is global — push everything warm to fix the snow and any people or warm-toned subjects in the frame shift with it.
Keeping a camera alive in the cold
Modern gear is tougher than its reputation, but cold still imposes real limits, and the failures cluster in predictable places. Most cameras are only rated to operate down to about 0°C (32°F); a few rugged bodies stretch to −10°C (14°F) or lower. You can shoot well below those ratings — plenty of people do — but you're accepting some risk to the gear when you do.
Batteries are the first thing to go. Cold slows the chemical reactions inside a lithium-ion cell, so it delivers less and drains faster. Expect a fully charged battery to last roughly half as long as it would on a warm day, sometimes much less — one polar-conditions source puts effective capacity at "maybe 50%, 10% or even less" in serious cold. The fixes are unglamorous and they work:
- Carry several spares and keep them warm against your body — an inner jacket pocket, close to your core, is the standard move across nearly every source.
- Revive a "dead" one. A cold battery that quits often isn't actually empty. Pull it, warm it in a pocket for a few minutes, and you'll usually squeeze out more frames.
- Cut the drain. Live View and the rear screen are heavy consumers. One landscape photographer working at around −25°C found that leaving Live View on cost him a battery in under 45 minutes; composing through the viewfinder and only switching the screen on when needed stretched it dramatically. Resist the urge to "chimp" — reviewing every frame on the screen — and power down or wrap the camera between subjects.
It's worth keeping perspective, though. A pro shooting one of the coldest games in NFL history, at −9°F (−23°C) with a brutal wind chill, came home having fired about 2,100 RAW frames with his main body still at 29% — performance "similar to what I've had in warmer weather," because it was a large, high-capacity battery. His friends on smaller bodies with smaller batteries were swapping constantly. As he dryly summed it up: "photographers get exhausted by the cold faster than today's batteries". Big battery, fewer problems — but warm spares regardless.
Condensation is the failure that actually wrecks cameras. When you bring cold gear into warm, humid air, moisture condenses on — and inside — it, and if you see fog on the lens, it's almost certainly forming on the sensor and electronics too. Do that repeatedly and you can do lasting damage. The cure is to warm everything up slowly:
- The bag method. Before you head indoors, seal the camera in a plastic bag — a zip-top freezer bag is ideal — trapping the cold air with it. The moisture then condenses on the outside of the bag instead of on your gear, and the camera warms gently inside. Leave it sealed until it reaches room temperature, which can take a couple of hours. Toss in a silica-gel packet or two for insurance.
- The simple version. If your camera bag is already as cold as the camera, just zip the camera inside it and bring the whole bag in to warm together; the insulation slows the change enough that condensation usually never forms. Some photographers stage it instead — leaving gear in an unheated porch, garage, or car first to take the edge off the temperature jump. Shooters covering that frozen football game simply left their cameras in an unheated tunnel rather than carry them into the heated room to edit.
A related point that surprises people: "weather-sealed" is insurance, not a force field. Sealing handles splashes and brushed-off snow, but buttons are easier to seal than the moving rings of a zoom or focus mechanism, which can leak once they're turning — and there's no universal standard for what "sealed" even means. Treat it as a safety margin, not a license to abuse the camera in wet snow, and keep lens changes fast and pointed downward so snow can't fall in.
Then there are the small, maddening problems. Snowflakes landing on a cold lens won't melt — so don't wipe them with a warm hand or cloth that will; blow them off with an air blower or brush them away dry. If actual ice forms on the front element, don't scrape it (you'll scratch the glass) — hold a chemical hand warmer gently against it to melt it, then wipe the water away. Watch your own breath, too: in deep cold, the ice crystals from it drift onto the rear screen and, more insidiously, onto the front of the lens, gradually fogging your images in a way you might not notice until you're home. And in genuinely extreme cold — below about −18°C (0°F) — mechanical parts start to misbehave: shutter curtains can stick and slow your frame rate, and in the worst cases something stops working entirely. Switching to an electronic (silent) shutter uses fewer moving parts and helps.
Cold rarely kills a camera outright. The warm room you carry it into afterward is what fogs the sensor.
Dressing to outlast the light
The most overlooked piece of camera gear in winter is you. Wildlife photography is a waiting game, and the cold catches up with you precisely when you've stopped moving and are standing still for the shot. The discipline is brutally simple: a warm photographer stays out longer, and the photographer who stays out longest gets the picture.
Layering is the whole system. Start with a synthetic or wool base layer — never cotton. In the outdoors world they say "cotton kills," because once it's wet from sweat or snow it stays wet, pulls heat out of you, and can tip you toward hypothermia; synthetics and wool dry fast and wick moisture away. Build up insulating mid-layers, and finish with a windproof, water-repellent shell. Down is the lightest way to add warmth, but it's useless once wet, so keep it dry or choose a synthetic fill if conditions are damp. Cover the extremities — a hat over the ears, warm synthetic or wool socks, boots you haven't laced so tight that you crush the insulation.
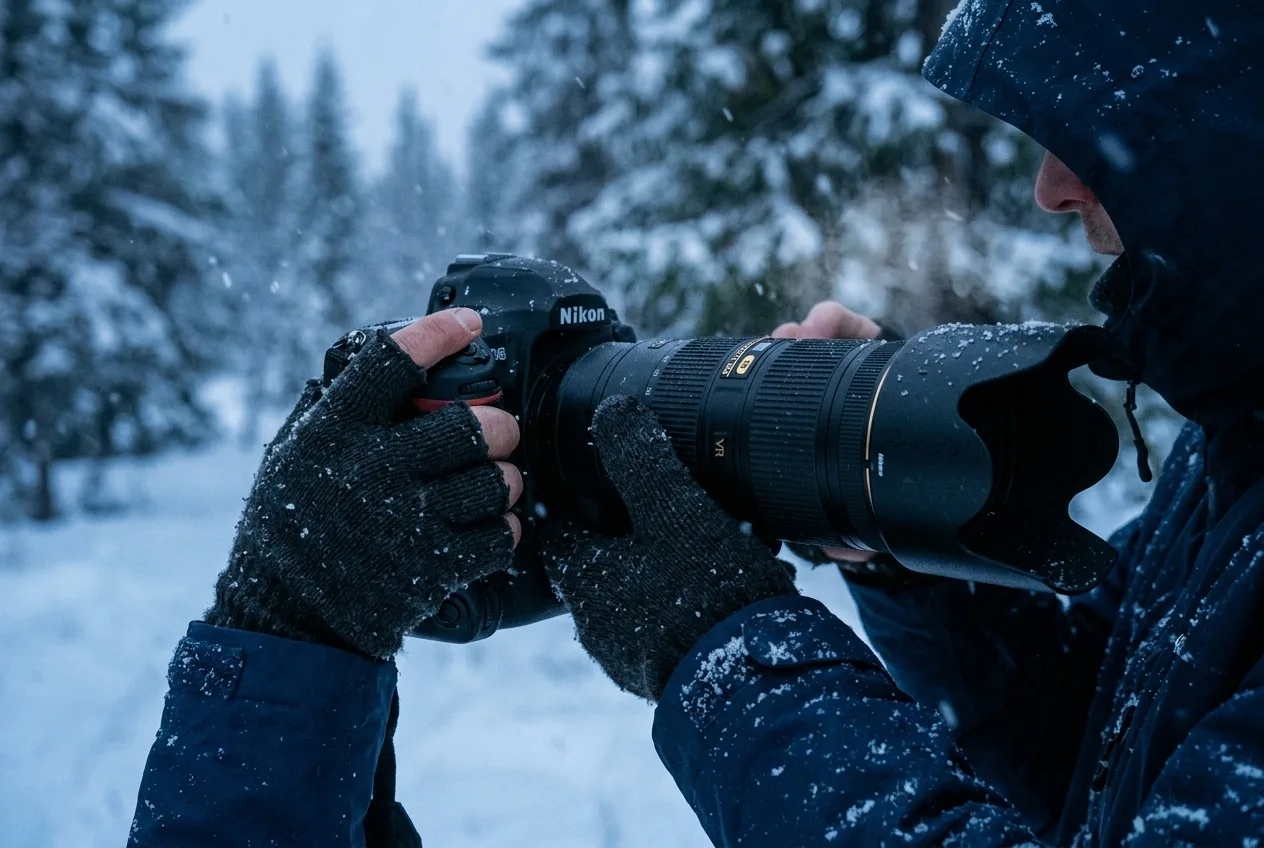
Hands are the genuine problem, because the same fingers you need warm are the ones that have to work tiny buttons. Fingerless gloves are a trap in real cold — your fingertips are the most frostbite-prone part of you to begin with. The combinations that actually work:
- Liner gloves under flip-top mittens. Wear a thin glove that gives you enough dexterity to run the camera, with a mitten you flip closed over it whenever your hands aren't on the controls.
- Gloves with detachable or fold-back fingertips, ideally with a grippy palm — the warmest pair you can still operate the camera in.
- Chemical hand warmers, tucked into gloves or pockets, to bring numb fingers back. Carry spare gloves, because a pair soaked with sweat on the hike in becomes a liability once you stop.
One veteran who has shot in genuinely punishing cold for decades is blunt about the ceiling: with the best gloves he's found, "I wasn't able to keep my fingers warm, but I was able to maintain feeling in them". Below a certain point that's the realistic goal — keep enough feeling to work the shutter, not toasty comfort.
There's a hazard people don't see coming until it bites: the camera itself can frostbite you. Press a frozen metal body to your face to use the viewfinder and your nose can stick to it, or worse. Guard against it by wrapping a scarf or balaclava over your face, or sidestep it entirely by composing on the rear screen from a tripod instead of pressing your eye to the camera. A small thing to find out the easy way.
The warmest gear in your bag is the gear that keeps you out there long enough to get the shot.
Reading the winter: where the animals actually are
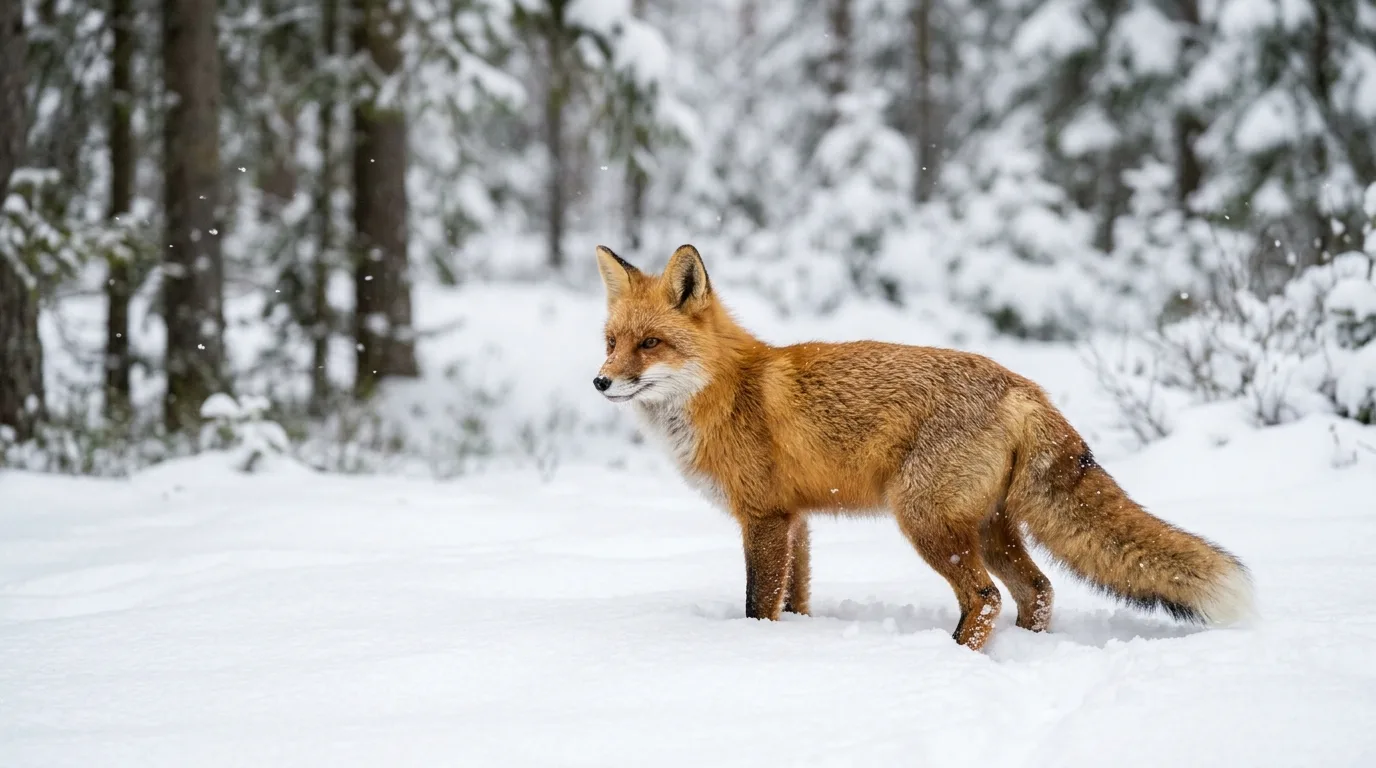
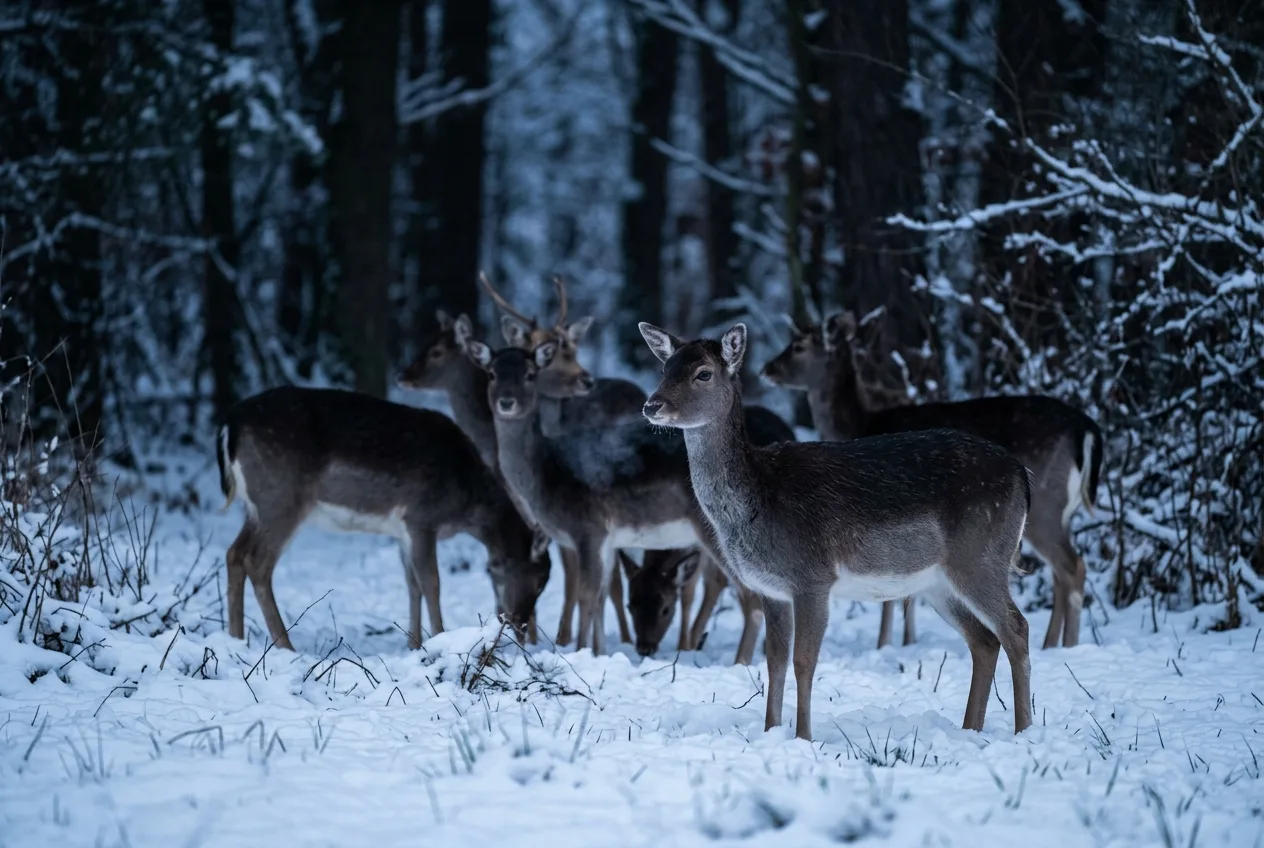
For all the gear talk, the reason to go out at all is that winter delivers wildlife. Scarcity does the work. As Nikon's wildlife guidance puts it, "many creatures have to venture more into the open to search for scarce food — and this can make it easier to capture them". The animal that melted into summer's undergrowth is now out on open snow, where you can both find it and frame it cleanly against a stark background.
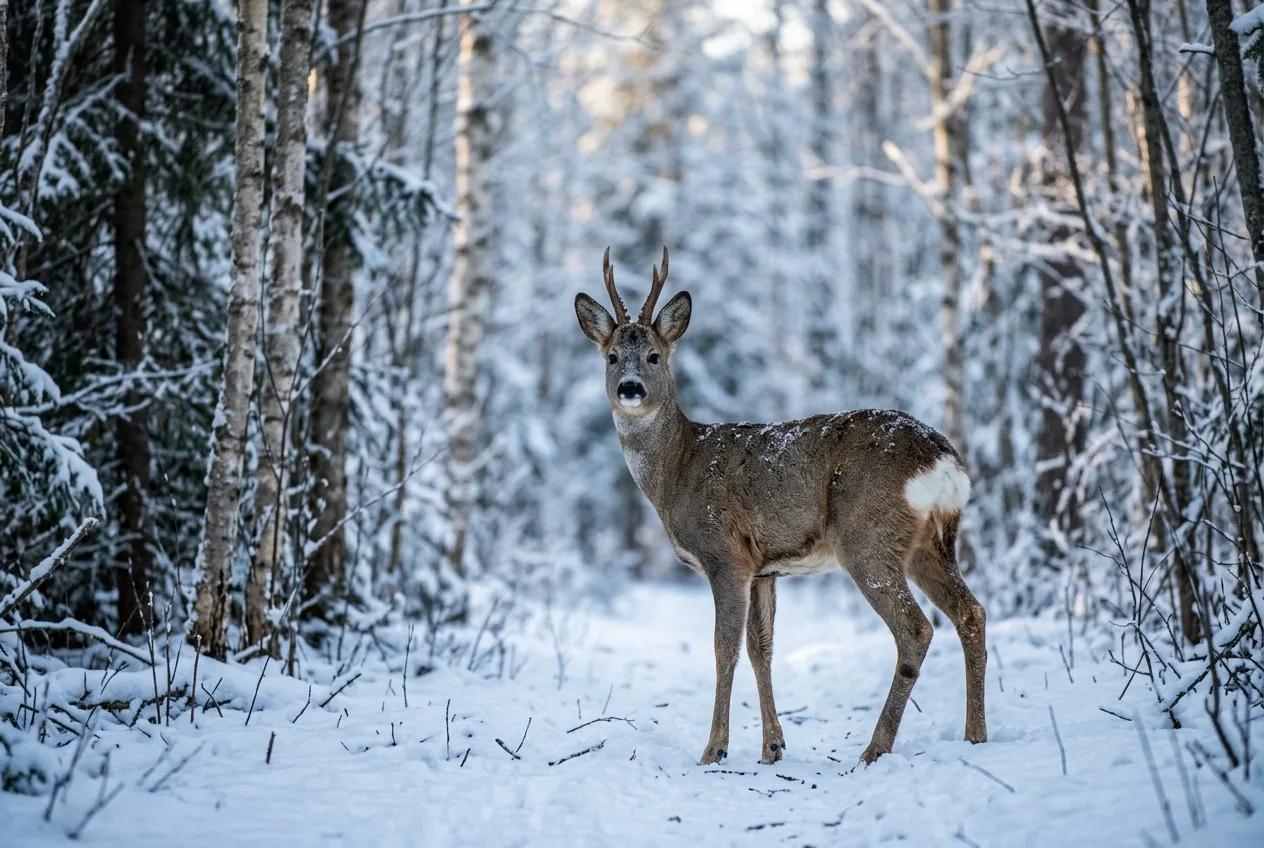
The clearest example is hoofed animals concentrating, and it follows a logic you can hunt by. Deep snow is exhausting to move through, so animals go where moving is cheaper. "Any place snow is plowed, that's where they're moving to," an Idaho wildlife manager observed of elk and pronghorn crowding plowed road shoulders — "it's easier to travel and burns less energy". Deer, with their short legs, struggle in deep snow, so they pick a sheltered south-facing slope where the snow is thinner and the sun warmer, and then largely stay there. They survive winter by burning as little as possible — a slower metabolism, a thick hollow-haired coat, and sharply reduced movement. Wildlife agencies even quantify the squeeze: a winter severity index built from days below 0°F (−18°C) and days with snow deeper than about 15 inches (38 cm) tracks exactly the cold-and-deep-snow combination that forces deer to hunker and yard up. Knowing all this, you don't wander at random — you work the sheltered slopes, the edges of remaining forage, the windswept ridges blown clear, and the cover near food and water.
Closer to home, the simplest winter setup of all is a bird feeder. Stock it and a parade of birds — and the odd squirrel — arrives, often photographable from inside a warm house through clean glass. Press your lens right up to the window or shoot through an open door to kill reflections. The same goes for nature-preserve feeding stations and well-used trails; settle into a hide or blind near food, water at a safe distance, or a regular travel route, stay still, and let the wildlife come to you. As one guide nicely puts it, "the more you stay hidden the more you are likely to see".
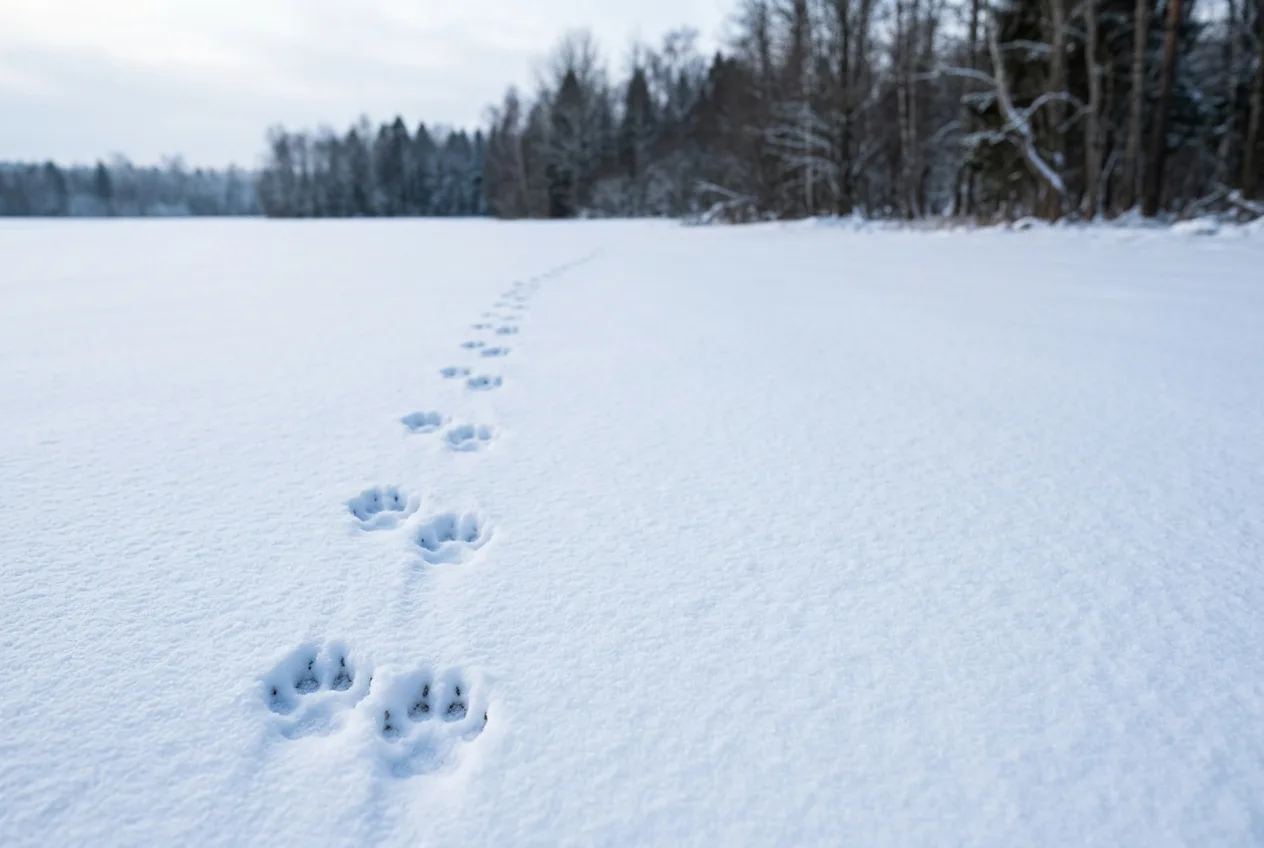
And then there's the snow itself, which turns the entire landscape into a record of who passed and what they did. "A fresh mantle of snow can be a sign board of who is active in the area," and following fresh tracks will often lead you straight to the animal that made them. The U.S. Fish and Wildlife Service calls fresh snow a place where "the movements of many shy creatures can be revealed" — prints betray an animal's size, gait, and habits even when the animal itself stays out of sight.
A short, practical primer on reading those tracks, drawn from agency and conservation trackers:
- Use the pattern, not just one print. Perfect prints are rare; clear ones need shallow, slightly wet snow that isn't melting. Measure the stride (distance between steps) and the straddle (width between left and right) to estimate an animal's size and speed.
- Read the gait. Trackers sort animals into steppers (deer, dogs and cats — a neat, narrow line where the back foot lands in the front foot's print), bounders (weasels), hoppers (rabbits, squirrels — two small prints followed by two larger ones), and lopers.
- Watch for tells. Cats leave rounded prints with no claw marks; dogs, coyotes, and foxes show claws — and a coyote travels in a businesslike straight line where a loose dog zigzags. A messy hole flanked by wing prints in the snow is a strike mark, where an owl dropped on prey.
These principles travel. European trackers read the same way for red deer, roe deer, chamois, and wild boar, sorting them by whether they walk on flat feet, on their toes, or on hooves. The species change with the continent; the method doesn't.
There's also a hidden world to be aware of, even if you never photograph it: beneath deep snow lies the subnivium, the insulated space at ground level where mice, voles, and shrews tunnel and survive, sheltered by the snowpack that traps the earth's warmth. When you see small tracks vanish into a hole, that's where they've gone. It's a reminder that the snow isn't just a backdrop — it's habitat, and a milder, thinner snowpack genuinely threatens the creatures that depend on it.
Fresh snow hands you a map of everything that moved overnight — you just have to learn to read it.
The ethics are different in winter, and they matter more
Every responsible wildlife photographer keeps their distance and avoids stressing animals. In winter, the stakes climb, because in winter a disturbed animal pays in a currency it can't easily replace: calories. Animals are already running a deficit, burning through fat reserves to stay alive, and every unnecessary flight burns fuel they need.
It's concrete. Moose and elk are "constantly seeking out lower snowpack areas to access grazing food sources," and "that constant movement burns calories and fat reserves" — push them and you've added to a debt that can be fatal. Even something as gentle-seeming as calling to an owl at night costs it: every time it flies to investigate a perceived threat, "it expends energy needed to survive the cold," which is why one conservation group's advice is to enjoy it but not do it night after night. The principle is to photograph the animal "as it normally would in the winter" — undisturbed — and to accept, as Leforestier puts it, that "no photo is worth disrupting an animal's natural behavior that could endanger its life". Keep your distance, lean on a long lens, and let the animal set the terms. The good news, neatly, is that an undisturbed animal also makes the better photograph.
A practical note on getting close without crowding: a telephoto in the 300–600mm range lets you fill the frame from a respectful distance, and shooting low — down at the animal's eye level — both flatters the image and is less threatening to the subject than a human looming over it. Modern stabilization and a willingness to crop mean you simply don't need to be close to make an intimate frame anymore.
A few habits that pull it all together
Some scraps that don't fit neatly anywhere but earn their place in the field:
- Be first to fresh snow. Untrodden snow is half the magic, and once it's churned to slush or stamped with footprints the spell is gone — so get to your spot early, and mind your own tracks if you'll be in your own frame.
- Let a little colour breathe. An all-white scene can feel empty; a touch of colour rescues it. At the edges of the day, distant terrain takes on a blue cast in early light and warm gold later, and snow will throw back the colour of a sunrise or sunset sky. A subject in a bright coat against white reads beautifully.
- Footprints make a composition. A line of tracks leading off into the distance is a ready-made way to pull a viewer into the frame.
- When autofocus hunts on blank snow, take over. A featureless white scene gives AF nothing to grab; switch to manual focus, or focus on a high-contrast edge — a rock, a branch, the animal's eye.
- Don't trust a bright LCD in bright snow. Glare lies. Lean on the histogram and the highlight warning to judge exposure, every time.
Winter asks more of you than any other season: more layers, more spare batteries, more patience standing still in the cold, more attention to a meter that's actively trying to mislead you. But it gives more back. The animals are out where you can see them, the snow simplifies every background into something clean and graphic, and a fresh fall hands you a map of everything that moved overnight. Get the exposure honest, keep your gear and your hands working, read the snow — and the hardest season to shoot becomes the most rewarding one.
Frequently asked questions
How do I stop my snow photos from coming out gray and underexposed?
Your meter reads bright snow as mid-gray and darkens the shot to compensate, so you have to add light back — roughly +1 to +2 stops of exposure compensation, and up to +2 to +3 in bright sun. Confirm it on the histogram: the data should sit near the right edge without clipping off it.
Should I shoot winter wildlife in manual or use exposure compensation?
For static scenes, exposure compensation is fine. For anything moving, use manual and lock the exposure — compensation collapses the instant your subject crosses from white snow to a dark background, blowing out the very frame you wanted, whereas a locked manual exposure keeps both the snow and the animal correct wherever it goes.
Why do my snow pictures look blue, and how do I fix it?
Snow in shade is lit by blue skylight, and light traveling through snow comes back bluer than it went in, so a cool cast is natural physics. Fix it with the "Shade" white-balance preset, by setting a warmer colour temperature (around 8000K for snow, ~7500K for shade), or by shooting RAW and correcting later — just don't remove the blue entirely or the snow looks fake.
How do I keep my camera battery from dying in the cold?
Carry several spares and keep them warm in an inner pocket against your body; cold can cut a battery's life by half or much more. Turn off Live View and stop chimping to slow the drain. If a battery quits, warm it in your pocket for a few minutes — it'll usually give you more frames.
What's the best way to avoid condensation when I bring my camera inside?
Warm it slowly. Before going indoors, seal the cold camera in a zip-top bag with the cold air trapped inside, so moisture condenses on the bag rather than on (and in) your gear, and leave it sealed until it reaches room temperature. If your camera bag is already cold, zipping the camera inside it and bringing the whole bag in to warm together works too.
Is winter actually a good time to find wildlife, or are the animals just hiding?
It's one of the best times. Scarce food and deep snow push animals into the open and concentrate them at feeders, sheltered south-facing slopes, plowed edges, and remaining forage, so they're easier to find and to frame cleanly. Fresh snow also records every animal's movements, turning the landscape into a tracking sheet. Just keep your distance — winter disturbance costs animals calories they can't spare.