The best wildlife photograph you'll take this year probably won't start with your camera. It'll start with an inexpensive trail camera strapped to a tree, doing the one thing you can't: sitting in the cold for three weeks, in the rain, downwind of nothing, learning a place while you're at work.
That's the part most photographers skip. We scout with our eyes and our hopes — "this looks like a good spot" — then carry a long lens into a clearing and wait, and the animal that lives there moves through at 4 a.m. and we never know. A recon camera closes that gap. It tells you what uses a place and when, before you ever set up. The National Geographic camera-trap photographer Steve Winter describes the whole game as finding a spot, learning its habits, and committing to it — and he's blunt about second-guessing the obvious: "When someone tells me what a cat's going to do, I think the opposite." A cheap camera lets you test those hunches cheaply, for weeks, without you in the frame.
A trail camera is the only scout that works around the clock, in any weather, with none of your scent on the wind.
This is a guide to using that scout well: where to hang it, how to set it so it tells you the truth instead of a flattering lie, how to turn a card full of time-stamped photos into an actual schedule, and how to read the light, heat, moon, and season so that when you finally do carry the big lens in, you're there at the right hour.
Why a cheap trail camera is your best photography accessory
There's an honesty problem with scouting on foot: you only see what's there when you're there, which is the daytime, on a trail, smelling like a person. The animals adjust around exactly that. A remote camera removes you from the equation, and the difference is not subtle.
It's also a coverage problem, and this is where one camera quietly lies to you. In a controlled Connecticut study, adding a second camera at a site raised survey detection by an average of 80% across four species — and for an elusive animal like the Virginia opossum, a single camera over a long 180-day run reached a detection probability of just 0.13, while a two-camera array at the same spot climbed to 0.86. The lesson for a photographer isn't "buy nine cameras." It's that absence on one camera is not absence of the animal — it's often just a camera pointed at the wrong three meters. Run it longer, or add a second eye, before you write a place off.
Absence on one camera is not absence of the animal. It's usually just a camera in the wrong three meters.
And the recon pays off precisely because good spots are stable. In a 13-year survey of African waterholes, the differences between waterholes explained far more of the variation in herbivore abundance (about 59%) than year-to-year swings did (about 39%); some waterholes were simply reliably better, year after year, and the best of them stayed attractive to every herbivore through the dry season. Find a productive feature with your camera this season and there's a real chance it produces next season too. That's an asset worth building.
There's an ethical dividend here as well, and it's the quiet reason this method is worth teaching. The first principle of responsible nature photography is to put the well-being of the subject ahead of the shot, and to reflect on the impact of your own presence. A camera that scouts for you means fewer trips into a sensitive area, more distance, and less of the disturbance that makes animals abandon a spot — or a nest. Wildlife-agency photography standards now fold remote cameras explicitly into "ethical practice," covering "both remote and person-operated devices," for exactly this reason.
Where to put the recon camera
A camera on a random tree in nice-looking habitat will mostly photograph swaying ferns. The skill is reading a landscape for the points that funnel animals past one spot. The scouting guides are unanimous on the principle: target a feature — "game trails, human trails, water holes, feeding areas, rub trees, nest sites." And there's a strategic wrinkle most people miss. When researchers worked out the minimum effort needed to detect the resident animals at a Chinese reserve, the most efficient strategy wasn't to camp one camera in one perfect spot — it was to spread cameras "across more sites for a shorter time at each site," rotating each one after about 40 days or roughly 20 independent photos, the point where it stops teaching you anything new. For a photographer, that's permission to keep moving a single camera around your features until one lights up.
Travel routes. Game trails are the highest-yield default, especially for the carnivores and larger mammals photographers prize. In a paired Tanzanian study, carnivores had a back-transformed 0.89 probability of showing a higher abundance index on trail cameras than on random ones; black-backed jackals alone went from a survey index of 1.55 on random placements to 4.72 on trails — about three times as many. In India's Ranthambhore, tiger detection probability ran 0.194 on trail cameras versus 0.003 on random ones, an order of magnitude apart. But carry the bias with you. Trails over-represent carnivores and big-bodied animals, and there's a subtler trap: in that same Indian study, trail cameras made ungulates look more diurnal than they really were — prey seem to avoid the trails during the predator-active night — and trail-based abundance indices tracked true density far worse than random ones did. A trail tells you who passes through. It can mislead you about when a nervous prey species actually moves.
Water. In dry country and dry seasons, water is the magnet, and the camera record literally shows the feature switching on and off. At Australian artificial water points, eastern grey kangaroo activity rose sharply as drought deepened and fell away once the rain returned and vegetation greened up. Worth a caveat for how you read it: that water concentrated animals in space and time without changing how many there were — the study found the water points "do not influence their density." You're photographing where animals go, not making more of them.
Mineral licks. If your area has them, a lick may be the single most concentrating feature in an animal's whole home range. A US Geological Survey description puts it about as plainly as it can be put: "No other point-specific sites in an animal's home range likely receive the same visitation rates from as many different individuals," with different animals often turning up in close succession. Camera work at 52 Amazonian licks bears that out — 20 mammal and 13 bird species — and, crucially for a photographer, it logged when each one came: paca activity peaking around 20:00 and tapering through the night, collared peccary around mid-morning, red howler monkey near midday, red brocket deer through the small hours. That's not just a shot list. It's a shot list with showtimes.
A mineral lick isn't a spot on a map. It's a stage with a published schedule, if you read the timestamps.
Food. A fruiting or mast-producing tree pulls animals to a fixed point on a seasonal clock. Radio-collared white-tailed deer were shown to expand their home ranges specifically to take in acorn-producing stands during the autumn mast-fall, when acorns ran to 76–90% of their diet and they spent about half their foraging time hunting for them. Find the oak that's dropping, point a camera at it, and you've found a stage that runs for a few weeks.
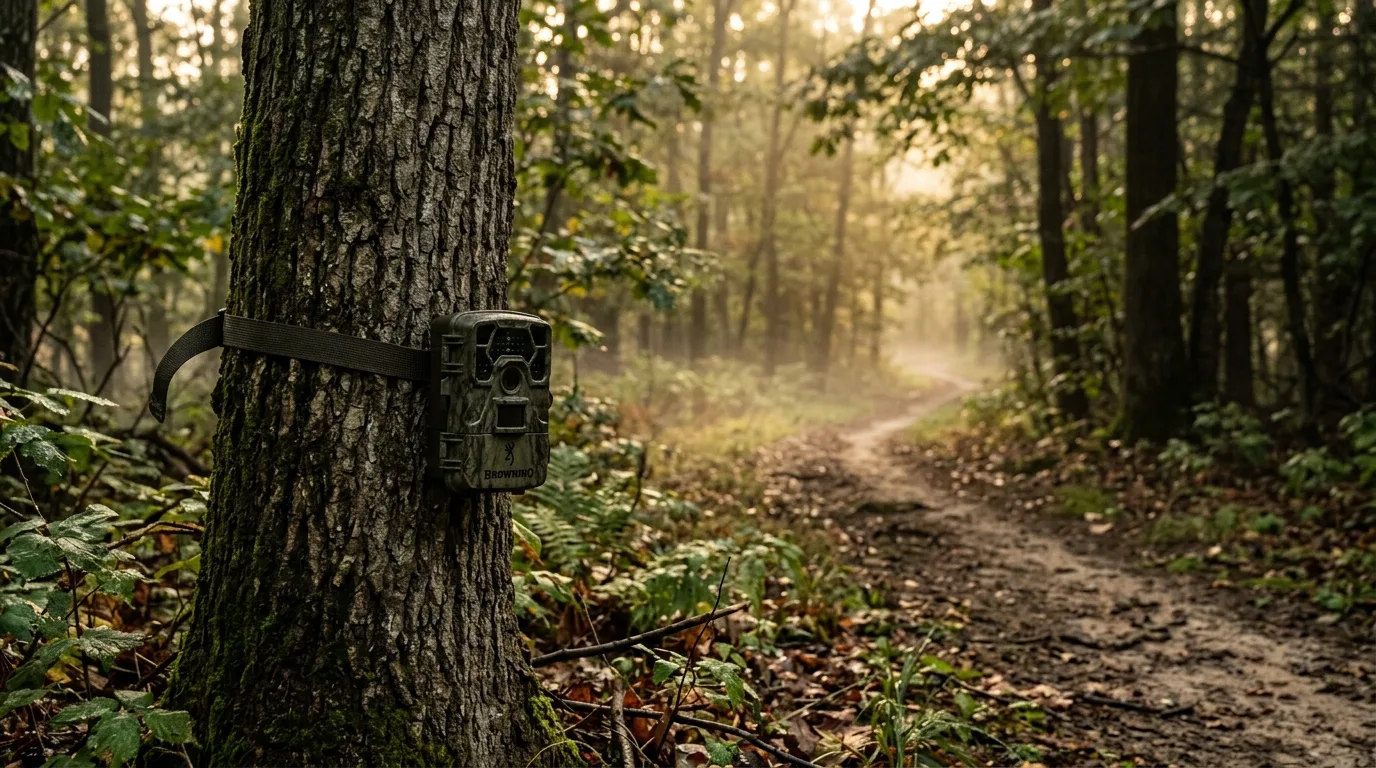
For the geometry of the set itself, the guidance is consistent: place the camera roughly 3 to 5 m from the feature — closer and many animals slip inside the frame or trigger nothing; farther than about 5 m and night subjects fall outside the reach of the infrared flash — and orient it perpendicular to the expected line of travel so an animal is still in the frame after the trigger's split-second delay. If you're scouting small mammals instead, the whole scale shrinks: drop the camera to about 2 m from a focal point and use local cover — a fallen log, a boulder, thick brush — because that's where the small stuff actually moves.
Set it so it tells you the truth, not a lie
Here's the mistake that quietly ruins scouting data: mounting the camera at a comfortable standing height and angling it down. It feels right. It detects worse, and it biases what you learn.
The cleanest experiment on this tested several lens heights and concluded that "deploying cameras <90 cm and parallel to the ground resulted in highest detection," because the passive-infrared sensor works best when it points at the center body mass of the animal — an angle near zero. A separate head-to-head trial drives it home: researchers mounted paired cameras at 90 cm and 350 cm on the same tree, facing the same road, and the high camera detected fewer of every species and threw more false triggers (17.3% versus 12.5%). In their downward-facing vertical pilot, the high camera caught foxes at one-twelfth the rate of the low horizontal one. The mechanism is simple: a high camera's sensor "is not directly in line with the heat signature of the animal." Mount low, keep it level.
A camera up high and angled down doesn't just look worse — it quietly lies to you about what's there.
A practical translation a lot of field guides land on is knee height — about 50 cm — facing parallel to the ground, which catches smaller animals along the bottom of the frame while keeping deer and bears from getting cut off at the top. Keep four or five feet of clear space in front of the lens so the flash doesn't bounce off nearby branches at night, and crank sensitivity up — but not to the absolute maximum, which fills your card with vegetation swaying in the wind.
Two more truth-in-data adjustments worth knowing. Match the height to your target's size. A Spanish field test that filmed wild animals with a parallel video camera as a gold standard found detection peaked when a camera sat at the target species' shoulder height; set it for one species, and for everything taller or shorter the count is biased low. For a multi-species scout, favor the larger animal's shoulder height — and accept that the small stuff is under-counted. And respect the day/night gap. That same study found detection "significantly higher during the day than at night," falling off with distance, with a faster trigger the closer the animal passes. None of this is about making the trail-cam photos pretty. It's about making sure the blank nights are real blanks and the busy nights are real — so the schedule you build next is one you can trust.
Turn the timestamps into a schedule
This is where a pile of mediocre trail-cam snaps becomes worth more than a good lens. Every photo is stamped with a time, and across enough photos those times are the animal's daily activity pattern. Ecologists have built this into a formal method: a camera "builds up a record of the distribution of activity over the course of the day," more frequent when the animal is active, and you can fit a curve to those detection times to read the peaks and even quantify how much of the day a species spends active. There are tidy R tools for it — `activity` and `overlap` — if you want to compare two species' schedules or put confidence intervals on a peak. But you don't need the math. Count your detections by hour, and the shape of the day appears.
For most of the animals a photographer is chasing, that shape is crepuscular — peaks around dawn and dusk. GPS work on red deer and elk found activity peaks tied to civil twilight at both ends of the day, with a practical wrinkle worth internalizing: those peaks lag the twilight, and in the Canadian population the morning peak landed almost two hours after first light. Sika deer show the same dawn-and-dusk pattern in spring and summer, sliding into a three-peaked dawn/dusk/midnight rhythm in autumn. A study across ten mammals in Northern Ireland sorted them cleanly: badgers, foxes, pine martens and wood mice nocturnal; hares and rabbits crepuscular; fallow deer and squirrels diurnal — with nearly three-quarters of fox activity (73%) falling between 21:00 and 07:00. Your card will tell you the local version of all this, which is the only version that matters.
Two caveats the timestamps will eventually reveal on their own. First, pressure shifts the clock. Where deer are culled or hunted hard, those tidy dawn/dusk peaks slide toward the middle of the night. If your target is going nocturnal, the camera shows it before you waste a dawn. Second, the season bends the schedule — an "ostensibly nocturnal species may be more likely to remain active into daylight hours during the summer months due to shortening nights." Read your own card, in your own season, for your own place. (For the deeper dive on reading activity from camera data, see From Timestamps to Animal Activity Patterns: A Camera Trap Workflow.)

Time the shot: light, heat, moon, season
Knowing the animal moves at dawn is only half the gift. The other half is that dawn and dusk are also your best light. The golden hour — soft, warm, low-contrast light that throws long shadows — runs by sun elevation from about 6° above the horizon down to 4° below it, while the harsh midday sun, once it's above 6°, is "possibly the worst time for photography." The animal's prime hour and the light's prime hour overlap. That's the whole reason this works.
Then layer in the modifiers your timestamps and a weather app let you anticipate:
- Heat moves animals into the cool. A GPS study of moose, red deer, and roe deer found temperature reshapes both when they're active and where they shelter — larger animals, more prone to overheating, push activity toward the cooler night and seek canopy cover by day, while smaller ungulates are more vulnerable to cold. A hot spell is a cue to shoot earlier, later, or near shade.
- The moon is overrated for big game and underrated for small prey — don't mix them up. Long-term GPS data on deer found moon phase has "an insignificant effect on deer movement": deer moved about 6 meters more per hour at new moon than at full moon, which is nothing against a normal range of 0 to 2,748 meters an hour — "merely a few steps." But for small nocturnal mammals the moon is a real force. Camera work in southeastern Australia found prey activity dropped 40–70% on bright nights (while the predators didn't respond at all), and a meta-analysis of 59 nocturnal mammal species found moonlight suppresses activity on average — though it stressed that responses vary by species and aren't a single rule. Even at those Amazon licks, red brocket deer, paca and porcupine all preferred the darker, near-new-moon nights. So: if you're after deer, ignore the moon; if you're after a small nocturnal mammal, favor the dark of the moon.
- The calendar concentrates animals. Breeding and feeding seasons pull animals into predictable windows. Male white-tailed deer movement spikes during a roughly three-week breeding band — in one Wisconsin study the peak fell in early November, with two-year-old males ranging widest of all the age classes — but the exact timing is region- and hemisphere-specific, so treat the pattern as portable and the month as local. Mast-fall pulls deer to oak stands across a defined autumn window. Water and lick visitation rise and fall with the seasons too. A recon camera left out long enough maps these windows for your specific spot.
One note on direction, since the camera guides themselves raise it. Facing the camera away from the low sun cuts glare and false triggers — but the usual advice to "face north" is only right in the northern hemisphere. Point it toward the pole-ward side of the sun's path for wherever you are: north in the northern hemisphere, south in the southern.
When you're actually there: fieldcraft and ethics
The camera got you to the right place at the right hour. Now don't blow it. The fieldcraft that separates a frame from a flushed animal is old and unglamorous. Move slowly, placing your foot heel-to-toe so you can feel a twig before it snaps and pull back before it does. Keep the wind in your face — "you do not want to be upwind of a mammalian target," and if it shifts, move. And when a grazing animal lifts its head, freeze; move forward only when the head goes back down to feed. Break up your outline with camouflage that actually disrupts your shape, stay quiet, and when the animal is coming to a known spot, let a hide do the waiting for you.
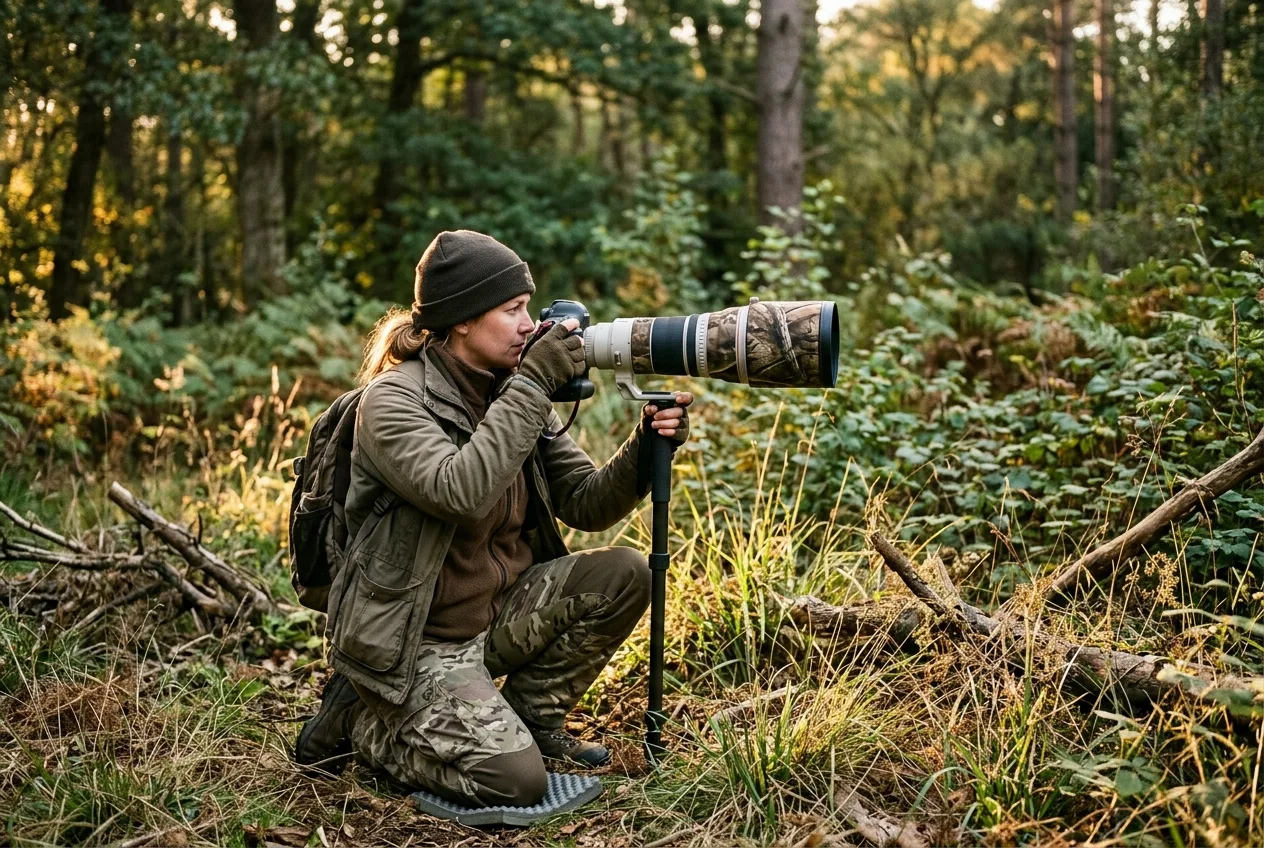
Keep your distance and let the glass do the reaching. Agency guidance is consistent: pictures come "an hour after dawn and an hour before dusk," patience beats pursuit, and you keep well back and use zoom rather than your feet. Read the animal — if your approach makes a bird flush or change its behavior, you're too close, and a bird that freezes or hunches into a pre-flight stance is telling you to back off. The right response is to move back and reach for a longer lens, not to push in. Skip the shortcuts that look like cheating because they are: don't bait or feed (it's illegal in many places and habituates animals), don't manipulate the scene by snapping off the branch in your way (you've just removed an animal's shelter), and avoid nests and dens entirely — the cost of your presence there is measured in abandoned young, not missed shots.
The point of scouting with a camera is to earn the shot with patience instead of pressure — to intrude less, not more.
That's the through-line. Everything above is in service of getting the picture while the animal goes about its life undisturbed — which, not incidentally, is also how you get the natural behavior worth photographing in the first place.
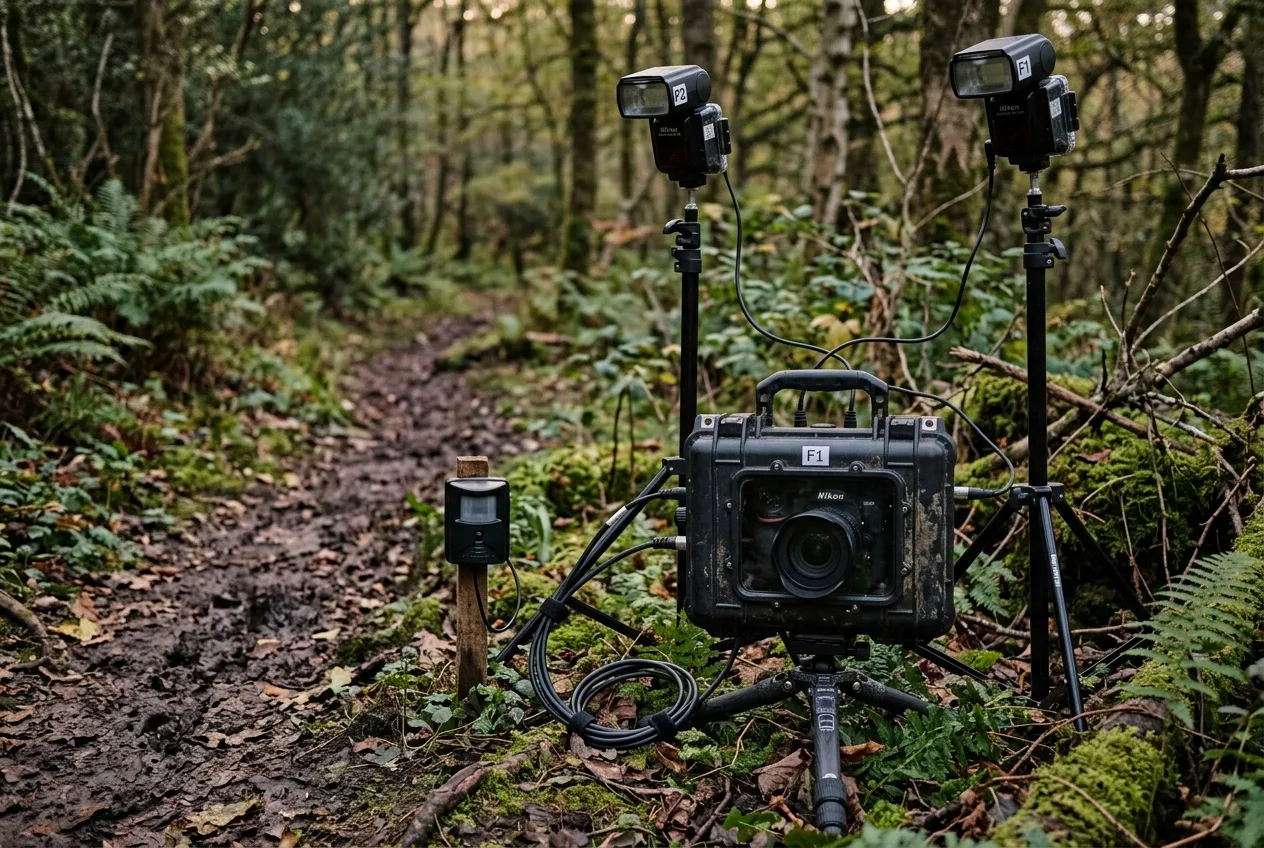
Graduating to a DSLR camera trap
If you fall far enough down this hole, the recon camera stops being just a scout and becomes the trigger for your real camera. A DSLR or mirrorless "camera trap" pairs your good body and lens with a motion sensor and off-camera flashes, fired by the same kind of passive-infrared trigger a trail camera uses. Trail cameras have tiny sensors, so even their 20-megapixel night frames look soft; a big sensor with off-camera flash gives you full-color, frozen night images sharp enough to print — pictures, as one practitioner puts it, your trail camera never will.
The workflow leans on everything above. Scout the spot and the animal's direction of travel with the cheap camera first — running it in video mode is a clever trick for learning which way animals come and go, and for catching anything that slips behind the DSLR or misses its narrow trigger zone. For the trigger itself, a built-in or external PIR is quicker to set up than a beam-break emitter-and-detector pair. Pre-focus manually on the trigger zone, set your flashes high (real light comes from above — the sun, the moon) and dial in a touch of negative exposure compensation, and weatherproof everything in a hard case, with a mat under a near-ground lens so rain doesn't fleck it with mud. Set the beam height to your subject — for something the size of a mountain lion, a beam 12–15 inches off the ground catches the cat while letting squirrels and rats walk under it untriggered.
And compose before the animal ever arrives. Steve Winter's rule is the one to internalize:
Find a spot where you'd say, "I would shoot this photograph without the animal in it." Compositionally, it has to work as a photograph.
Get the camera low, too — eye level with the subject, not looking down on it, because shooting from above "takes away their power." A cellular trail camera left on the setup lets you check for hits from your phone before you hike back in. At that point the cheap camera isn't just scouting the location — it's scouting your own composition.
Frequently asked questions
Do I really need a trail camera if I already know where animals are?
Knowing where isn't knowing when, and a single foot-scout misses the night and the shy species entirely. A camera run for a few weeks reveals the hours and the animals you'd never catch on a daytime walk, and the productive spots it finds tend to stay productive across seasons.
Where's the best place to put a scouting camera?
On a feature that concentrates animals — a game trail, water source, mineral lick, or fruiting/mast tree — about 3–5 m away and perpendicular to the line of travel. Trails dramatically raise detections of carnivores and larger mammals; water and licks pull traffic seasonally and even log when each species visits.
How high should I mount it?
Low — roughly knee-height, around 50 cm and no more than about 90 cm — and level with the ground, not angled down from head height. Cameras mounted high and tilted down detect fewer animals and throw more false triggers; for small mammals, go lower still, from ground level up to about 76 cm.
What's the best time of day to photograph wildlife?
For most species, the hour around dawn and dusk — which is also the golden hour for light. Crepuscular activity peaks line up with the soft, low-angle light photographers want; your own camera's timestamps will pin down the local timing, which tends to lag twilight and shifts with hunting pressure and season.
Does the moon phase matter for timing a shoot?
For deer and other big game, essentially no — GPS data shows a negligible effect, a few meters of movement per hour. For small nocturnal mammals, yes: bright moonlight can cut their activity by 40–70%, so favor darker nights for those subjects.
Is it ethical to bait a spot to get animals in front of the camera?
Be very careful — wildlife-photography ethics codes broadly warn against baiting, and feeding wildlife is restricted or outright illegal in many jurisdictions. The spirit of this whole approach is to find where animals already go and intrude less, not to lure them in.